Most patio door drafts come down to one of four things: worn or compressed weatherstripping, a misaligned door panel that isn't pressing the seals evenly, a damaged bottom sweep that no longer contacts the sill, or a lock that isn't pulling the door tight against the frame. The good news is that all four are fixable in an afternoon with basic tools and parts you can grab from any hardware store today.
How to Fix Drafty Patio Doors: DIY Step-by-Step Guide

Jamie Archer
8 Jun 2026
Quickly locate the draft leak points
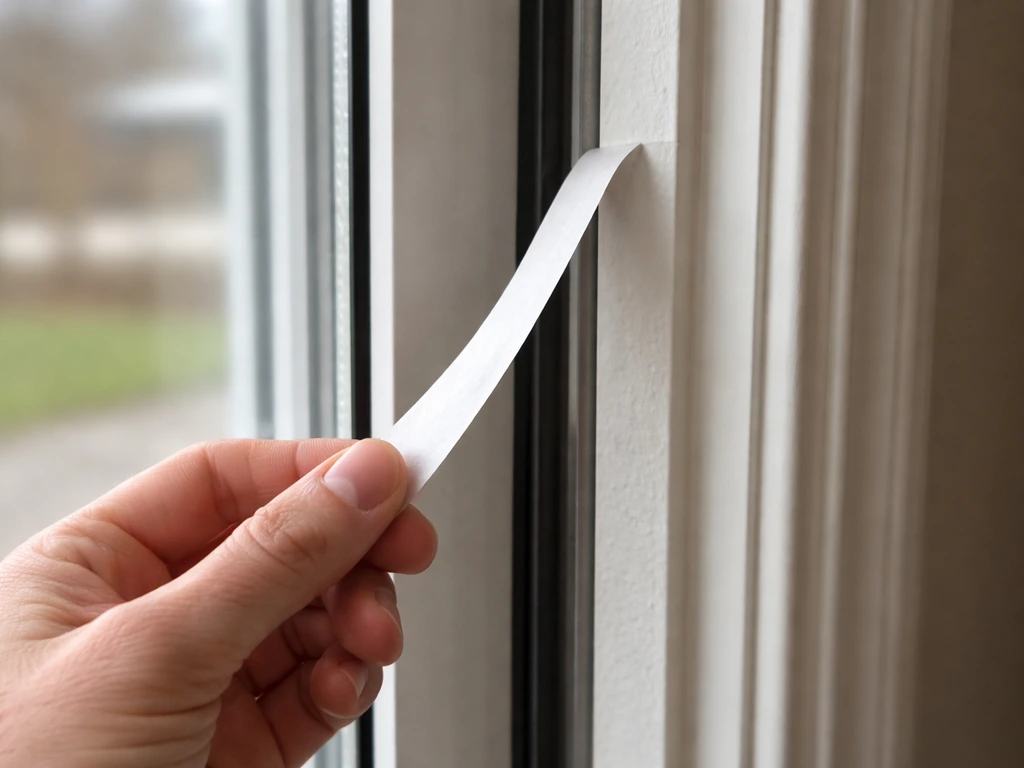
Before you buy anything or start pulling off seals, spend five minutes finding exactly where the air is getting in. The fastest method is the paper strip test. Grab a sheet of printer paper or a thin strip of newspaper, close the door on it in different spots around the perimeter, and tug gently. Where the paper slides out with little or no resistance, you have a gap. Where it holds firmly, the seal is doing its job.
Work your way systematically around the door: start at the lock side (the vertical jamb where the door latches), move along the top, then the opposite side, and finish at the bottom sweep and the two bottom corners. The corners are notorious trouble spots because that's where weatherstripping ends meet the sweep, leaving a small but cold gap. Mark any problem areas with a piece of painter's tape so you don't lose track.
If you want a second method, hold a lit incense stick or a candle near the perimeter on a windy day and watch the smoke. Any horizontal pull toward the frame tells you air is being drawn through at that point. On a cold day you can also just run your hand slowly around the frame and feel for the cold spots.
Common causes of patio door drafts
Understanding what's actually failing helps you fix the right thing instead of guessing. Here are the most common culprits on sliding glass patio doors.
- Weatherstripping: The foam, bulb, or V-strip seals running along the top and side jambs compress and flatten over years of use. Once they lose their shape they stop pressing firmly against the door panel, and air flows right through.
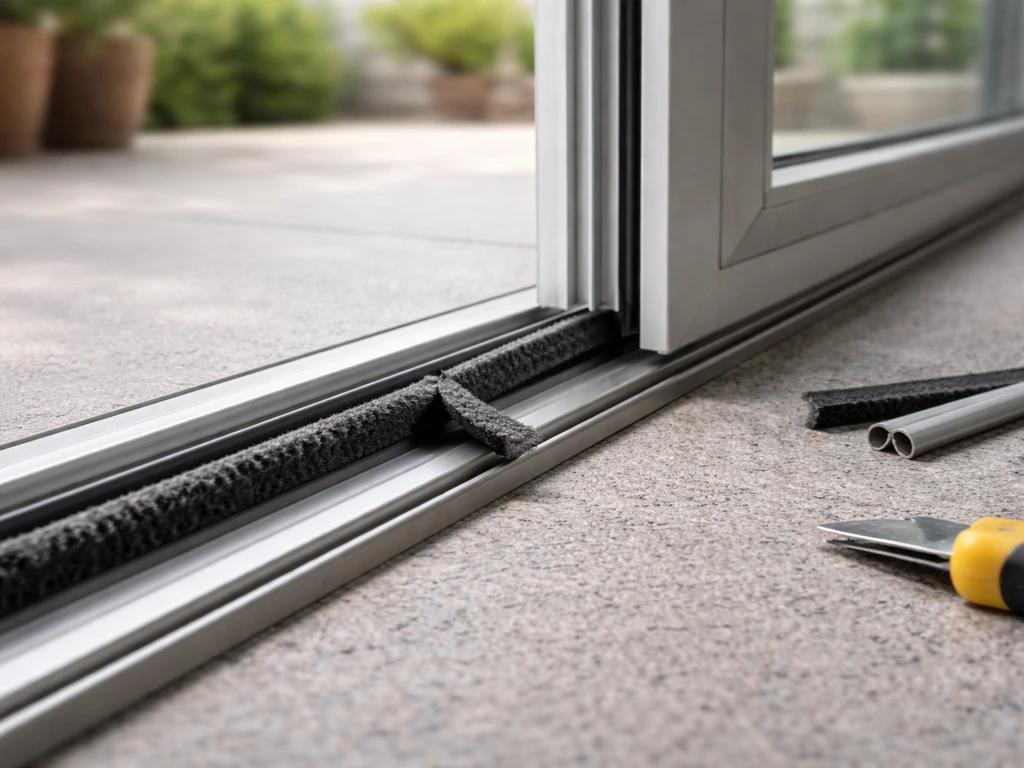
- Bottom sweep or bottom seal: The flexible fin or brush strip at the very bottom of the door panel drags across the sill every time you open and close the door. It wears down, gets torn, or pulls out of its channel—and when it does, cold air pours in at floor level.
- Door alignment and roller height: If the rollers are worn or adjusted incorrectly, the door panel hangs unevenly. An uneven door doesn't compress the weatherstripping uniformly around the frame, so some sections seal fine while others have a visible gap.
- Track debris: Sand, dirt, and grit build up in the lower track and physically prevent the door from rolling fully into the closed position. Even a few millimeters of debris can break the seal.
- Lock and strike misalignment: The locking mechanism is what pulls the door tight into the jamb. If the strike plate is even slightly off, the door can appear closed but the seals won't be fully compressed—especially on the lock side.
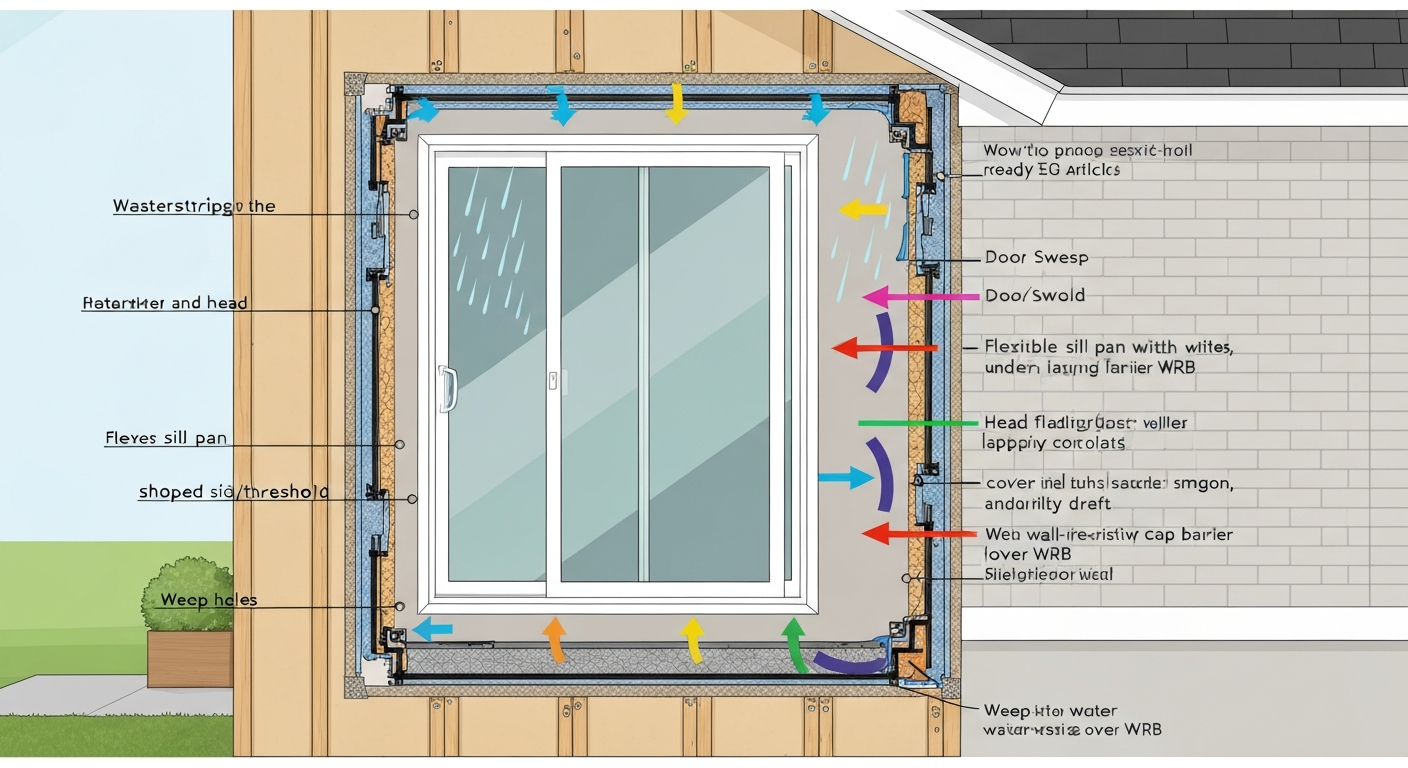
- Damaged or clogged threshold area: Blocked weep holes at the sill base trap water, which degrades the surrounding seals and contributes to both drafts and eventual water damage.
DIY inspection checklist
Tools and supplies to have on hand
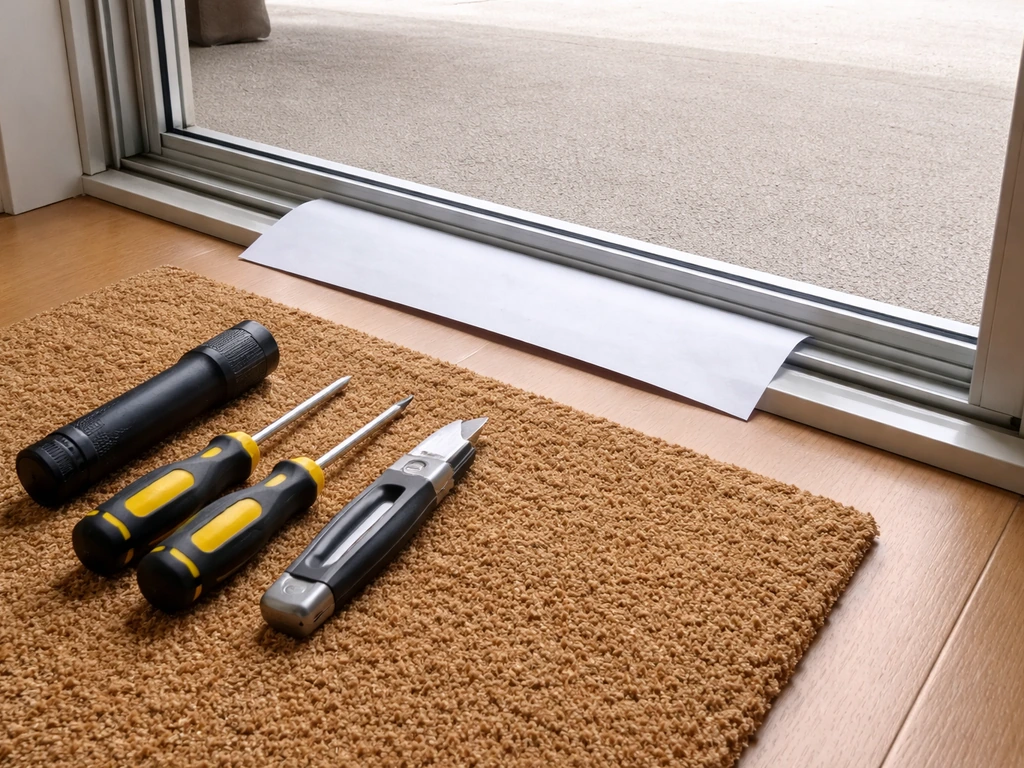
- Strip of printer paper or thin newspaper (draft testing)
- Flashlight
- Flathead and Phillips screwdrivers
- Needle-nose pliers
- Utility knife
- Stiff nylon brush and a vacuum with a crevice attachment
- Tape measure
- Pipe cleaner or small flexible wire brush (for weep holes)
- Silicone-based or dry PTFE lubricant spray (not WD-40 or any petroleum oil)
- Painter's tape for marking gaps
What to look for
- Run the paper strip test around the full perimeter as described above. Mark every spot where the paper pulls free easily.
- Visually inspect the weatherstripping. Look for sections that are flattened, cracked, pulling away from the groove, or missing entirely. Push on it with your finger—it should spring back. If it stays compressed, it's dead.
- Check the bottom sweep. Open the door and look at the sweep from the inside edge. It should be a uniform fin or brush that sits flush in its channel with no tears, gaps, or sections hanging loose.
- Look at the door panel from the side when it's closed. Is it sitting level in the frame, or does one corner look lower or closer to the frame than the other? Uneven panel position usually points to rollers.
- Inspect the track. Run your finger along the lower track and feel for grit, compacted debris, or any visible blockages. Also check the weep holes (small slots or holes along the outer sill) to see if they're clogged.
- Test the lock. Lock the door and then try to wiggle the panel. Any noticeable movement side-to-side or front-to-back means the lock isn't pulling the door fully into the jamb.
How to fix gaps and replace damaged weatherstripping
If the paper test showed leaks along the top or sides and the weatherstripping is visibly flat or cracked, replacement is straightforward. The first step is figuring out what type of weatherstripping your door uses. Most sliding patio doors use one of three types: kerf-in seals (a fin or barb that presses into a narrow slot cut into the door frame), adhesive-backed foam or V-strip, or compression bulb seals that clip or press into a channel.
Pull a small section of the existing seal out and bring it to the hardware store to match it, or take a photo of the kerf groove and its dimensions. Getting the right profile matters because a seal that's too thin won't compress enough and you'll still have a draft, while one that's too wide won't seat properly.
Replacing kerf-in weatherstripping
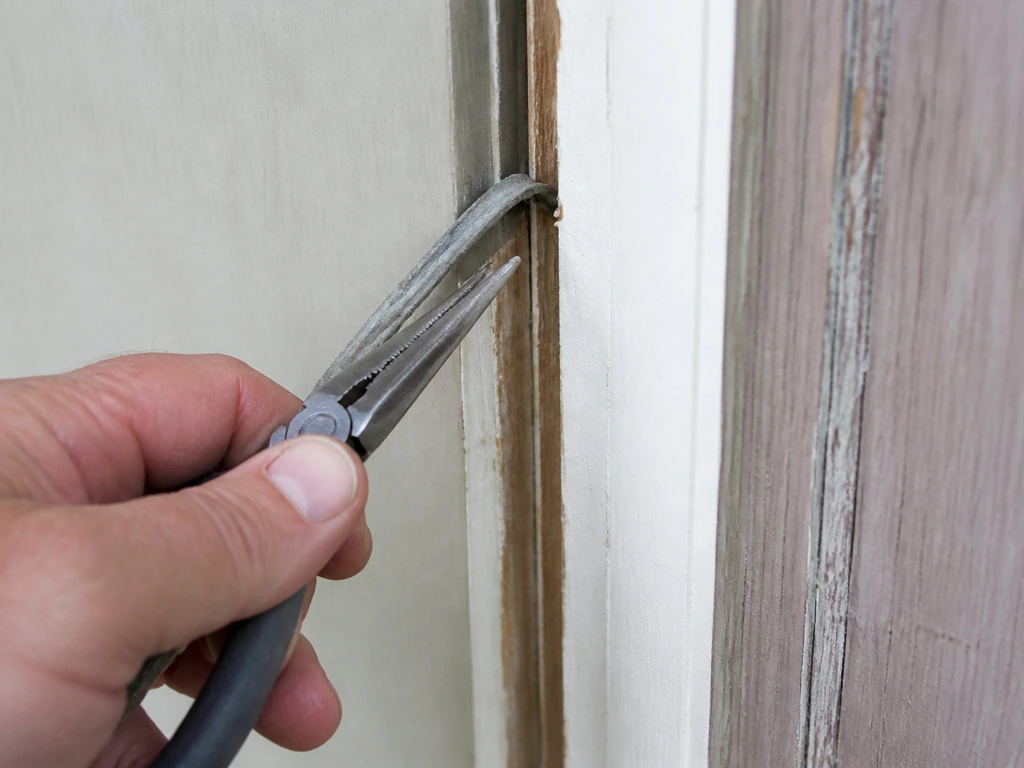
- Remove the old seal by pulling it out of the kerf groove. Use needle-nose pliers if it's stuck. Clean any debris from the groove.
- Measure the run length and cut your replacement piece slightly longer, about a half-inch extra on each end. You'll trim it flush after installation.
- Insert the fin or barb of the new seal into the kerf slot at one end. Press it in firmly with your fingers, then work down the length of the groove, using a flathead screwdriver to push the fin fully seated if needed. The seal should not pull out easily once seated.
- Trim the ends flush with a utility knife.
- Close the door and run the paper test again over the repaired section to confirm the seal is compressing evenly.
Replacing adhesive or V-strip seals
- Peel off the old seal and clean the surface thoroughly with rubbing alcohol. Any residue or dust will prevent the new adhesive from bonding.
- Cut the replacement to length, peel the backing, and press it firmly into place along the frame.
- For V-strip (tension seal), orient the open side of the V toward the door panel so that when the door closes it compresses the V flat.
One thing to remember with any weatherstripping replacement: the seal should make consistent contact along its entire length when the door is locked. If you find you only get good compression in some spots, the door alignment (rollers) is the real issue, not just the seal itself. Fix the alignment first, then reassess.
Door alignment, rollers, and track cleaning
If your paper test showed drafts at multiple scattered points rather than one continuous section, uneven roller height is almost always the root cause. The door isn't hanging level, so the weatherstripping is pressed firmly in some spots and barely touching in others.
Clean the track first
Before adjusting anything, clean the lower track completely. Use the crevice attachment on your vacuum to pull out loose debris, then scrub the track with a stiff nylon brush to break up compacted grit. Don't skip this step. Dirt in the track can physically prevent the door from rolling fully closed, and it also damages the rollers over time. After cleaning, apply a light coat of silicone spray or dry PTFE lubricant to the track surface. Avoid WD-40 and any petroleum-based oil because they attract dust and form an abrasive paste that makes the problem worse within weeks.
Also clear the weep holes at the base of the outer sill. These small drainage slots can get packed with debris. Push a pipe cleaner or small flexible wire brush into each hole and work out the blockage. Clogged weep holes trap water against the sill and gradually degrade the seals from the outside in, which contributes to drafts over time even if everything else looks fine.
Adjust the roller height
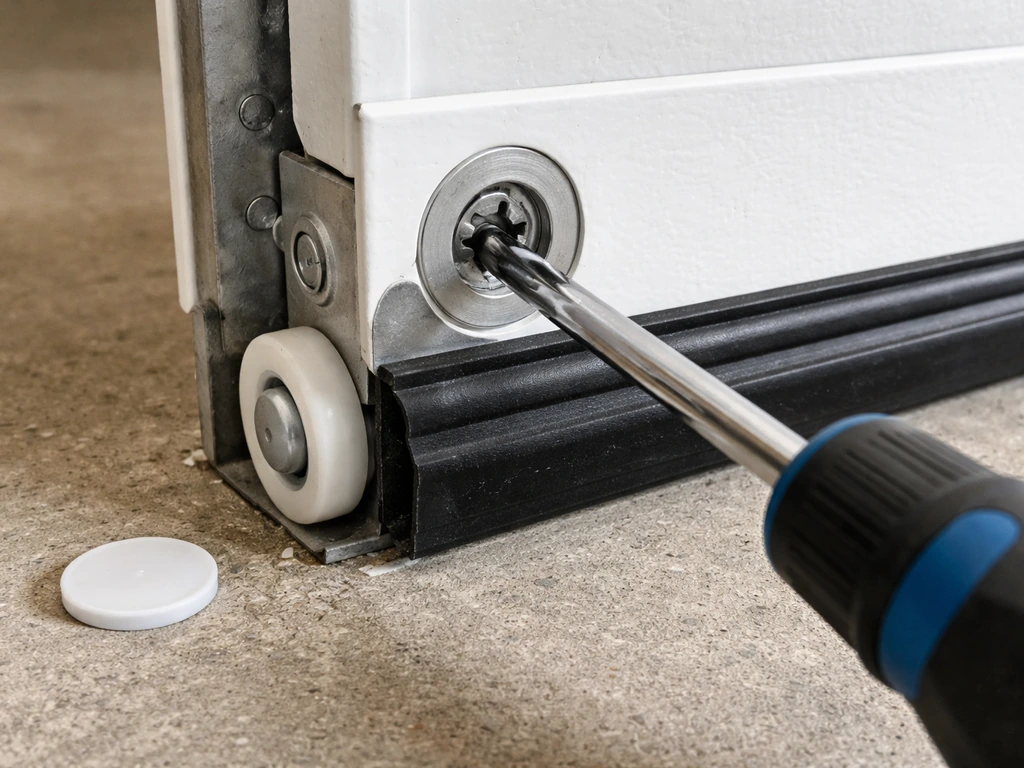
- Look at the bottom of the door panel, near both ends. There will be small access holes or plugs covering the roller adjustment screws. Remove the plugs if present.
- Use a Phillips screwdriver to turn the adjustment screw. Turning clockwise typically raises that corner of the door; counter-clockwise lowers it. Make adjustments in small increments, about a quarter-turn at a time.
- After each adjustment, slide the door closed and check whether it sits level in the frame and whether the gap at the top looks even from side to side.
- Once the door looks level, run the paper strip test again around the full perimeter to check seal compression. Aim for consistent resistance all the way around.
- Replace the access plugs when done.
The goal is to have the door panel sit evenly in the frame so the weatherstripping compresses uniformly. A well-adjusted door slides smoothly, closes flush against the jamb, and locks without having to lift or push on the door panel.
Fixing the threshold, bottom seal, and sweep
Cold air at floor level is one of the most common complaints, and in most cases it comes down to a worn bottom sweep. Open the door and look at the sweep fin: it should make full, even contact with the sill along its entire length. If it's torn, crushed, or barely touching, replace it.
- Measure the width of the door panel and buy a replacement sweep that matches. Most patio door sweeps have a flexible fin or brush element that slots into a channel along the door bottom.
- Remove the old sweep by sliding it out of the channel, or unscrew any retaining screws if it's a screw-mounted type.
- Slide the new sweep into the channel and position it so the fin just makes contact with the sill surface along the full width. Too much pressure and the door will drag; too little and you'll still have a gap.
- Check the ends where the sweep meets the door frame corners. These joints are common draft entry points. Seal any small gaps at the ends with a bead of exterior-grade silicone caulk.
- Slide the door back and forth a few times. The sweep should drag very lightly, not catch or create resistance.
While you're at the threshold, check the sill itself. If it's visibly out of level or there are gaps between the threshold and the floor on the interior side, that's a separate issue that may need caulk or, in worse cases, threshold reinstallation. A thin bead of interior silicone along the base of the threshold on the inside can close minor gaps quickly.
Lock and strike adjustment for a tight close
The latch isn't just about security. On a sliding patio door, the lock is also what draws the panel firmly into the jamb and compresses the weatherstripping on the lock side. As part of patio door draft troubleshooting, verify the lock and strike alignment so the door fully closes and compresses the seals evenly the lock is also what draws the panel firmly into the jamb and compresses the weatherstripping on the lock side. If it's even slightly misaligned, the door will feel like it's latched but there'll be a noticeable gap on that side.
- Close the door and watch what happens as you engage the lock. The door panel should pull noticeably inward toward the jamb as the lock engages. If the door doesn't move at all when you lock it, the strike is positioned too far out.
- Locate the strike plate on the door frame (the side jamb). It's typically held by two screws and has an adjustable range of about 3 to 6 mm in most cases.
- Loosen the screws slightly and shift the strike plate inward (toward the interior of the home) by a millimeter or two. Tighten and test.
- Lock the door and run the paper strip test on the lock side. If you now feel resistance where you previously had none, you've found the right position.
- If the locking hook or pin isn't engaging the strike cleanly after the adjustment, revisit the roller height first. A door that's hanging too high or too low will throw off the lock engagement regardless of where the strike is positioned.
After adjusting the strike, always confirm the door locks smoothly without forcing. If you have to push or lift the door panel to get it to latch, the rollers and strike both need adjustment. Forcing the lock compresses the rollers over time and creates new problems.
Confirming your fix actually worked
Once you've made your repairs, do a full re-test before calling it done. Run the paper strip around the entire perimeter again, including the bottom corners, and confirm consistent resistance all the way around. On a windy day, hold your hand near the frame and feel for any remaining cold spots. If you used an incense stick or candle in your initial test, repeat it now.
The door should also lock without any forcing, the panel should sit evenly in the frame with no visible gap at the top or sides, and the bottom sweep should leave a very faint drag mark on a piece of paper slid under it. These three checks together give you a reliable confirmation that the seals are working.
What to buy: a practical shopping list
| Item | What it's for | Notes |
|---|---|---|
| Kerf-in weatherstripping (foam bulb or fin type) | Top and side jamb seals | Match profile to existing kerf width; bring a sample or photo |
| Adhesive-backed V-strip or foam tape | Supplemental sealing or adhesive-mount frames | Best for surfaces without a kerf groove |
| Patio door bottom sweep | Bottom seal/floor contact | Match door panel width; fin or brush type both work |
| Exterior-grade silicone caulk | Sealing sweep end gaps and threshold-to-floor joints | Clear or color-matched |
| Silicone spray or dry PTFE lubricant | Track and roller lubrication | Do not use WD-40 or petroleum-based sprays |
| Pipe cleaners or small flexible wire brush | Weep hole cleaning | Any hardware or craft store |
| Stiff nylon brush | Track scrubbing | A grout brush works well |
When to replace parts or call a pro
Most patio door drafts are fully fixable with the steps above. But there are situations where DIY adjustments won't get you there, and it's worth knowing the difference before you spend hours on it.
Call a professional or plan for part replacement if you run into any of these:
- The rollers are visibly cracked, chipped, or broken. Roller replacement requires removing the door panel from the track, which is manageable for a confident DIYer but is a bigger job. If the rollers are seized or the axle is broken, they need to come out.
- The track itself is bent, dented, or corroded. No amount of cleaning or adjustment will fix a physically damaged track. This typically requires professional repair or full door replacement.
- The door frame is warped or out of square. You can tell by looking at the gap around the closed door: if it's wider at one corner and narrower at another diagonally opposite corner, the frame has moved. Roller and strike adjustments can mask this slightly but can't fix it.
- The threshold or sill pan was installed incorrectly or is severely out of level. This is a structural installation issue and typically needs a contractor.
- After cleaning the track and adjusting rollers and the strike, the paper test still shows multiple scattered gaps. Inconsistent compression at random points around the perimeter usually means the door geometry itself is off, not just the seals.
- The door requires significant force to close or lock even after all adjustments. This signals something structural is going on, and continuing to force it will damage the lock mechanism.
For the other related problems that often accompany a drafty door, stopping cold air at floor level, reducing overall heat loss, or dealing with bugs getting through screen door gaps, the same foundational fixes apply but there are additional steps worth taking seasonally. To learn how to keep cold out of patio doors with the right sealing steps, focus on finding draft gaps, then replace or adjust the seals and alignment where needed. If you are also dealing with flies getting in, keep the same door gaps sealed and focus on the bottom sweep, threshold, and any screen door gaps. Good draft control is also the first step toward meaningful energy savings through the door, so the work you do today pays off well into winter.
Keep it sealed: ongoing maintenance
Once you've fixed the draft, a simple maintenance routine keeps it from coming back. Clean the lower track every few months and reapply silicone lubricant. Check the weep holes before heavy rain seasons (at minimum, spring and fall) and clear them with a pipe cleaner if needed. Give the weatherstripping a quick visual check once a year and press-test it with your finger. Replacing a small section of seal before it fails completely takes about fifteen minutes and costs a few dollars. Waiting until winter to notice the draft again costs you in both comfort and heating bills.
FAQ
How do I tell whether the draft is from the rollers or from the weatherstripping itself?
If you can press the door closed and the paper strip suddenly holds better on the lock side, the seal is probably fine and the door is not being pulled tightly. If the paper test still shows gaps even when the door is fully latched, then focus on weatherstripping profile or replacement. Also look for uneven compression, you should not see firm contact in some spots and clear leaks in others if alignment is correct.
What’s the best lubricant to use on a sliding patio door track, and what should I avoid?
Use a dry PTFE lubricant or a silicone spray made for door tracks, apply a light coat after the track is clean and debris-free. Avoid WD-40 or petroleum oils, they can attract dust and create a gritty paste that wears rollers faster and can make the door sit slightly lower, which brings back drafts.
My paper test shows leaks all around, not one section. Does that mean I need new weatherstripping?
Not automatically. Broad leakage often points to misalignment or rollers not letting the door close fully. Start by cleaning the lower track and clearing the weep holes, then re-test. If the paper slides out everywhere or the bottom corners leak badly, check that the door locks smoothly without lifting, and adjust alignment before buying any seal.
How can I check whether the bottom sweep is contacting the sill evenly before replacing it?
Look with the door closed and use a flashlight along the sweep fin, you should see the fin touching along the entire length, not riding on the roller pockets or hanging off at the corners. Then do the paper test specifically under the corners and the center, if you get strong resistance in the middle but not at the ends, the door may be slightly out of level, and alignment adjustment can fix more than a sweep replacement.
The weatherstripping replacement works in the shop but still drafts at the corners. Why?
Corner drafts frequently come from a small gap where the seal ends meet the sweep, or from an incorrectly profiled seal that does not compress in that specific channel. Make sure the seal is cut cleanly and fully seated in the channel where applicable, and re-check the lock side and top after adjusting the bottom, because alignment changes how the ends compress.
Can I seal gaps with caulk instead of replacing weatherstripping or the sweep?
You can use a small amount of interior silicone at minor threshold-floor gaps, but caulk is not a reliable replacement for functioning seals. Weatherstripping and sweeps need compression and movement as the door closes, caulk can crack or interfere with seal contact, leaving the draft path open again.
What if the door latches, but it takes force to lock?
If you must push or lift to get the lock to catch, stop and adjust rollers and the strike, because forcing the lock compresses parts unevenly and can damage the rollers over time. After adjustment, confirm the door locks smoothly with no added pressure and repeat the paper test around the perimeter, especially the lock side and bottom corners.
Do weep holes matter if my patio door still looks dry?
Yes, because clogged weep holes can trap water against the sill, which slowly degrades seals from the outside. If drafts persist or you see seal wear near the bottom, clear the weep holes with a pipe cleaner or small flexible brush and then re-test after the door has been opened and closed a few times.
How often should I re-check or replace weatherstripping on a sliding patio door?
Do a quick visual and finger press check at least once a year, look for flattening, cracking, or loss of spring. Replace small sections before the seal fully fails, if you notice the paper test starting to slip out with little resistance at the same area each time, plan replacement promptly to avoid energy loss and colder floor drafts.
When should I stop DIY and call a professional?
Consider a pro if the door will not stay level after roller adjustments, if the track or frame appears warped, if you find significant damage at the sill or threshold that prevents proper seal contact, or if the gap pattern keeps changing after you adjust and re-lubricate. These situations often require part replacement or alignment beyond basic weatherstripping and strike tuning.
Next Article
How to Protect Patio Door from Rain: DIY Fixes, Steps & Costs
How to protect patio door from rain: step-by-step DIY fixes, tests, tools, seasonal tips, and when to call a pro.