You can fully secure a patio door without a deck by using interior security bars, floor-mounted foot bolts, reinforced strike plates with 3-inch screws, and anti-lift devices. Every one of these methods works from inside the house, requires no exterior platform to stand on, and can be completed in an afternoon with basic hand tools. The absence of a deck is simply not a limiting factor for any of the best-performing options.
How to Secure a Patio Door With No Deck, DIY Guide

Jamie Archer
23 Jul 2026
Who this guide is for, and what it will not cover
This guide is written for homeowners and renters who have a patio door that opens directly to grade level, a concrete patio, a staircase, or any other situation where there is no elevated deck to work from. It covers sliding glass doors, French doors, and secondary screen doors. Whether you are a DIYer doing the work yourself or an informed consumer who wants to know exactly what a professional should do, the instructions below give you the full picture.
One firm boundary: this guide will not provide instructions, techniques, or information that could be used to force open, bypass, or defeat a patio door lock from the outside. We will not describe forcible-entry techniques such as lock shimming or jimmying, which is a forcible entry technique for a patio door. We will not link to or provide content such as "how to break into patio doors", if you are locked out, contact a licensed locksmith or local emergency services instead. That content facilitates burglary regardless of who reads it, and it has no place here. If you are locked out of your own home, call a licensed locksmith.
A note for renters: several methods here, such as portable security bars and stick-on alarm sensors, require zero drilling and are fully reversible. Others, like replacing strike plate screws or adding a foot bolt, involve minor drilling that most landlords approve with written notice, but always check your lease first.
Top ways to secure a patio door with no deck
Here is the quick summary. The sections below go into full installation detail for each method. For detailed, step-by-step guidance on how to lock a patio door, see the linked guide (635cc55c-c301-4d5a-83fc-f61da7361e8b).
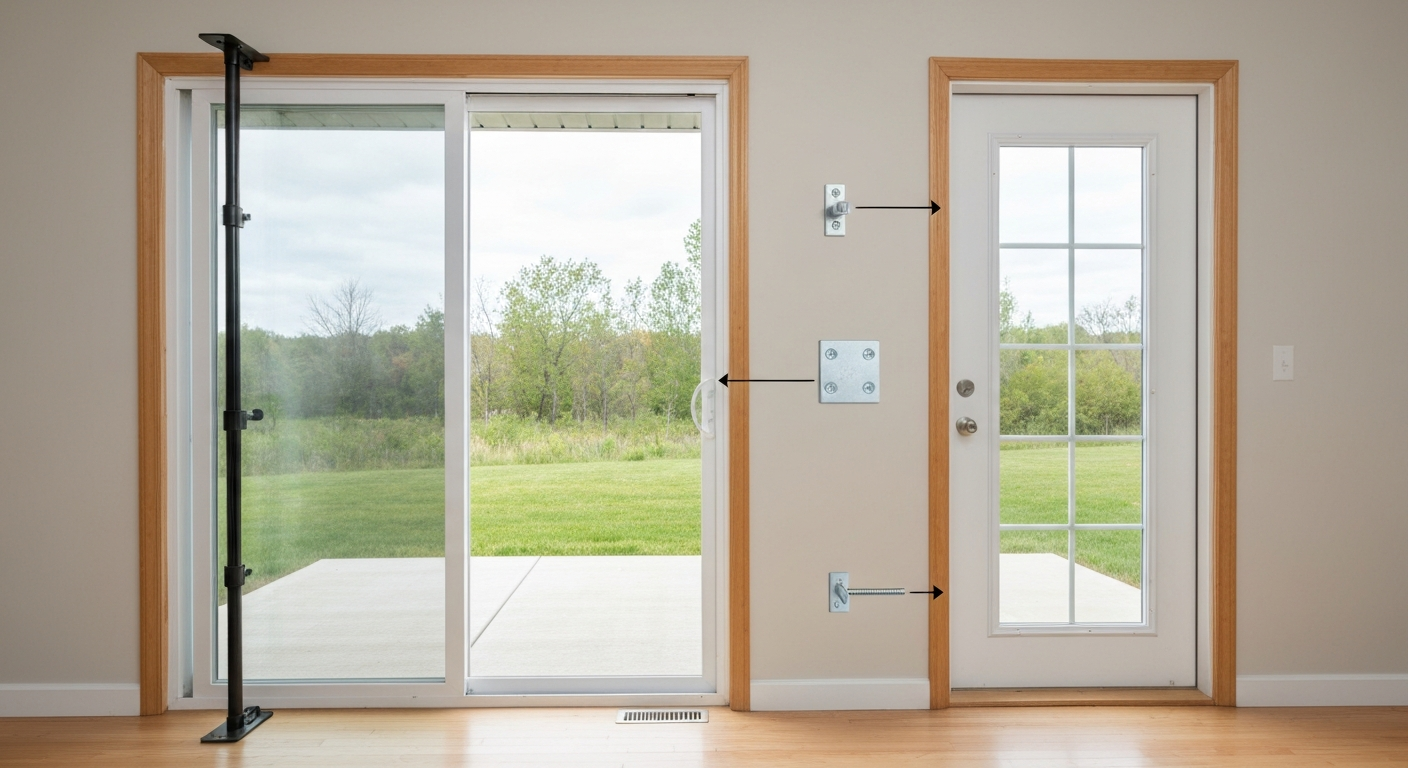
- Interior security bar or Charley bar: adjustable, no drilling required for the bar itself, works on sliding doors and some French doors
- Wooden dowel or cut-down closet rod in the track: free or near-free, takes 30 seconds to deploy, best as a backup layer
- Floor-mounted foot bolt: permanent, flush with the floor when retracted, excellent for French doors that open inward
- Reinforced strike plate with 3-inch screws: single highest-value upgrade for French doors and hinged panels, ~$15 in parts
- Anti-lift devices and sash interlocks: essential for sliding glass doors, prevents the panel from being lifted out of the track
- Keyed secondary lock or auxiliary deadbolt: adds a second keyed point of resistance to either door style
- Security window film (ASTM F1233-tested): slows glass break-in dramatically, applied from inside with no exterior access needed
- Door/window contact alarm sensors: battery-powered, no drilling, instant deterrent
Tools and materials checklist
Get everything on the general list before you start. Then pull the method-specific items for whichever installations you are tackling.
General tools you will need for most methods
- Cordless drill with variable speed
- Drill bit set (1/16" through 3/8" HSS bits for wood/metal, plus a masonry bit if your threshold is concrete)
- Phillips and flathead screwdriver set
- Tape measure and pencil
- Painter's tape (for marking positions without scratching frames)
- Safety glasses and work gloves
- Level (small torpedo level is fine)
- Stud finder (for strike plate work near jambs)
Method-specific materials
| Method | Key Materials | Approx. Cost |
|---|---|---|
| Security bar / Charley bar | Adjustable steel security bar (e.g., Prime-Line U-9867 or equivalent) | $15–$35 |
| Wooden dowel in track | 3/4" or 1" hardwood dowel rod, cut to track length | Under $5 |
| Foot bolt (French door) | Flush bolt kit with drilling template, masonry anchors if concrete floor | $20–$60 |
| Reinforced strike plate + screws | Heavy-gauge steel strike plate, (4) 3-inch #10 hardened screws | $10–$20 |
| Door frame reinforcement kit | Door Armor MAX or equivalent combo kit (includes steel jamb shields + 3" screws) | ~$96 |
| Anti-lift device / sash interlock | Purpose-made sliding door anti-lift clips or Charlie lock insert | $8–$25 |
| Keyed secondary lock | Auxiliary sliding door lock or surface-mount deadbolt (ANSI/BHMA Grade 2 or better) | $25–$75 |
| Security window film | ASTM F1233-tested film (3M Scotchshield, LLumar, or equivalent), spray bottle, squeegee | $3–$6/sq ft installed |
How to pick the right solution for your situation
Not every method fits every door or budget. Run through this checklist before buying anything.
- What type of door do you have? Sliding glass doors are most vulnerable to lift-and-remove attacks, so anti-lift devices are non-negotiable. French doors flex at the center where the two panels meet, making strike plates and foot bolts the priority. Screen doors alone provide zero security and should never be your only layer.
- How often is the door used as a primary exit? If this door is your daily exit, avoid any security device that adds more than two seconds to your egress in an emergency. A foot bolt and security bar both disengage instantly from the inside.
- Do you rent or own? Renters should start with portable bars, door sensors, and dowels. Owners can add permanent hardware like foot bolts, reinforced strike plates, and keyed locks.
- What is your floor material at the threshold? A wood or composite floor needs only a standard drill and wood screws. A concrete or stone threshold requires a hammer drill and concrete screws or masonry anchors. Know this before you buy a foot bolt.
- What is your budget? A wooden dowel costs nothing. A full layered approach (anti-lift + security bar + reinforced strike + keyed lock) runs $60–$130 in parts. Security film is the most expensive single item but is the only method that addresses glass breakage.
Interior and portable security bars
A security bar, often called a Charley bar or patio bar lock, is a steel or aluminum rod that braces against the door frame or a bracket and physically prevents the door from sliding or swinging open. It works entirely from the inside and needs no exterior access at all, which makes it ideal when there is no deck. See our full guide on how to secure patio doors for detailed step‑by‑step instructions and product recommendations. The bar can be swung up and out of the way in under a second when you want to open the door normally.
Pros and cons
| Pros | Cons |
|---|---|
| No deck or exterior access needed | A surface-mounted bar bracket requires drilling into the door frame |
| Instantly removable for egress | Purely mechanical — does not alert you if the door is tampered with |
| Works on sliding and some French doors | Cheap bars can be lightweight; look for steel over aluminum |
| Renter-friendly models require zero drilling | Visible inside the home — minor aesthetic issue for some |
Step-by-step installation
- Close and latch the patio door completely.
- For a track-lying bar (no drilling): measure the inside width of the sliding door track from the closed door panel to the far jamb. Cut a hardwood dowel (1" diameter for most tracks) to that measurement using a handsaw. Drop it flat into the lower track. That is the entire installation. Keep a second cut piece for the upper track as an anti-lift backup.
- For a wall-bracket Charley bar: hold the bar bracket against the door frame or side jamb at the height specified in your product instructions (typically 42"–48" from the floor for comfortable reach). Mark the bracket hole positions with a pencil.
- Drill pilot holes at your marks using a bit slightly smaller than your screw diameter. Keep depth shallow — do not drill through the jamb into the exterior.
- Drive the included screws to seat the bracket firmly. Do not overtighten into a hollow aluminum frame; use the provided anchors if included.
- Hang the bar on its bracket and test engagement. The bar should drop into position under light resistance and lift out easily with one hand.
- Test the door from the inside by pushing firmly at several points. The bar should not flex significantly.
Cost and where to buy: Basic track dowels cost $3–$8 at any hardware store. Purpose-made security bars like the Prime-Line U-9867 or similar products run $15–$35 at Home Depot, Lowe's, or Amazon. Look for steel construction and a mounting bracket that uses at least four screws.
Floor-mounted foot bolts and surface-mounted foot locks
A foot bolt is a vertical bolt that drops from the bottom edge of a door panel into a strike cup in the floor. It is the go-to solution for French patio doors because it secures the inactive panel (the one that does not normally open) firmly to the floor without any hardware on the exterior side. For step-by-step options specific to French doors, see our guide on how to secure a French patio door. When retracted, it sits flush with the door bottom and does not create a trip hazard.
Pros and cons
| Pros | Cons |
|---|---|
| Highly effective on French door inactive panels | Requires drilling into door bottom and floor — not reversible easily |
| Flush with floor when retracted, no trip hazard | Concrete floors require a hammer drill and masonry anchors |
| Completely interior — no deck access needed | Not applicable to sliding glass doors without a channel modification |
| Works alongside any other lock layer | Strike cup must be positioned precisely or bolt will bind |
Step-by-step installation
- Purchase a flush bolt or foot bolt kit. Most kits (such as Marvin's Auxiliary Foot Bolt) include a paper or cardboard drilling template. If yours does not, you will create your own in step 3.
- Close and latch both door panels. Tape the drilling template to the inside face of the door bottom rail, centered on the door width, with the bolt barrel positioned to clear the door sweep and weatherstripping.
- Mark the bolt barrel hole location on the door bottom and the strike cup hole location on the floor directly below it by pressing a pencil through the template.
- Drill the barrel mortise into the door bottom. Use a spade bit or Forstner bit matching the bolt barrel diameter (typically 3/4" to 1"). Drill only as deep as the barrel length, not through the door.
- For wood floors: drill the strike cup hole with the appropriate bit, then chisel or rout a shallow recess so the cup plate sits flush. Drive the cup in place with wood screws.
- For concrete floors: use a hammer drill with a masonry bit. Drill to the anchor depth required by the concrete screws or masonry anchors in your kit. Tap anchors in, then drive screws to seat the cup.
- Insert the foot bolt barrel into the door and secure the face plate with the provided screws. Drive pilot holes first to avoid splitting the door rail.
- Test by closing the door, dropping the bolt into the cup, and pulling the door firmly outward. There should be zero movement.
Cost and where to buy: Basic surface-mount foot locks run $20–$35. Recessed flush bolt kits designed for French door bottoms are $35–$60 and are available at Lowe's, Home Depot, and directly from door hardware suppliers. If your threshold is concrete, budget an extra $10–$15 for masonry anchors and a masonry bit if you do not already own one. For installation into concrete or stone thresholds, manufacturers recommend using masonry anchors or concrete screws installed with a hammer drill; see Simpson Strong‑Tie technical guidance on anchors (masonry/concrete anchors) for details.
Reinforced strike plates and long jamb screws
This is the single most cost-effective security upgrade you can make to any hinged patio door, including French doors. The factory strike plate on most residential doors is a thin stamped-steel plate held by two 3/4-inch screws that bite only into the door jamb, not into the structural framing behind it. Replacing those screws with 3-inch hardened screws that pass through the jamb and anchor into the stud transforms the kick-resistance from a few hundred pounds to over 1,000 pounds of applied force. It takes about 20 minutes and costs around $15.
Pros and cons
| Pros | Cons |
|---|---|
| Dramatic improvement in kick resistance for minimal cost | Applies only to hinged/French doors, not sliding panels |
| Fully interior installation, no deck needed | Requires a stud finder and careful alignment to hit the framing |
| Invisible once installed — no aesthetic change | Does not help if the glass panel is broken directly |
| Works with existing lockset, no new hardware cutout | Full door frame reinforcement kit costs more but covers hinges and jamb length |
Step-by-step installation
- Open the door and locate the existing strike plate on the door jamb. Remove all existing screws with a screwdriver.
- If replacing the strike plate itself (recommended for doors with flimsy factory hardware), hold the new heavy-gauge steel plate over the existing mortise. It should overlap the original cutout on all sides.
- Use a stud finder to confirm the framing stud is behind the jamb at the strike plate location. On most standard door frames, the king stud or trimmer stud runs right behind the jamb. Mark its center.
- Start the 3-inch #10 hardened screws by hand to get them started straight. The screw must pass through the strike plate hole, through the jamb, and travel at least 1.5 inches into the stud.
- Drive the screws with a drill on low torque to avoid stripping. Finish with a screwdriver for final seating — snug, not crushing the plate.
- Test the door latch engagement. The latch bolt should retract and spring back smoothly. If there is binding, the new plate may need a small amount of mortise adjustment with a chisel.
- For a full frame reinforcement kit like Door Armor MAX (available at Lowe's for approximately $96), follow the kit instructions to also cover the hinge side and the jamb edge with steel channel — the principle is the same but the kit anchors the entire jamb length.
Cost and where to buy: A heavy-duty replacement strike plate runs $5–$15 at any hardware store. A pack of 3-inch #10 hardened screws costs $3–$8. A full door frame reinforcement kit (Door Armor MAX or equivalent) runs approximately $96 at Lowe's and includes everything needed for one door. All of these are interior-only installations requiring zero exterior access.
Anti-lift devices and sash interlocks for sliding doors
Older sliding glass doors, and many current budget models, can be lifted out of their track entirely with the latch engaged, because the factory roller clearance is generous enough to allow it. An anti-lift device removes that gap. It is the one security upgrade that is unique to sliding doors, and it requires zero deck access because it installs on the top track or the door header, entirely from inside the house. For a step-by-step checklist and more sliding-door-specific tips, see our guide on how to secure a sliding glass patio door.
Pros and cons
| Pros | Cons |
|---|---|
| Eliminates lift-and-remove attack vector entirely | Does not secure the door against horizontal sliding if latch fails |
| Installs in 10 minutes on most doors | Cheap plastic clips can wear or crack over time — inspect annually |
| No deck, no exterior access, no drilling required for clip-type | Sash interlock versions require minor drilling into the door frame |
| Inexpensive and widely available | Must be sized to match your specific track dimensions |
Step-by-step installation
- Open the sliding door panel about 12 inches to give yourself working room and access to the top rail.
- Measure the gap between the top of the sliding panel and the upper track channel. This tells you what thickness of anti-lift clip you need. Most are adjustable via a set screw.
- For clip-style anti-lift devices: slide the device into the upper track groove so it rides on top of the door panel's upper edge. Position it in a spot where it will not interfere with the door's normal travel. Tighten the set screw with a hex key or small screwdriver.
- For screw-in anti-lift pins or Charlie bar sockets: hold the device against the inside face of the door header or upper track. Mark the hole positions. Drill pilot holes (use the manufacturer's specified bit size). Drive the included screws to seat the device firmly.
- Close the door and test: grip the door at the top and attempt to lift it upward. There should be firm resistance and no upward travel.
- Also test that the door still slides smoothly through its full range of travel without the anti-lift device dragging.
- Add a secondary anti-lift device at the opposite end of the upper track for maximum coverage, especially on wider door panels.
Cost and where to buy: Clip-style anti-lift devices sell for $8–$15 for a two-pack at Home Depot, Lowe's, and Amazon. Sash interlock sets with matching hardware for both the door and frame run $20–$25. Look for metal construction over plastic where possible. This hardware is stocked in the sliding door hardware section of most large home improvement stores, often next to replacement rollers and track pieces.
Layering your security: how these methods work together
No single device secures a patio door on its own. The goal is to make a forced entry slow enough and loud enough that an opportunistic intruder gives up. Police crime-prevention guidelines consistently recommend combining at least two physical barriers with a noise-making deterrent. Here is how to think about layers for each door type.
Recommended layers by door type
| Door Type | Priority Layer 1 | Priority Layer 2 | Optional Layer 3 |
|---|---|---|---|
| Sliding glass door | Anti-lift clips in upper track | Security bar or dowel in lower track | Keyed auxiliary lock + window sensor alarm |
| French patio door | 3-inch screws in strike plate | Foot bolt on inactive panel | Security window film on glass panels |
| Screen door only | This is not a security door — treat it as a screen only; focus security on the primary door behind it |
Security window film: what it does and does not do
Security film does not prevent glass from breaking. What it does is hold the broken glass together in a spiderweb pattern so an intruder cannot easily reach through or pass through the opening. Films tested to ASTM F1233 (the standard used to evaluate security glazing systems for forced-entry resistance) and European EN 356 standards are the benchmark for this category. Independent test and standards bodies and industry labs list ASTM F1233: Standard Test Method for Security Glazing Materials and Systems (Intertek summary) as the benchmark for comparing forced‑entry resistance of glazing systems and for documenting intrusion‑resistance performance. Professional-grade products from 3M Scotchshield, LLumar, and similar manufacturers are applied from inside the house, require no deck or exterior scaffold, and typically cost $3–$6 per square foot including professional installation. A standard 6-foot patio door glass panel runs roughly $60–$120 in film cost. For maximum performance, look for products with an edge attachment system that anchors the film to the frame, which significantly improves tear-out resistance versus just surface-applied film. Honest caveat: film is a delaying measure, not a barrier. Pair it with a track bar and alarm sensors for a complete approach.
Troubleshooting common problems after installation
Security bar won't stay in position
If the bar slides or falls out of its bracket, the bracket screws have likely loosened or were not driven into solid material. Remove the bar, tighten the screws, and if the holes have stripped out, move the bracket 1/2 inch and redrill into solid frame material. Hollow aluminum extrusion frames require the toggle anchors included with most kits.
Foot bolt binds or won't drop cleanly
The strike cup hole is slightly off-center from the bolt barrel. Close the door, drop the bolt as far as it will go, and mark the floor at that point. If the mark is off the cup center by more than 1/8 inch, re-drill or elongate the cup hole slightly with a rotary tool. Lubricating the bolt barrel with a dry graphite lubricant also helps if the barrel is dragging in the housing.
New 3-inch strike screws cause the latch to bind
If the door latch does not engage smoothly after installing a new strike plate, the plate is sitting slightly high or the latch bolt hole does not align perfectly. Use a flat file or sharp chisel to widen the latch bolt opening in the plate by 1/16 inch at a time until the latch drops in cleanly. Do not simply over-drive the screws to pull the plate into position, as this distorts the plate geometry.
Anti-lift clips interfere with door sliding
The clip is either too thick or positioned where the upper track narrows. Loosen the set screw, slide the clip to a wider section of the track, and re-tighten at the minimum depth that still prevents lift. If the door track has significant debris or paint buildup, clean it first, a dirty track makes the measured gap inaccurate.
Seasonal maintenance to keep these upgrades working
- Spring: Clean the lower sliding track thoroughly before reinserting any dowel or bar. Grit in the track wears the bar ends and can jam the bar in place under the door.
- Spring: Inspect anti-lift clips for cracking or deformation. Replace any plastic components that show visible wear — they are inexpensive.
- Fall: Test foot bolt operation before heating season. Seasonal wood movement can tighten or loosen the bolt-to-cup alignment by a small but perceptible amount.
- Fall: Check that 3-inch strike plate screws are still snug. Settling and seasonal door movement can work screws loose slightly over 12–18 months.
- Year-round: If your door has security window film, inspect the edges for peeling or bubbling, especially at the bottom where condensation collects. Re-seal lifted edges with a compatible edge sealant recommended by the film manufacturer.
- Year-round: Test all alarm sensors monthly by opening the door and confirming the chime or alarm triggers. Replace batteries at the first low-battery chirp.
When to call a professional
The methods in this guide are genuinely DIY-friendly. But there are a few situations worth handing off to a pro. If your sliding door has severely damaged rollers or a warped frame, no security bar will close the gap consistently, and the door itself needs repair before security hardware makes sense. If you are installing a keyed auxiliary lock and need to cut a new mortise or bore a new hole through a steel or fiberglass door, a locksmith or door company with the right jig will get a cleaner result faster than you will with a handheld drill. And if your threshold is unusual, such as a thick stone tile over concrete with radiant heating embedded in it, the foot bolt strike cup needs to be positioned to avoid the heating elements, which requires knowing exactly where they are.
FAQ
Quick answer: What effective DIY-safe options secure a patio door when there’s no exterior deck to anchor hardware?
Use interior or portable security bars (track or jamb-mounted), floor-mounted/auxiliary foot bolts (installed into threshold or floor with proper anchors), replace short strike‑plate screws with 3" hardened screws into framing, add jamb/strike reinforcement plates or a door‑armor kit, fit anti‑lift devices or track pins for sliding doors, install keyed secondary locks or crossbars for French doors, retrofit security (laminated) glass or certified security film, and add alarm/contact sensors. Each option avoids relying on an exterior deck for attachment and is suited to DIY or licensed‑pro installs.
How do recommended methods differ for sliding glass, French (double) doors, and screen doors?
Sliding glass doors: use a solid track-mounted bar or U‑bar, anti‑lift pins, keyed secondary lock or retrofit mortise lock, replace rollers if sagging, and consider security film/laminated glazing. French doors: install top/bottom flush bolts or floor‑mounted foot bolts, active‑leaf multi‑point lock or keyed secondary lock, reinforce strike plates and hinge screws (3" screws), and use a crossbar for temporary security. Screen doors: fit a keyed lock or security bar, reinforce frame attachments, or add a security screen panel (stainless mesh) — note screens resist insects and pests, not forced entry; pair with a secure glass/wood door behind. Choose devices rated for door type and avoid hardware that requires an outside deck to anchor.
What tools and materials will I need for common DIY installations?
Basic tools: tape measure, pencil, drill/driver, sets of wood/masonry bits, hammer, chisel, screwdriver set, level, studfinder, and hammer drill for concrete. Materials: security bar or track bar, anti‑lift pins, keyed secondary lock or patio kit, 3" hardened (structural) screws, jamb/strike reinforcement plate or door‑armor kit, floor bolts and appropriate masonry or concrete anchors (Tapcon/concrete screws or wedge anchors), security film or laminated glazing (or installer contact), alarm/contact sensors, weatherproof sealant, and safety gear (glasses, gloves). Have templates from product manuals handy.
Step‑by‑step outline: How to install a track/portable security bar for a sliding glass door?
1) Measure door width and choose a bar sized to close tightly between the sliding and fixed frame. 2) Place bar in the bottom track or fit bar against frame per manufacturer instructions so it resists opening. 3) If using a U‑bolt/bar that mounts to jamb, mark pilot holes and drill shallow pilot holes into frame (avoid drilling into glass). 4) Secure with supplied fasteners; for wood frames use wood screws, for metal frames use self‑tapping screws. 5) Test operation — door should not open past the bar. 6) Add anti‑lift pins to stop vertical removal if recommended. Follow product manual; avoid forcing or altering glass.
Step‑by‑step outline: Installing a floor‑mounted (auxiliary) foot bolt for French doors without a deck?
1) Close the door and mark bolt position on threshold/floor aligned to strike plate template. 2) Select appropriate anchor: wood screws for wood thresholds, masonry anchors/concrete screws for concrete. 3) Drill pilot hole per anchor manufacturer depth (use hammer drill for concrete). 4) Install the bolt body flush to door bottom and fasten with recommended long screws/anchors. 5) Install strike sleeve/keeper in floor with matching anchor. 6) Operate bolt to confirm engagement; adjust strike position if needed. Seal around fasteners for moisture protection. Use templates supplied with the bolt.
Step‑by‑step outline: Upgrading strike plates and jamb screws (highest value/lowest cost upgrade)
1) Open door, remove existing strike plate. 2) Place new heavy steel strike or door‑armor plate and mark screw holes aligned to framing. 3) Drill 1/8" pilot holes through jamb into framing/stud locations. 4) Install 3" hardened screws through strike plate into studs (ensure screws fully seat and penetrate framing). 5) Test deadbolt/lock engagement; adjust plate alignment if needed. This upgrade transfers shear loads into framing and is one of the most effective inexpensive DIY reinforcements.
Next Article
Which Is a Forcible Entry Technique for a Patio Door
Learn common forcible entry tactics on sliding and patio swing doors and how to inspect, adjust, and reinforce fast.