Building steps from French doors to a patio comes down to three things done in the right order: measure the drop from your door threshold to the finished patio surface, design a stair layout that hits safe riser and tread dimensions, and make sure the steps don't block the door swing or let water sneak back under the sill. Get those three right and the whole project falls into place. Skip any one of them and you'll be redoing work or chasing a leak for years.
Steps From French Doors to Patio: Measure, Build, Adjust

Jamie Archer
22 Jun 2026
Get the measurements right first
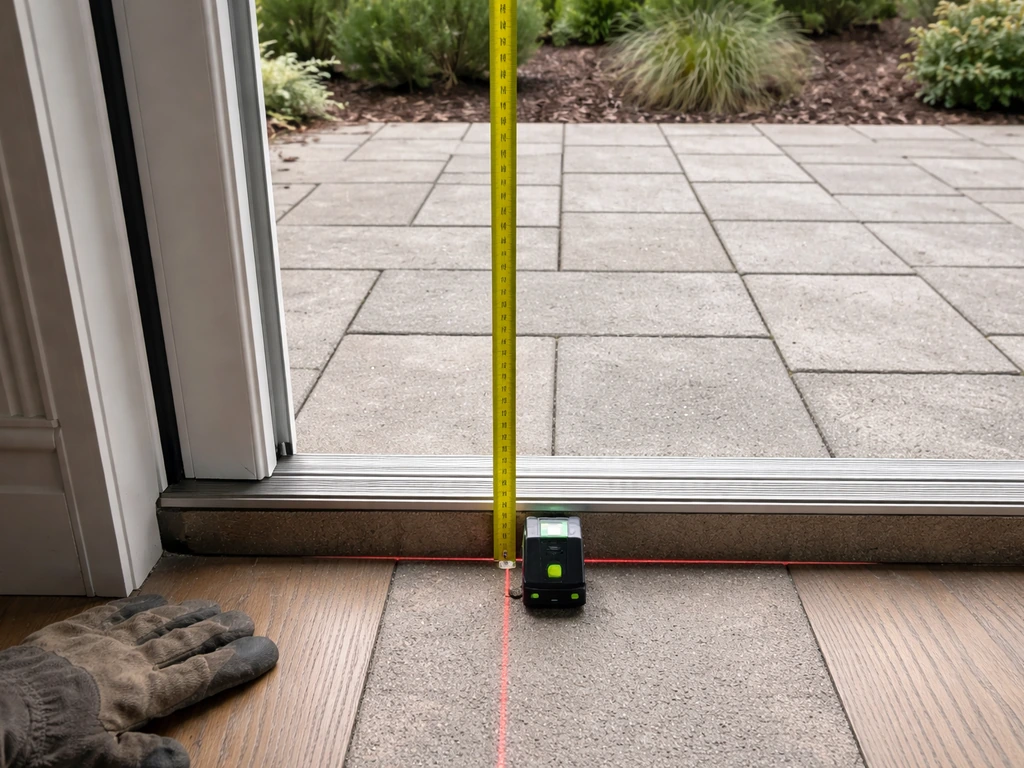
Before you sketch anything or buy a single bag of concrete, measure the total rise: the vertical distance from the top of your door threshold down to the finished patio grade. This one number drives everything else. Use a long level or a laser level and a tape measure. Hold the level at threshold height, extend it out over where your steps will land, and measure straight down to the ground.
If your patio surface is already in (concrete, pavers, gravel), measure to the finished surface. If the patio isn't poured yet, account for your planned patio thickness so the steps end at the right height. If you are planning patio steps from sliding door, measure the rise carefully so the landing lines up correctly with the threshold planned patio thickness.
The IRC sets the maximum allowable drop from the top of a threshold to the exterior landing at 7 3/4 inches. That means if your threshold is only 6 or 7 inches above grade, you may not need formal steps at all, just a small platform or a single thick paver landing. But most existing homes have a floor elevation well above grade, so you'll typically be dealing with a total rise of 12 to 30 inches or more, which means at least two to four steps.
Also measure the door rough opening width at this point, and note which direction the French doors swing. Most French doors swing inward, but some configurations swing out. An outswing French door changes everything about step placement because the door arc sweeps directly into the space where your steps will sit. Measure the full arc of each door panel when fully open (typically 90 degrees) and note how far it extends from the threshold. That clearance zone cannot be filled with steps.
Plan your step layout: risers, treads, and the landing
Once you have your total rise, divide it into individual riser heights. The IRC caps residential risers at 7 3/4 inches maximum and requires treads to be at least 10 inches deep. Comfortable, everyday steps usually land around 7 inches of rise and 11 inches of tread, that's what most people expect when they're walking without thinking about it. Steeper steps feel abrupt, especially when you're carrying something out to the patio.
Here's how to calculate your stair layout: divide your total rise (in inches) by your target riser height. Round to the nearest whole number, that's your number of steps. Then divide the total rise by that number to get your exact riser height. For example, if your total rise is 21 inches and you target 7-inch risers, you get exactly 3 risers. If the total rise is 23 inches, 3 risers gives you 7.67 inches each, which is still under the 7 3/4 inch limit. All risers in a single stair run must be within 3/8 inch of each other, no mixing and matching.
The landing at the base of the steps needs to be at least 36 inches deep in the direction of travel, and at least as wide as the door opening. For French doors, which typically span 60 to 72 inches of combined door width, plan your landing and steps to match or exceed that width. A wider landing also gives you room to open both door panels fully without stepping backward off the edge.
| Total Rise | Number of Risers | Riser Height | Total Stair Run (10" treads) |
|---|---|---|---|
| 7–8 in | 1 | 7–8 in | No stair needed—single step or landing |
| 14–16 in | 2 | 7–8 in | 10 in |
| 21–23 in | 3 | 7–7.67 in | 20 in |
| 28–31 in | 4 | 7–7.75 in | 30 in |
| 35–38 in | 5 | 7–7.6 in | 40 in |
If you plan solid risers (a closed-riser stair), the IRC also requires a nosing projection: each tread nosing needs to overhang the riser below by between 3/4 inch and 1 1/4 inches. This isn't just a code box to check, it genuinely helps people feel more secure footing on the way up and down, especially in wet conditions.
Prepare the ground before you build anything

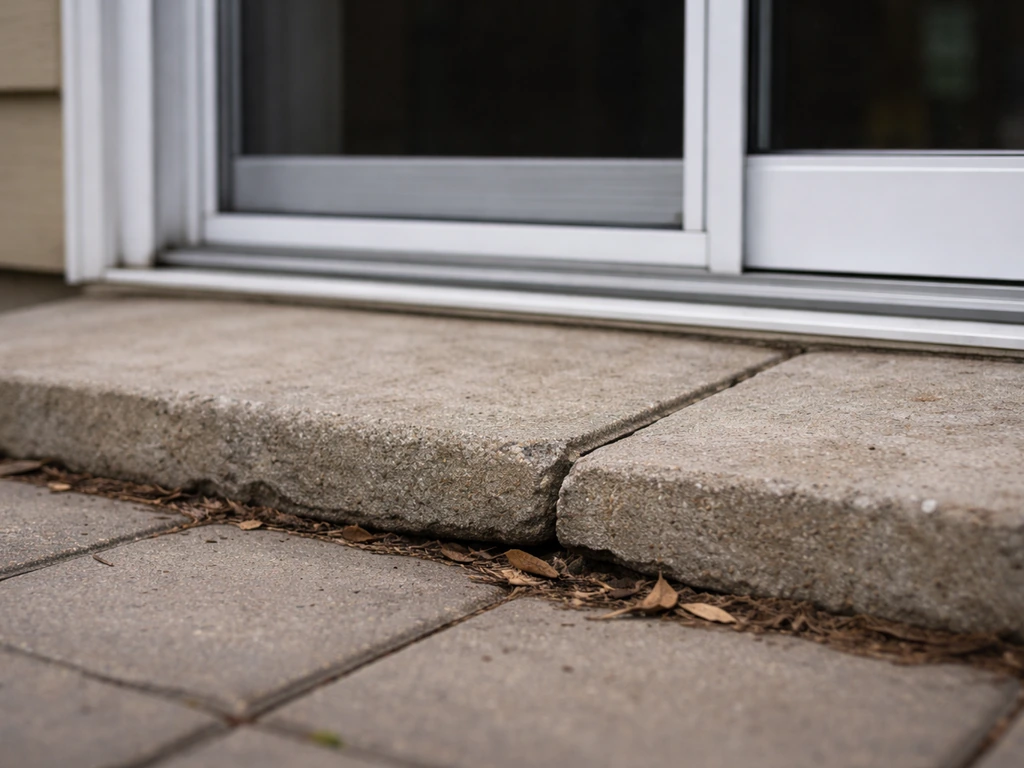
Skipping proper site prep is the number one reason patio steps settle, tip, or crack within a few years. The ground under your steps needs to support the load without shifting, and it needs to drain so water doesn't pool under the structure and cause frost heave. Frost heave is what happens when water in the soil freezes and expands, lifting footings or slabs, sometimes by inches. Over a few winters, heaved steps can pull away from the threshold area and create a tripping hazard or a gap that lets water into the house.
If your steps will bear significant weight (concrete block, brick, or poured concrete), footings need to extend below the local frost depth. That depth varies by region: a few inches in coastal areas, 36 to 48 inches or more in northern climates. Check with your local building department, they'll know the frost depth for your area and whether a permit is needed for exterior steps. For lighter prefab step units or paver-based steps, a well-compacted gravel base is often sufficient, but only if you're not in a hard-freeze climate.
For the base itself, excavate 6 to 8 inches deep and fill with compactable gravel (dense-graded aggregate, sometimes called Class II base or road base). Compact it in 2 to 3 inch lifts using a plate compactor, don't try to compact it all at once. A well-compacted gravel base provides both load bearing and drainage, letting water move through rather than accumulating under your steps. Slope the base layer slightly away from the house (about 1/8 inch per foot) to encourage water to drain outward.
Build or install steps that actually work with French door swing
This is where French doors differ from a standard single door or a sliding glass door. If you are trying to create steps down from patio doors, always plan the landing depth to match your French door swing. French doors have two independently operating panels, and each one has a swing arc you need to respect.
If both panels swing outward, you need a landing deep enough that both doors can open to 90 degrees without the panels hitting the top step edge. A common minimum is 60 inches of landing depth for outswing French doors, though 48 inches works if the doors aren't used in full-open position often.
If the doors swing inward, your clearance concern shifts to the threshold itself: make sure the top step sits low enough that the door can clear the threshold weather seal without scraping.
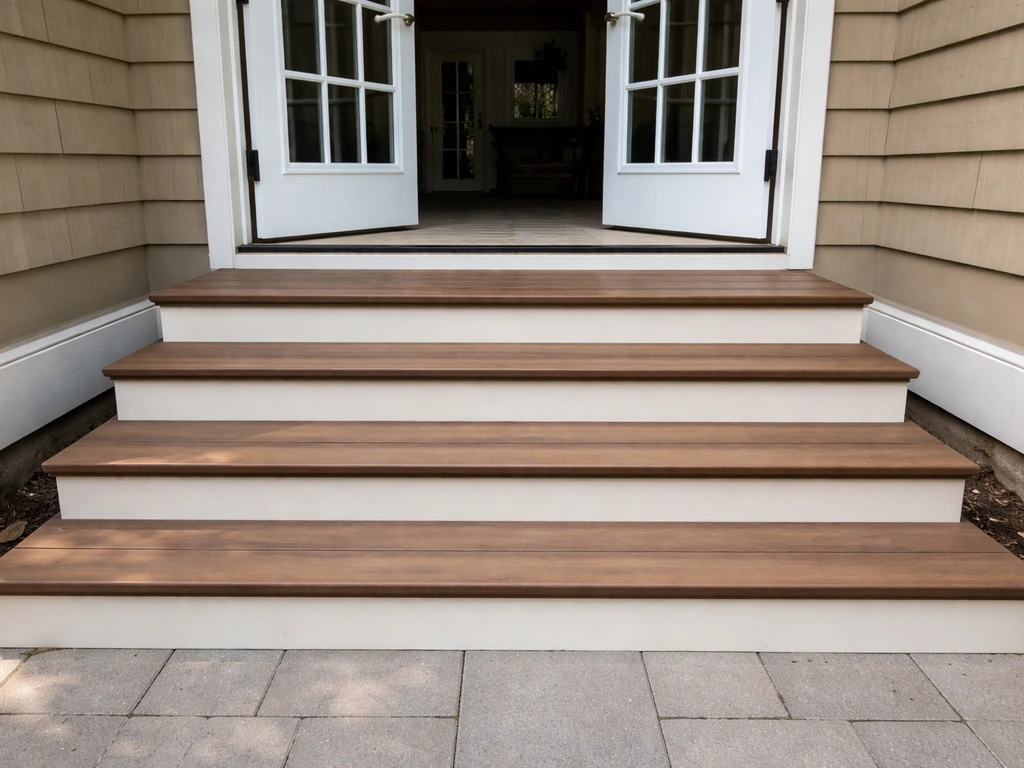
For most DIYers, the simplest and most reliable approach is precast concrete steps or a built-up paver platform. Precast steps come in standard widths (typically 48 or 60 inches) and are heavy enough to stay put without footings in mild climates. They're a weekend project: excavate and compact your base, set the steps, check for level side-to-side and proper slope front-to-back (1/4 inch per foot pitching away from the house), and you're done. For wider openings matching full-width French doors, you may need two precast units side by side or a custom poured concrete stair.
If you're building a poured concrete or block stair, lay out your stringers or form dimensions before pouring. Mark the exact location of each step so the top of the finished stair lands at the correct height below the threshold, remember, the IRC allows no more than 7 3/4 inches of drop from threshold top to landing surface. Double-check this measurement before the concrete goes in, because it's not something you can adjust after the fact.
For a paver-based stair, build each step as a dry-laid or mortared paver course set on compacted base. Use full-size pavers for the treads and cut pavers or concrete block for the risers. Each course needs to be level individually and pitched forward slightly. Paver steps are forgiving to adjust and easy to add non-slip inserts to later, but they do require more careful base prep than precast to avoid settling.
Weatherproofing and door compatibility after the steps go in
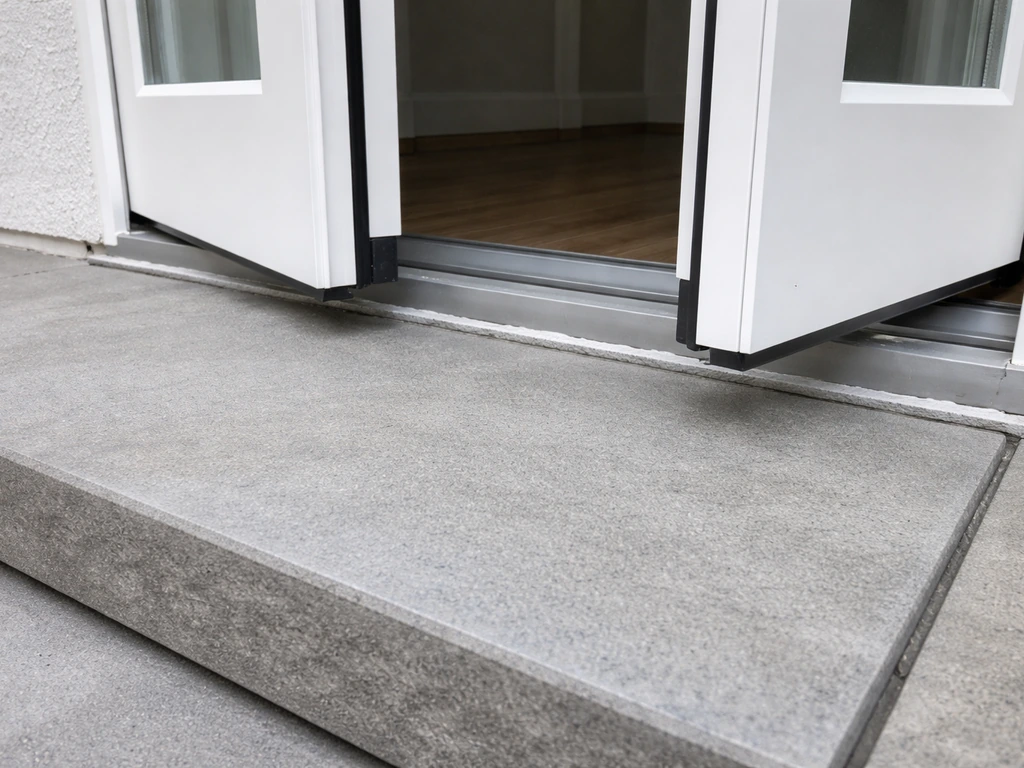
Once the steps are in place, your job isn't done. The connection between your new steps and the door threshold is a potential water entry point, and French doors are especially vulnerable because the center meeting stile (where the two doors come together) already creates a natural gap that water loves to exploit. The steps just add another opportunity.
Check the threshold gap first. Open both door panels and look at the gap between the bottom of the threshold and the top of your first step or landing. There should be enough clearance that the door weatherstripping can compress and seal, but not so much that water or cold air flows freely underneath. Typically 1/4 to 1/2 inch of clearance is ideal.
If the step surface is higher than designed and the door is now scraping the step, you'll need to either lower the step surface or raise the threshold, neither is a simple fix, so get this measurement right during planning.
If the step surface is higher than designed and the door is now scraping the step, you'll need to either lower the step surface or raise the threshold, neither is a simple fix, so get this measurement right during planning, see sliding glass door steps to patio for the same threshold-clearance idea.
The sill pan and flashing at the base of your French doors need to drain outward, not into wall cavities. The sill pan is a sloped tray behind the threshold that collects any water that gets past the door seal and redirects it to the exterior. It works correctly only if water can exit at the front, there are small weep holes or open pathways at the bottom of the threshold or door frame that allow drainage.
Don't seal these weep holes when caulking around the door frame or where the frame meets the step surface. If you block the drainage path, water backs up into the wall assembly and you'll be dealing with rot and mold long before you figure out where it's coming from.
While you're at it, check that the housewrap or WRB (water-resistive barrier) behind the door frame laps correctly over any flashing at the base of the opening. The flashing should terminate on top of the drainage plane, not tucked behind it. If you're doing any work around the door frame as part of the step installation, caulking, adding trim, reattaching siding, make sure you're not disturbing this layering. If you see a gap between the door frame and the siding that wasn't there before, seal it with a flexible exterior caulk rated for masonry or wood contact.
Finally, check that the steps don't interfere with door operation in cold or wet conditions. A step that's too close to the door swing can prevent full opening, and if the door panel hits a step edge repeatedly, it will eventually damage the weatherstripping at the bottom rail. Test both doors at full open, full close, and locked position. The locking hardware on French doors (especially where the active panel latches to the passive panel) needs the doors to align perfectly, if the steps are pushing the door frame or causing the threshold to flex, you may notice the deadbolt or shoot bolt becoming stiff or refusing to engage.
Safety details that actually matter
Handrails are required by IRC when a stair has four or more risers, and they need to sit between 34 and 38 inches above the stair nosings. That said, even a two-step or three-step run benefits from a grab rail, especially for older family members or kids. If you're installing handrails, anchor the posts into the step structure itself or into properly sized footings, not just bolted to the step surface. A post that wobbles when you grab it is worse than no handrail at all because it creates a false sense of security.
Slip resistance is non-negotiable on exterior steps. Smooth concrete and polished stone become ice rinks when wet. Apply a non-slip additive to any painted or sealed surface (silicon carbide grit is cheap and effective), use brushed or broom-finished concrete, or install grip tape on paver nosings. The step edges are the highest-risk point, make sure the nosing overhangs slightly (that 3/4 to 1 1/4 inch IRC requirement) and has a visible contrast or texture difference from the tread surface.
Make sure water can't accumulate on any step surface. The IBC specifically requires outdoor stairways to be designed so water won't pool on walking surfaces. A slight forward pitch on each tread (about 1 to 2 percent, or roughly 1/8 inch per foot) sheds rain and melting snow. Check this with a level after installation, if any tread is perfectly flat or pitches backward toward the house, fix it before you move on.
Your build checklist and tool list
Here's what you'll need to pull this together, whether you're doing a simple precast step install or a full poured concrete stair:
- Tape measure and long level (or laser level)
- Shovel and wheelbarrow for excavation
- Plate compactor (rent for a day—don't skip this)
- Dense-graded gravel, 6–8 inches depth
- Precast concrete steps, concrete block, pavers, or form lumber depending on your build type
- Ready-mix or bagged concrete for footings if required
- Speed square and chalk line for layout
- Masonry adhesive or mortar if layering block or pavers
- Non-slip additive or grip tape for tread surfaces
- Exterior flexible caulk for sealing around door frame
- Handrail hardware and posts if 4+ risers
The build order that works best: measure and plan first, then excavate and compact the base, set footings if needed and let them cure, install the step structure from bottom up, check levels and pitch at every course, then address the threshold gap and weatherproofing last before doing any final caulking or sealing. Doing it in this order means you're not trying to adjust the step height after you've already sealed everything up.
If the numbers are getting complicated, especially if you have an outswing French door, an unusual floor height, or a sloped grade that doesn't run level, this is a reasonable project to have a mason or carpenter check your layout before you build. The structure itself may be DIY-friendly, but a bad plan built well is still a bad plan. An hour with a pro reviewing your measurements and confirming your footing depth can save you from tearing it all out after the first winter.
Steps from sliding doors to a patio follow very similar logic on the structural side, but the door clearance math is simpler since sliding panels don't swing outward. Follow the same structural logic used for steps from sliding doors to a patio, but double-check the door clearance and threshold sealing details for your exact setup. If you're comparing the two situations, the main French door-specific concerns are always the swing arc clearance and the center stile gap that creates additional weather sealing challenges.
FAQ
If my French door threshold to patio drop is just under the IRC limit, do I still need steps from French doors to patio?
Often you do not. If the total drop is within the threshold-to-landing allowance, you can use a small platform or a single thick landing surface instead of a full stair run. Still verify the door weather seal clearance (roughly a quarter to a half inch) and keep the landing drained outward, so water does not sit directly under the threshold.
How do I measure the door swing clearance correctly for an outswing French door?
Don’t measure only the panel width. Measure the swing arc from the threshold to where the door edge is at full opening, then mark a “no-build” clearance zone that includes the door edge plus any handle clearance. When you set the bottom step, leave enough depth so the door can reach its full open position without contacting the top step edge or nosing.
What should I do if my calculated riser height is slightly over the maximum (for example 7 5/8 to 8 inches)?
Rework the run by changing the number of steps, then recalculate exact riser heights so all risers in that run stay within the allowed maximum and within the required consistency range (small variation only). Avoid mixing riser heights to “fix” one step, because stairs fail inspections and create uneven footing problems even if the overage feels minor.
Can I use a different tread depth than the typical 10 inches minimum if my space is tight?
If available space forces tread depth below the minimum, you need to redesign the run, for example increasing landing depth, adjusting the overall step count, or changing the layout instead of shrinking treads. Anything undersized increases slip risk and makes the step feel cramped, especially on wet exterior surfaces.
How can I tell whether my landing depth is enough without guessing the door opening angle?
After planning the rise and step run, dry-fit the landing and place marks on the wall side to show where each door panel lands at full open. Confirm that both panels can open to about 90 degrees without the door contacting any tread nosing. If you cannot physically swing the doors through, your landing is too shallow or the step edge is too far into the clearance zone.
What if the patio is already built, and I can’t change the finished patio grade height?
Then you adjust the stair build to hit the threshold clearance rather than regrading the patio. Measure from the threshold down to the finished surface again, compute your exact riser heights, and verify the top step ends where you planned before pouring or setting pavers. If the step surface ends up too high, you generally have to lower the steps, because raising the threshold is usually not a simple retrofit.
How important is the 1/4 to 1/2 inch clearance between the threshold and the first step?
It matters because too tight can cause scraping and premature weatherstrip damage, and too much can create airflow and water leakage paths. Use a tape measure with the doors opened fully to confirm the gap works with normal door compression. If you already built steps and discover scraping, avoid “forcing it” by loosening hardware, the fix is to adjust the step height or threshold alignment.
Should I caulk around the door frame where it meets the step or landing surface?
You should not seal over or block the drainage pathways that let water exit. Focus caulk on areas that do not interfere with weep holes, sill pan drains, or the WRB flashing layering. If you are adding trim or reattaching siding near the threshold, use flexible exterior sealant rated for exterior wood or masonry contact, and keep drainage paths open.
How do I prevent exterior steps from settling or tipping even if I use gravel base?
The key is lift-by-lift compaction and correct base depth, not just adding “some gravel.” Compact in 2 to 3 inch lifts with a plate compactor, confirm the base is stable before setting blocks or steps, and keep the base pitched outward so water drains away. If you skip compaction or leave soft spots, the first winter can start the cracking and rocking.
Do I need footings below frost depth for a small precast step set?
Only if the conditions require it, which depends on climate, step weight, and whether the assembly will be significantly load-bearing. In mild areas a well-compacted gravel base can work with heavy precast units, but in hard-freeze regions footings may be necessary to prevent frost heave. When in doubt, verify frost depth and permit requirements with your local building department.
What’s the easiest way to check tread pitch after installation?
Use a level and measure at two points across each tread from back edge to nosing, verify it pitches outward slightly. Aim for a small forward pitch, about 1/8 inch per foot, and correct any tread that is flat or pitches backward before the mortar cures or before final surface finishes lock everything in.
Are handrails really required if I only have two or three steps from French doors to patio?
Handrails are required by code when there are four or more risers, but adding a grab rail can still be worthwhile for comfort and safety. If you install one, anchor posts into the step structure or into properly sized footings, not just into the surface. A wobbly post is worse than no rail because it reduces user trust.
What slip-resistance upgrades work best on outdoor concrete and pavers?
For sealed concrete or painted surfaces, use a non-slip additive (like silicon carbide grit) or switch to a broom-finished texture. For pavers, use grip tape on high-wear nosing sections if the design allows it, and keep the nosing edge texture and contrast visible. Also confirm you have the correct nosing overhang so the leading edge is not slick or unprotected.
Next Article
Patio Steps From Sliding Door: Fix Uneven, Drafty Entry
Step-by-step fixes for uneven drafty patio steps from a sliding door, including leveling, drainage, and threshold alignm