If your sliding glass door is dragging, sticking, rubbing the frame, or letting in drafts and water at the threshold, there's a good chance the problem starts outside, with the landing or step the door opens onto. A sunken, uneven, or crumbling patio landing throws off the entire door system: the track tilts, the rollers bind, the weatherstripping gaps open, and suddenly a door that used to glide stops working right. The fix involves leveling or rebuilding that landing, adjusting your track and rollers, and sealing the threshold properly. This guide walks you through each part in sequence so you can solve it today.
Sliding Glass Door Steps to Patio: DIY Fix Guide

Jamie Archer
24 May 2026
Quick safety check and tools you'll need
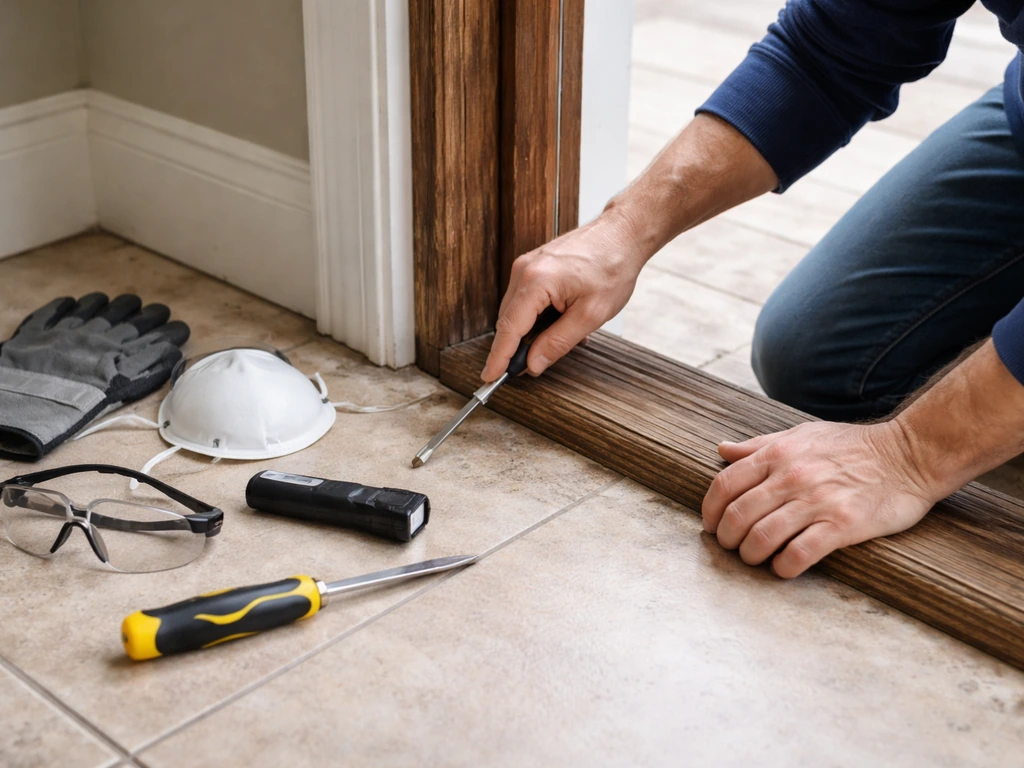
Before you touch the door or step, do a quick walk-around safety check. Look for any rot in the door frame or sill, press a screwdriver into the wood at the corners and bottom of the frame. Soft spots mean structural damage that goes beyond a DIY patch. Check whether the patio slab or landing has sunk more than about an inch relative to the door sill; if it has, water has likely been sitting against the framing, and you need to confirm there's no rot or damaged flashing before you do anything else. Also check that the door is still on its track before you start moving it. Lowe's notes that a patio door can go off track easily during diagnosis, so handle the panel gently.
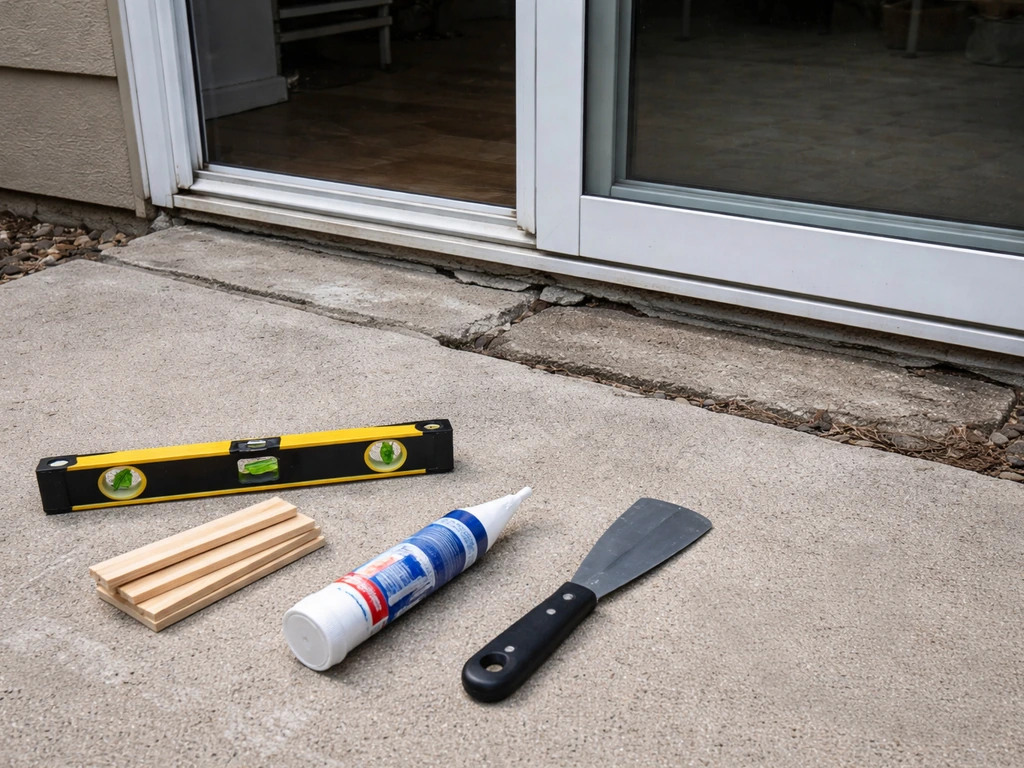
Gather everything before you start. Having to stop mid-job because you're missing a tool is how small projects turn into weekend disasters.
- 4-foot level (and a short torpedo level)
- Tape measure
- Flat-head and Phillips screwdrivers (for roller adjustment screws)
- Pry bar and hammer
- Cold chisel and angle grinder or rotary tool (for concrete work)
- Margin trowel and mixing bucket
- Polymer-modified concrete repair mortar (such as a freeze-thaw-rated product like Patchwell or MEADOW-PATCH T2)
- Exterior-rated elastomeric caulk or polyurethane sealant (ASTM C920-compliant, such as a 1-component polyurethane like Sikaflex-211)
- Door sweep and/or replacement weatherstripping
- Safety glasses and work gloves
- Knee pads (you'll be on the ground more than you expect)
Measure and confirm the current threshold and track setup
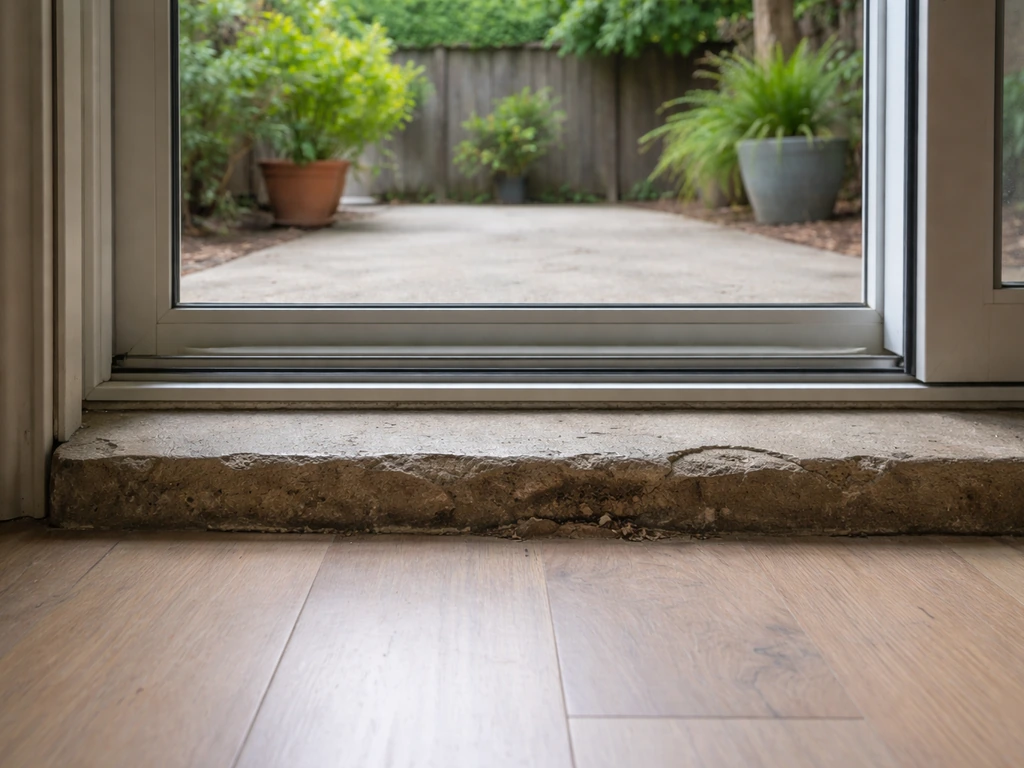
Take the guesswork out by measuring the actual condition before you start tearing anything apart. Lay your 4-foot level along the top of the track from left to right and check the bubble. Then set it lengthwise, front to back, across the threshold to see if it tilts toward or away from the house. Note which way it's off and by how much, even a 3/8-inch drop over 4 feet is enough to make a sliding door bind. Next, measure the height from your door sill (the bottom of the door frame) down to the patio surface at the edge of the track. Most sliding glass doors are designed with the finished patio surface sitting at or just below the bottom of the door track, typically within about 1/2 inch. If your patio has settled 2 or 3 inches below that, the door panel is hanging at the wrong angle relative to the frame.
Also check the track itself for debris, cracks, and warping. Run your finger along the track channel, grit, concrete dust, and old caulk chunks are common culprits for sticking. Look at the weep holes on the exterior face of the threshold (small slots that drain water out). Pella's installation guides stress that weep holes must be open and functional; if yours are packed with dirt or were accidentally filled, water backs up behind the threshold and accelerates rot and freeze-thaw damage. Clear them out with a toothpick or thin wire before you do anything else. Finally, note which type of step situation you have: a concrete landing, a wood deck landing, or a direct drop from the threshold to the ground. Each calls for a slightly different fix, though the measurement and door-adjustment steps are the same.
Fix uneven or worn steps and add a proper patio landing

The goal here is a solid, level surface that brings the patio up to within a half inch below the door sill, so the track sits at its intended angle and water sheds away from the house (slope the surface about 1/8 inch per foot away from the door). How you get there depends on what's there now. These steps from sliding door to patio help you diagnose and fix the landing so the track stays level and water sheds correctly.
Patching or releveling a concrete landing
If the slab is cracked or has sunk only slightly, a polymer-modified concrete resurfacer handles this well. Products like MEADOW-PATCH T2 or Patchwell are specifically engineered for exterior, freeze-thaw environments and will bond to the existing slab without popping off in winter. Chisel out any loose or crumbling concrete to solid material, clean out dust, dampen the area, and mix your repair mortar according to the bag instructions. Feather it in with a margin trowel so the high point meets the target height. Allow at least 24 hours to cure before exposing it to moisture or foot traffic, DAP's guidance for similar repair mortars specifies that minimum wait, and skipping it means a soft surface that chips out fast. If the slab has sunk severely or cracked in multiple sections, you're looking at either mudjacking (pumping grout under the slab to lift it) or removing and replacing the landing, both are worth getting a quote on rather than patching over.
Building or adjusting a wood deck landing
If your door exits onto a wood deck or wood-framed landing that has sagged, the most common cause is a rotted ledger board or settling post. Check each post and beam for soft spots. If it's just the decking surface that's worn or cupped, replacing individual deck boards and shimming the joist below the threshold area can bring you back to level. Use pressure-treated lumber rated for ground contact anywhere near the soil, and make sure the finished deck surface still slopes slightly away from the door. One caution: rebuilding or significantly modifying the landing near the door frame can affect how the door's sill pan and flashing drain. Viwinco's installation guidance is clear that you never want to trap water between the sill pan and threshold components, so after any landing work, confirm your sill pan still has a clear drainage path to the outside.
Adding a step where there isn't one
Some older homes have sliding glass doors with a significant drop straight to a patio or yard, no step at all. If you're adding a landing or a step pad here, the same rules apply: finish height should be within about 1/2 inch below the door sill, and the surface must slope away from the house. A simple precast concrete step unit or a poured concrete pad works well. Keep the step at least as wide as the door opening so there's no awkward edge to navigate. If you're also considering French doors or other door types with step requirements, the ideal landing dimensions are similar but the threshold height and clearance requirements differ, something worth checking if you're doing a bigger renovation.
Level the track and align the sliding panel
Once the landing is solid and level, recheck the track. If the track was shimmed or caulked during original installation to compensate for an out-of-level slab (common in older installs), you may need to re-shim or re-caulk after your landing work. Before adjusting the door panel, clean the track thoroughly, vacuum out debris, wipe down the channel, and check for any physical damage to the track extrusion. A bent or gouged track section will defeat any amount of roller adjustment.
Adjusting the rollers
Most sliding glass doors have two adjustment screws, one at each end of the bottom of the panel, often hidden behind small plugs. Pella's installation instructions and Andersen's hardware adjustment guides both describe removing these plugs to access the roller adjustment screws. On Andersen gliding patio doors, turning the screw clockwise raises the panel; counterclockwise lowers it. Pella uses the same directional logic. The goal is to set the panel so its reveal (the gap between the panel edge and the door frame) is equal top and bottom on both sides. Pella's vent panel adjustment instructions are specific: if the reveal is not equal, adjust the appropriate roller until it equalizes. Move the panel to within about 1/2 inch of the locking jamb first, then adjust so the gaps are parallel. After adjustment, reinstall the hole plugs to keep weather and debris out of the roller cavity, both Pella and Andersen flag this step in their guides.
If the door still won't roll smoothly after adjustment, the rollers themselves may be worn or flat-spotted. Lowe's DIY troubleshooting makes the same distinction: if turning the adjustment screws doesn't fix the bind, inspect the rollers for wear. Lowe's DIY troubleshooting notes that if adjustment screws do not resolve the bind, the rollers themselves may be worn or in need of inspection if turning the adjustment screws doesn't fix the bind, inspect the rollers for wear.. Replacement rollers are model-specific, so have your door's brand and series number ready. Andersen and Pella both sell replacement hardware through their parts programs. Don't substitute generic rollers without confirming they match the load rating and profile of the originals.
Weatherproofing at the threshold
This is the part most DIYers skip, and it's why drafts and water come back. After any landing, track, or roller work, the threshold seals need to be checked and often replaced. There are three zones to address: the sweep on the bottom of the door panel, the weatherstripping around the panel perimeter, and the exterior caulk joint between the door frame and the house.
Door sweeps
Sliding patio doors don't use a traditional door sweep the way a hinged door does, but many have a pile weatherstrip or vinyl fin at the panel bottom that drags lightly on the track and blocks air. If yours is flattened, torn, or missing, replacing it is a 20-minute job. The Building America Solution Center lists common sweep types including brush/pile sweeps, snap-in kerf types, and vinyl adhesive types. For sliding glass doors, pile or brush weatherstrip pressed into a kerf slot along the panel bottom is most common. The fit rule from Duck Brand's installation guidance applies regardless of sweep type: the seal should just make contact with the threshold surface when the door is closed, not compress so hard it drags.
Exterior caulking
The caulk joint between the door frame and the house cladding is a major air and water infiltration point, especially after any movement from landing settlement. PNNL's building science guidance is clear that inadequate or failed flashing and weatherstripping is the leading cause of water entry at exterior doors. Cut out any cracked or loose caulk with a utility knife, clean the joint, and apply a fresh bead of ASTM C920-compliant exterior sealant. A 1-component polyurethane sealant like Sikaflex-211 handles joint movement well and is UV-resistant, important for a south-facing door. Andersen's installation materials guidance recommends using manufacturer-tested sealant products rather than generic substitutes, which is worth following if your door is under warranty. Apply the bead in one continuous pass and tool it smooth immediately.
Sill pan and weep holes
If any landing work exposed or disturbed the door sill pan (the sloped tray that sits under the threshold and directs water out), inspect it for cracks or gaps. Pella's installation instructions describe the correct sill pan approach and note that if weep holes have been cut away or blocked, you should drill new ones to restore drainage. Viwinco's installation guide reinforces the same point: water must never be trapped between the pan and threshold. If the sill pan itself is damaged beyond simple caulking, that's a situation where you want a pro involved, it's tied directly into the house's water-resistive barrier.
Troubleshooting common problems after the fix
Even after doing everything right, a few issues come up regularly. Here's how to diagnose them by symptom.
| Symptom | Most Likely Cause | Fix |
|---|---|---|
| Door still sticks or drags at one end | Roller on that end is too low, or track debris remains | Readjust that roller clockwise to raise; reclean the track channel |
| Door rubs on the top frame or header | Panel raised too high by over-adjustment | Back off both rollers counterclockwise slightly until clearance returns |
| Unequal gap (reveal) along panel edge | Rollers set at different heights | Equalize reveal by adjusting the lower roller up until gaps match |
| Lock latch won't engage or is hard to throw | Panel is misaligned relative to locking jamb | Move panel within 1/2" of locking jamb, re-equalize rollers, recheck latch keeper alignment |
| Draft at threshold after new landing | Pile weatherstrip worn or sweep not contacting track | Replace pile weatherstrip; confirm sweep just kisses threshold surface |
| Water at interior threshold after rain | Weep holes blocked or caulk joint failed | Clear weep holes; recaulk exterior frame joint with ASTM C920 sealant |
| Screen door not tracking after work | Landing height change shifted screen track position | Adjust screen door rollers per manufacturer guide; check screen panel reveal |
One note on the lock: if the latch keeper (the strike on the door frame) is physically out of position after a roller adjustment, you can usually loosen the keeper screws and shift it up or down to meet the latch. Pella's owners manual troubleshooting covers this as part of the door's operational alignment checks. Screen doors are worth checking separately after any threshold work, Pella's screen door guidance includes leveling the screen panel within its track, and a landing height change can throw off a screen door that was previously fine.
Keeping it running well and knowing when to call a pro
A sliding glass door at a patio needs about 15 minutes of maintenance twice a year. In spring, vacuum the track channels, wipe them down, and apply a silicone-based lubricant (not WD-40, which attracts dirt) to the track. Check the pile weatherstrip and replace it if it's flattened. Run a bead of caulk over any spots where the exterior seal has cracked. In fall, clear the weep holes and recheck the threshold for any gaps that opened over summer. Check the landing surface for new cracks before freeze-thaw cycles start, and patch them with a freeze-thaw-rated mortar before water gets in and expands them.
Call a professional when any of these are true: you find soft or punky wood in the door frame, sill, or surrounding framing when you press a screwdriver into it; the door frame has visibly racked or moved out of square and roller adjustment no longer gets a parallel reveal; the sill pan is damaged and requires removing the door from the opening to replace it; the concrete landing has sunk more than 2 inches and mudjacking or full slab replacement is needed; or the door is still under the manufacturer's warranty and the work required would void that coverage. Simonton's warranty, for example, explicitly excludes modifications not in accordance with their installation specifications, and Andersen ties warranty coverage to proper installation and adjustment procedures. If you're in doubt about whether your planned work crosses that line, a quick call to the manufacturer's tech support line is worth it before you start. For major structural settling where the house itself has moved, you're into foundation territory and that's a structural engineer conversation, not a patio door adjustment.
FAQ
Can I fix sliding glass door steps to patio problems by only shimming the door track?
Yes, but only if you also restore the correct drainage relationship under the threshold. If you shim the track or add height without checking the sill pan and weep-hole function, you can end up trapping water behind the sill components, which leads to faster rot and freeze-thaw damage.
How high can I build up the patio landing without breaking the door’s operation?
Before adding any material, confirm whether the door sill is designed to sit slightly above or within the patio finish. A common safe target is the same concept described in the guide (finish surface near the intended height), and you should avoid raising the landing so much that the door sweeps drag hard or prevent proper latch engagement.
What’s the best caulk to use around a sliding glass door frame to stop drafts and water?
No. Silicone caulk is often used on joints, but at exterior door penetrations and moving gaps you generally want a sealant that stays flexible and bonds well to masonry and trim (the guide mentions ASTM C920-compliant exterior sealant). If you patch with the wrong caulk, it can peel and open during freeze-thaw.
My door still drags after adjusting the rollers, what should I check next?
If you still have sticking after roller adjustment, check for a physical mismatch like a bent track section or damaged extrusion, and inspect for debris and hardened caulk in the track channel. Worn or profile-mismatched rollers are the next likely cause, but you should not replace rollers without first verifying the track is straight and clean.
Do I need to re-adjust the sliding glass door after leveling or resurfacing the patio step?
Seasonal movement can change the reveal and latch alignment, so after any landing repair you should re-check alignment and the sweep weatherstrip contact. If the door gets noticeably worse in winter than summer, prioritize weep-hole clearance, sill pan inspection, and making sure the weatherstrip is not over-compressed.
Will fixing the patio landing affect the screen door too?
If you have a screen attached to the sliding door, landing-height changes can misalign the screen track or change the screen’s clearance. After you finish the threshold and roller work, roll the patio door and then check the screen panel for rubbing, sticking, or uneven gaps in its own track.
What are signs that my landing repair made the patio door angle wrong?
Yes, especially if the patio surface slope causes the door to open with a different resting position. If the door must be lifted to close, or the latch does not fully seat, stop and re-measure the patio finish height and track level, because forcing closure can prematurely wear rollers and weatherstripping.
What’s the most common mistake when adding a step pad or resurfacing near the sill pan?
You should avoid installing a step pad or resurfacing layer in a way that blocks water paths. The key decision is keeping the sill pan drainage route and exterior discharge area clear, including restoring or drilling functional weep holes if anything was disturbed during landing work.
When should I stop patching and switch to mudjacking or replacement for patio landing problems?
If the landing has sunk more than about 2 inches, the guide flags mudjacking or full replacement as the right path rather than patching. That threshold matters because repeated settling will break resurfacer bonds and reopen the threshold gaps quickly.
How can I confirm whether DIY step or threshold changes will void my sliding door warranty?
If your door is under warranty and the required work would be out of spec, you should check with the manufacturer first. A practical step is to gather the door brand, series number, and documentation of your measurements, then ask whether the landing height change and any sill pan adjustments you plan could void coverage.
Next Article
Steps From Sliding Door to Patio: DIY Fix Checklist
Fix uneven steps at a sliding door patio with a DIY checklist: inspect tracks, rollers, threshold, sealing, and alignmen