To seal a patio door for winter, you need to work through four things in order: adjust the door's rollers so it actually closes tight, replace or add weatherstripping along the frame and meeting rail, install a door sweep or threshold seal at the bottom, and caulk any remaining gaps around the exterior perimeter. If you're wondering how to seal patio door gaps, start by adjusting the rollers and making the door close evenly, then move on to weatherstripping, a sweep, and caulk. Skipping straight to caulk without fixing alignment first is the most common mistake, and it's why so many people re-do this job every year.
How to Seal a Patio Door for Winter: Step-by-Step

Jamie Archer
17 Jun 2026
Why patio doors leak in winter
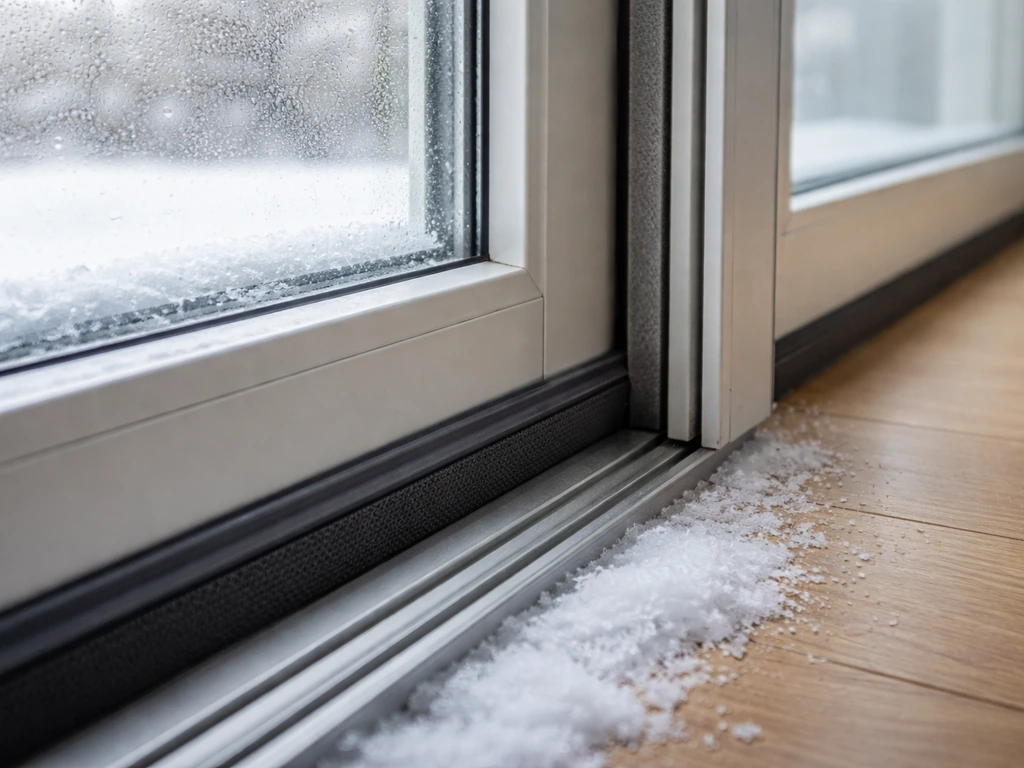
Sliding patio doors have more potential leak points than a standard hinged door, and they tend to develop drafts gradually so you don't notice until cold air is visibly rolling in across the floor. There are four main culprits to check.
- Frame perimeter caulk: The sealant between the door frame and your exterior wall shrinks, cracks, and pulls away over time. Even a hairline gap here becomes a serious cold-air entry point in winter.
- Weatherstripping along the sides and top: The vinyl or foam strip that compresses when the door closes gets compressed flat, torn, or coated in grime. Once it loses its springback, it stops sealing.
- The meeting rail: On a two-panel sliding door, this is where the moving panel meets the fixed panel. It's the single most overlooked draft source because it sits in the middle of the door unit, not at the edge.
- The threshold and sweep area: The bottom of the door either has a sweep that drags on the sill or a threshold pile seal. Both wear out, and a worn sweep lets cold air funnel straight under the door.
- Weep holes: These small drainage slots in the bottom track exist to drain water out of the door frame. If they're clogged with debris or accidentally sealed with caulk, water backs up inside the track and can seep inside during winter rain and snowmelt.
Alignment shift is the hidden cause that makes all of the above worse. As a house settles over years, the door frame can rack slightly, and the door panel itself drops if rollers wear down. A door that sits even 1/8 inch lower than it should won't compress the weatherstripping properly no matter how new it is. That's why adjustment comes before sealing. If adjustment is what needs fixing first, then learning how to stop patio door from leaking will help you seal the remaining gaps after the frame and rollers are set.
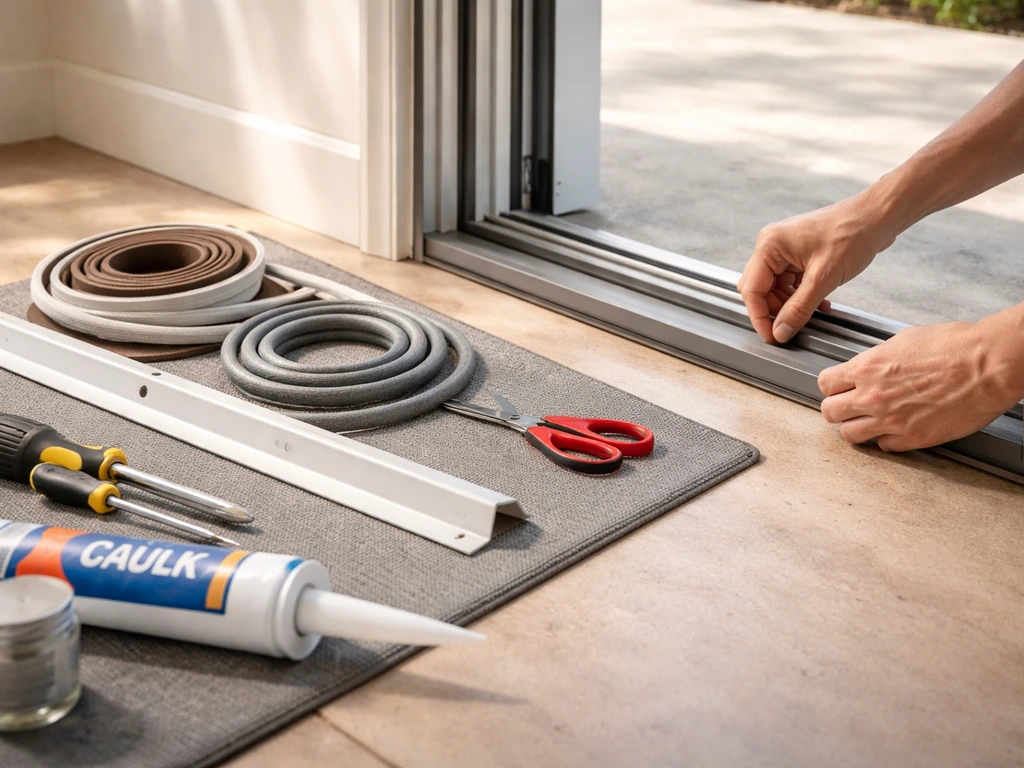
What to buy before you start
Get everything together before you pull out the old weatherstripping. There's nothing worse than having the door half-stripped in December. Here's what you'll need:
- Exterior-grade silicone or polyurethane caulk (not latex paintable caulk, which shrinks too much outdoors)
- Foam backer rod in the appropriate diameter (use this in any gap wider than about 1/4 inch before caulking so the caulk doesn't sink and fail)
- Replacement weatherstripping: compression-style vinyl or rubber for the door frame sides and top; brush-pile or foam for the meeting rail
- Door sweep or threshold seal: rubber or brush-style depending on your threshold design
- Spray foam in a minimal-expansion can (for any large gaps at the rough opening behind the door casing, if needed)
- Phillips and flathead screwdrivers for roller adjustment access plugs
- Utility knife and scissors for trimming weatherstrip to length
- Rubbing alcohol or acetone for cleaning surfaces before applying adhesive-backed strip
- A candle or incense stick for draft testing
- A flashlight
Budget-wise, a full weatherstripping and caulk job on a single sliding door typically costs $20 to $60 in materials if you're just replacing worn parts. If you need a new threshold seal assembly or professional-grade brush sweep, add another $15 to $40. The job takes about 2 to 3 hours start to finish.
Adjust the door first, this step changes everything
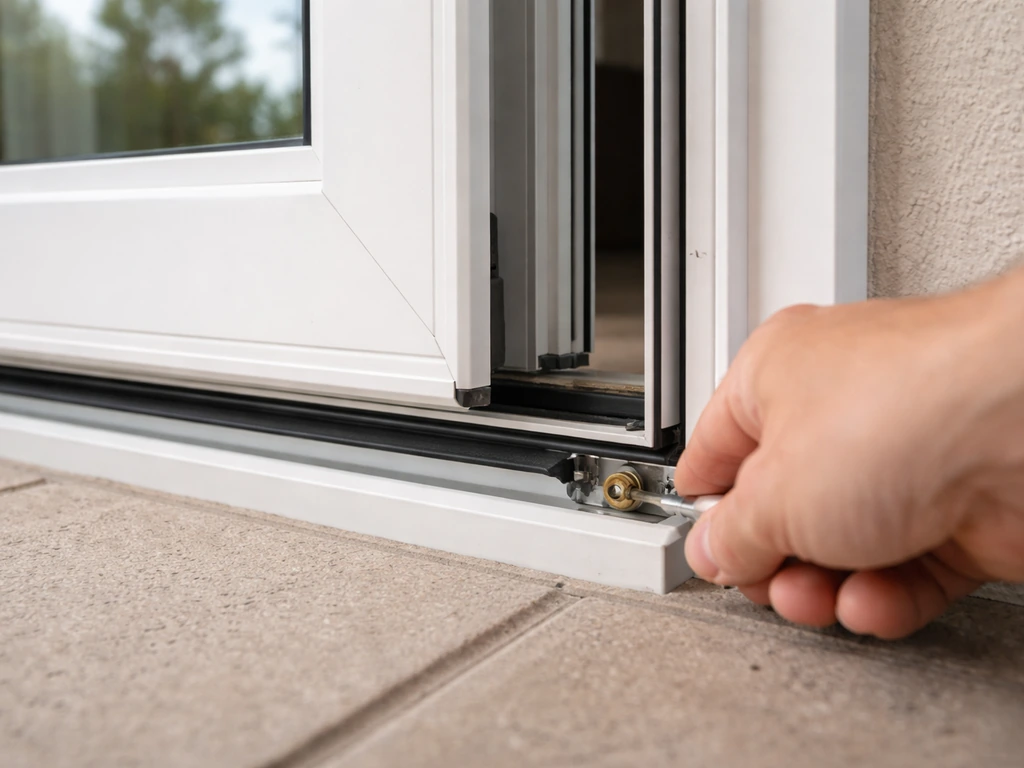
Before you touch a tube of caulk or a roll of weatherstrip, check whether the door is sitting at the right height and closing evenly. Once your patio door seals properly, you can focus on the fun part like how to decorate a patio door for Christmas. A sliding glass door hangs on two rollers underneath the panel. Those rollers have adjustment screws, usually accessible through holes or plugs in the bottom edge of the door frame or through the edge of the door itself. The procedure is straightforward but takes patience.
- Open the door fully and look at the gap between the top of the door and the top track. It should be even across the width — roughly equal from left to right. If it's wider on one side, that side needs to be raised.
- Find the roller adjustment plugs or access holes on the bottom rail of the door (consult your door brand's guide if needed — Andersen, MILGARD, and most major brands place them at each bottom corner). Pop out the plastic plugs with a flathead screwdriver.
- Insert a Phillips screwdriver into the adjustment screw. Turn clockwise to raise that corner, counterclockwise to lower it. Work in small increments — quarter turns at a time — and slide the door back and forth after each adjustment to check for smooth movement and even reveal.
- Once the top gap looks even, close the door and check how tightly it meets the frame on all sides. You should feel slight resistance as the weatherstripping compresses. If you can press the door inward with your finger and see light, it's still sitting too low or the weatherstrip is gone.
- Re-insert the adjustment plugs when done.
Also check the lock and latch while you're here. If the door latch requires lifting the handle hard or forcing it closed to engage, the latch receiver (the strike) may need repositioning, or the door height adjustment isn't quite right yet. A door that doesn't latch fully won't compress the meeting rail seal, which is a major source of drafts right in the center of the door.
Step-by-step: seal the frame perimeter and gaps
Once the door is adjusted and closing properly, work your way around the exterior perimeter caulk joint first, then move inside to the weatherstripping.
Exterior caulk at the frame
- Go outside and inspect the joint where the door frame meets the house siding or exterior wall. Run your finger along it. Cracked, peeling, or missing caulk gets removed completely with a utility knife or caulk removal tool — don't just caulk over old failed material.
- Clean the joint with a dry cloth and let it dry. If the gap is wider than about 1/4 inch, press foam backer rod into it first so it sits about 1/4 inch below the surface. This gives the caulk a proper backing and prevents it from cracking as the gap flexes with temperature changes.
- Apply a steady bead of exterior silicone caulk and smooth it with a wet finger or caulk tool. Cut the tube at a 45-degree angle for better control.
- Do NOT caulk over the weep holes at the bottom of the door track. Those small slots need to stay open to drain water out. If you accidentally covered them in a prior year, clear them now with a toothpick or thin wire.
Interior frame weatherstripping
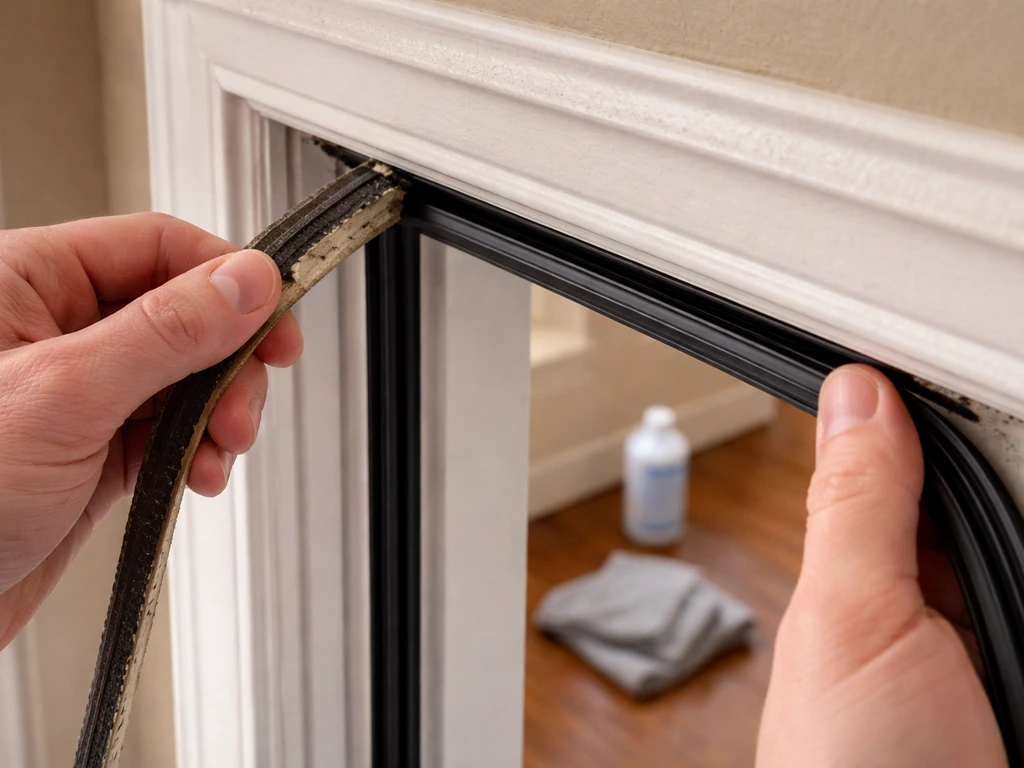
- Remove the old weatherstripping from the side jambs and top of the door frame. Most is held on by a channel or adhesive backing. Clean the surface with rubbing alcohol and let it dry fully.
- Cut your replacement compression weatherstrip to length — measure first, cut second, and make sure corners are mitered or overlap cleanly so there's no gap at the corners where the strips meet.
- Press compression-style (V-strip, foam, or rubber) weatherstripping into the channel or peel-and-stick it firmly along the frame. The strip should be on the frame, not on the door itself, so it compresses as the door slides closed and contacts it.
- For the meeting rail (center of the door where panels overlap), use a brush-pile or foam weatherstrip rated for sliding doors. This area needs a material that won't create drag or prevent the door from sliding freely.
Weatherstrip and sweep options: sliding glass door vs. screen door
The glass panel and the screen panel need to be treated differently. Nearly all of your heat-loss sealing effort should go toward the glass door. Here's a quick comparison of the main options and where they apply.
| Seal Type | Best For | Pros | Watch Out For |
|---|---|---|---|
| Compression vinyl/rubber strip | Glass door: side jambs and top | Good seal, durable, low drag on sliding | Loses compression over time; replace every 3-5 years |
| Brush-pile (mohair) weatherstrip | Meeting rail and screen door frame | Allows smooth sliding, good air seal | Collects lint/dust; check annually |
| Foam adhesive tape | Temporary fix or low-traffic areas | Cheap and fast to apply | Compresses permanently within one season; not a long-term fix |
| Door sweep (rubber blade) | Glass door bottom | Seals threshold gap well | Can drag and wear if set too low; adjust height carefully |
| Brush door sweep | Glass door bottom on uneven thresholds | Flexible, handles slight height variation | Check annually for matting of bristles |
| Screen door weatherstrip | Screen door perimeter (secondary seal only) | Reduces some airflow past the screen in mild weather | Screen does not provide meaningful thermal insulation; prioritize the glass door |
For the threshold sweep specifically: measure the door bottom width, cut the sweep 1/8 inch narrower than the opening so it doesn't bind at the ends, and fasten it with the provided screws. For the DS102 brush door sweep, the instructions include measuring, marking, and trimming the sweep length to full width, along with guidance for trimming the brush seal itself measure, mark, and trim the sweep length to full width. Adjust the height so the rubber or brush material makes firm contact with the threshold without dragging heavily, you want light resistance, not a door that's hard to open. If your threshold itself is cracked, damaged, or missing its insert seal, replacing it is worth doing now rather than patching around it.
Screen doors are largely a secondary concern for winter sealing. If your screen door sits in the outer track during winter, make sure it closes fully and its frame-edge weatherstrip is intact so it doesn't rattle or let air bypass the system. But don't spend more than 20 minutes on the screen if the glass door seal needs work, the glass door is doing all the real thermal work.
Test for drafts and fine-tune
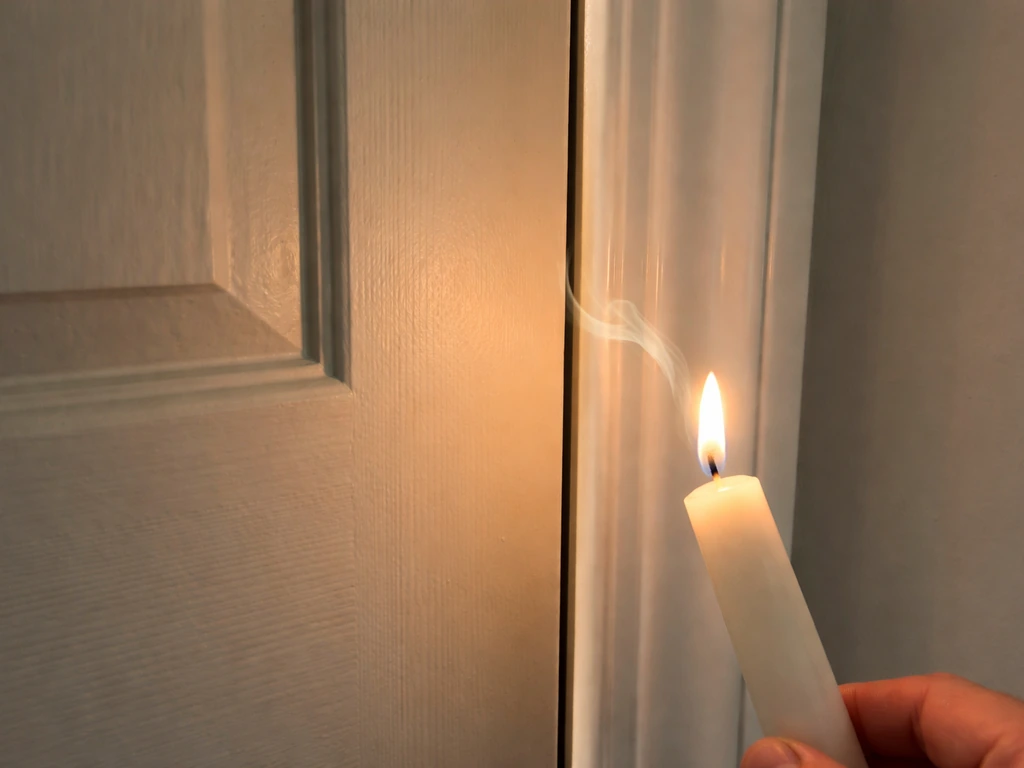
Don't assume the job is done until you've tested it. On a cold day, a simple candle or incense stick held near the door edges is your best diagnostic tool. Steady smoke or flame deflection tells you exactly where air is still moving. Work your way around all four edges, the meeting rail, the threshold, and the lock hardware. Air tends to come around gaps rather than through the door material itself, so follow the smoke to find the exact spot.
- Close and latch the door. Hold a lit candle or incense stick about an inch from the perimeter, moving slowly along each edge.
- Mark any spots where the flame flickers with a piece of tape so you can address them without losing track.
- Check the lock and latch area specifically — if air is leaking right at the latch hardware, the door may need another small roller adjustment so it closes more firmly against the frame at that point.
- Check the threshold area by running the back of your hand slowly along the bottom gap. Cold air flowing across the floor usually originates here.
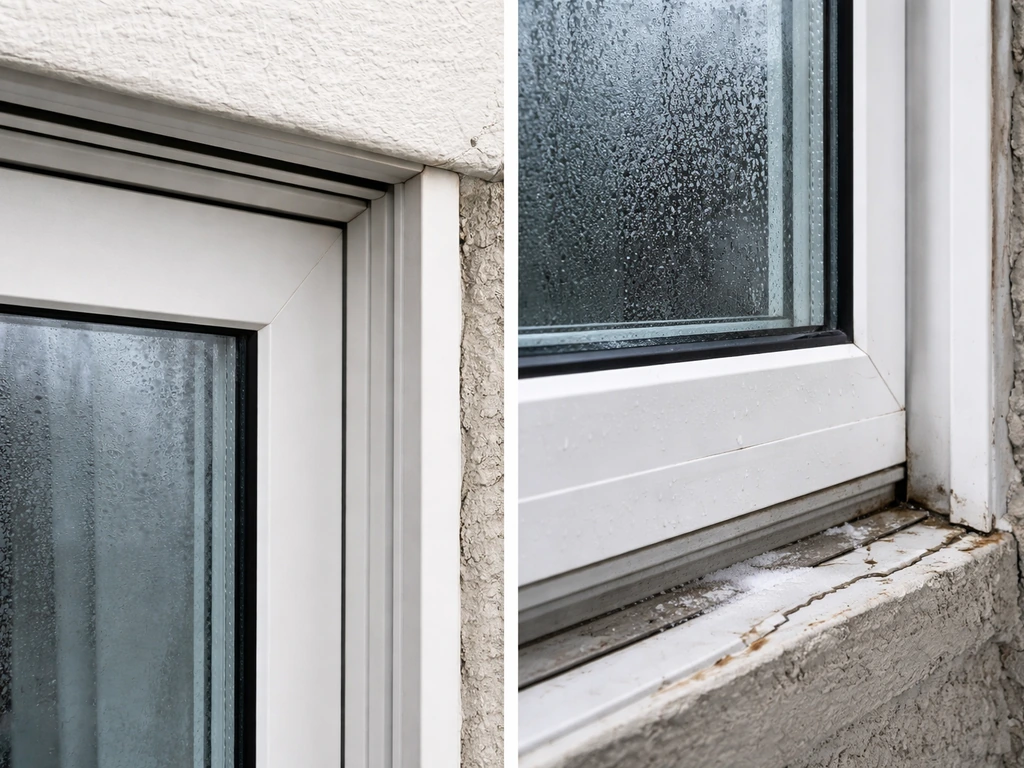
- If you feel cold spots through the glass itself (not the edges), that's a failed insulated glass seal, which is a separate issue. A fogged or condensation-filled glass unit means the argon gas fill has leaked out and the pane needs replacement, not weatherstripping.
After making any fine adjustments, re-test. Most doors need one round of small tweaks after the first seal test. Also recheck that your weep holes at the bottom track are clear by pouring a small cup of water into the track channel, it should drain out within a few seconds through the weep slots. MILGARD recommends cleaning weep holes on vinyl sliding patio doors as a quick maintenance step, about five minutes, to help the track drain water properly recheck that your weep holes at the bottom track are clear. If it sits there, clear the holes with a toothpick or thin wire before closing everything up for winter. Blocked weeps are a common cause of water damage at the sill, and they're a 5-minute fix now versus a costly rot repair later.
Keeping it sealed: maintenance and when a pro makes sense
A well-sealed patio door doesn't stay that way without some basic attention. Once a year, preferably in early fall before cold weather hits, run through a quick inspection: check the perimeter caulk for cracks, press on the weatherstripping to confirm it still has springback, slide a piece of paper under the door sweep to confirm it grips, and pour water in the track to verify the weep holes drain freely. Clean the track while you're at it, grit and debris accelerate roller wear and can push the door out of alignment.
If you find yourself re-doing the same seal every year, that's usually a sign of a deeper issue: rollers that are genuinely worn out and no longer holding the door at the right height, a warped or racked frame creating a gap no weatherstrip can fully bridge, or a threshold that's cracked and sunken. These are still often DIY-fixable, but they require replacing hardware rather than just resealing. Follow these steps to weatherproof a sliding patio door by adjusting, sealing, and testing for drafts.
Call a professional when you see any of these situations: the door frame or surrounding wall shows signs of water damage, rot, or mold (meaning water has been getting in long enough to cause structural issues), the door has visibly bowed or the frame is out of square by more than a small amount, the glass unit itself is fogged or cracked, or the roller adjustment screws are spinning freely without raising the door (meaning the roller housing is broken, not just adjusted). At that point, you're past maintenance and into repair or replacement territory, and a door specialist will save you time.
For broader winter preparation beyond sealing, the process overlaps with general winterizing, cleaning tracks, lubricating rollers with silicone spray, and inspecting hardware before the first freeze. And if you're dealing with active water leaking in during rain rather than just cold-air drafts, the diagnostic approach is somewhat different since rain intrusion is often more about the weep drainage system and exterior caulk than about weatherstripping. The good news is the materials and tools for both problems are nearly identical.
FAQ
Do I seal a patio door in “one go,” or should I do adjustments and sealing in stages?
Do it in stages. First set the door height so it closes evenly, then install or replace weatherstripping and the bottom sweep, and only then apply exterior caulk. If you caulk before the door compresses correctly, you can end up with a permanent gap that looks sealed but still drafts.
Should I remove the screen door weatherstripping or seal it for winter too?
Keep it intact and make sure the screen closes fully, but prioritize the glass door. Screen-door seals help with drafts in some layouts, yet they are often bypassed when the outer track alignment is off. If you notice rattle or a thin air gap at the screen edge, re-seat the screen and replace the screen-frame weatherstrip before adding more sealing effort.
What caulk type should I use around the patio door exterior perimeter for winter sealing?
Use exterior-grade sealant made for window and door joints, and apply it over clean, dry surfaces. If the perimeter area gets frequent rain, choose a sealant that stays flexible after curing so it can handle door-frame movement. Also, avoid filling large voids with caulk alone, use the right backing or repair first so the joint does not crack.
How do I know whether my drafts are coming from weatherstripping versus the threshold or lock area?
Test by smoke or incense at each section: meeting rail, lock strike area, threshold line, and the vertical frame edges. If smoke moves right at the latch receiver center, the door may not be closing fully or the strike position may be off. If it moves under the bottom rail or along the track edge, the sweep height or threshold condition is usually the cause.
My door is hard to close after installing a sweep. Is that okay?
A little resistance is normal, but heavy drag usually means the sweep is cut too wide or installed too low/high. Re-check that you trimmed it so it does not bind at the ends, and adjust the sweep height so the rubber or brush makes firm contact without scraping hard or preventing full closure.
Can I just add more weatherstripping thickness if I still feel drafts?
Not reliably. If the door is riding low or the frame is racked, thicker weatherstripping can compress unevenly, leave a high spot, and still leak at corners. Fix alignment and roller height first, then re-seal using the correct weatherstrip type and fit.
What if my weep holes won’t drain, even after I clear them?
If water still pools after clearing, you may have debris buildup deeper in the track, a misaligned or clogged drainage channel, or an incorrectly seated threshold insert. Clean the track thoroughly, verify drainage path with another water pour, and consider inspecting the threshold assembly rather than only patching caulk.
Should I lubricate rollers before or after I replace weatherstripping and caulk?
Do it before final testing and keep it separate from the seal work. Use silicone spray on rollers and lightly clean grit from the track first, since dirty rollers can keep the door from achieving the correct compression. After lubrication, re-check alignment and then proceed to sealing.
How often should I re-seal or re-check a patio door for winter?
Plan for a seasonal check, ideally early fall. Confirm caulk integrity (no new cracks), verify weatherstripping springback, confirm sweep grip with a piece of paper, and test drainage again if the door sees heavy rain. If you are redoing the same seal area every year, treat it as a symptom of worn rollers, a racked frame, or a failing threshold.
When is it not DIY?
Call a professional if roller adjustment screws spin without lifting the door, the glass is cracked or fogged between panes, the frame shows rot or structural water damage, the frame is clearly out of square beyond minor settling, or the door is visibly bowed. Those conditions usually require repair or replacement, not just sealing.
Next Article
How to Weatherproof a Sliding Patio Door Step by Step
Step-by-step DIY to weatherproof a sliding patio door, stop drafts and leaks by fixing seals, sweeps, track alignment