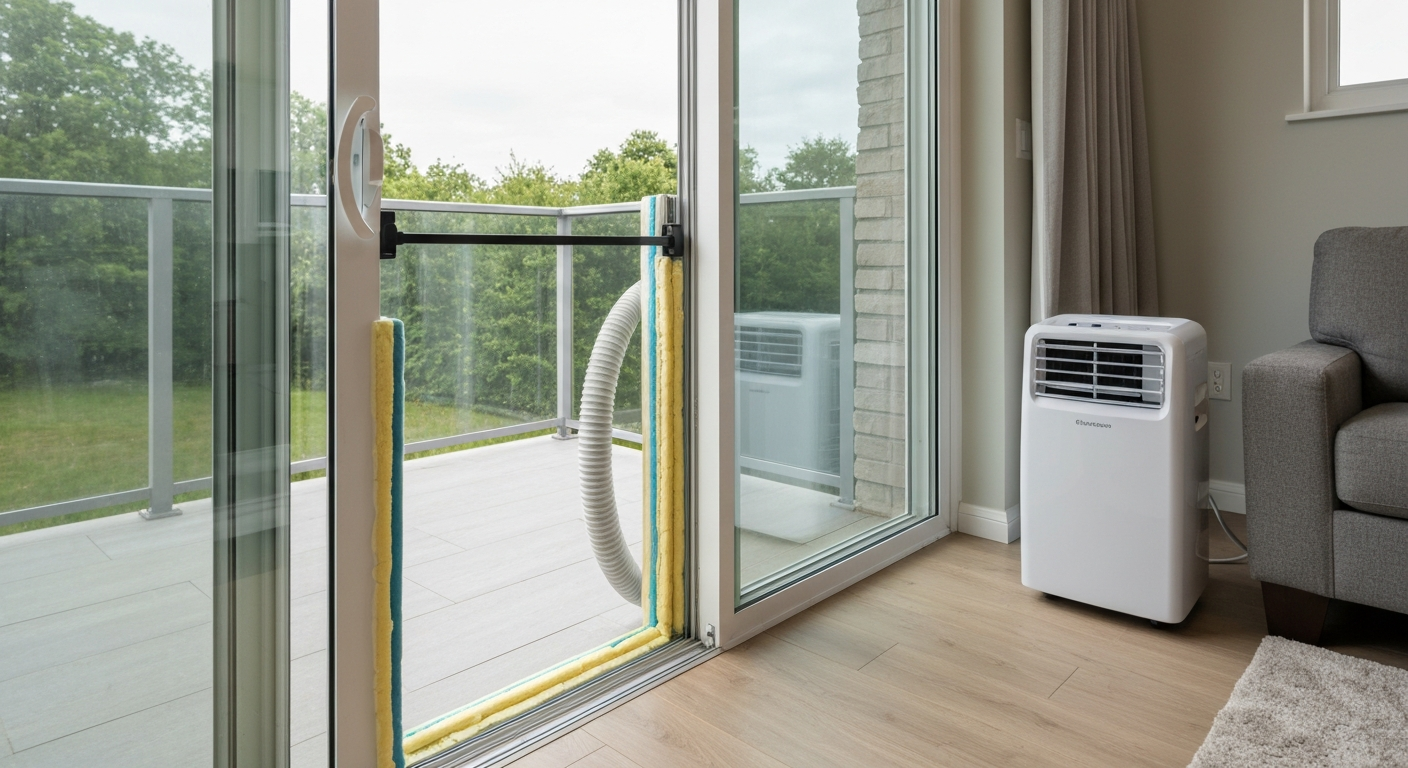
You can absolutely vent a portable air conditioner through a patio door. Slide the active door panel partway open, drop a telescoping vent panel (or a custom-cut insert) into the remaining gap, connect your AC's exhaust hose to the collar on the panel, seal the edges, and add a security bar so the door can't be pushed open. The whole job takes 30 to 90 minutes depending on whether you buy a ready-made kit or cut your own panel. This guide walks you through every decision and every step, from measuring the opening to troubleshooting condensation problems after the fact.
How to Install Portable Air Conditioner in a Patio Door

Jamie Archer
28 Jul 2026
Who this guide is for and what you'll walk away with
If you have a portable AC and a sliding glass door is your only realistic venting option, or you just prefer not to sacrifice a window, this is your guide. I'm assuming you're comfortable with a tape measure, a drill, and maybe a jigsaw if you go the custom-panel route. You don't need HVAC experience. By the end you'll know how to measure correctly, pick the right kit, install it safely in a sliding glass door, adapt the approach for French or hinged patio doors, handle drainage, and lock things down so your home stays secure while the AC runs.
Is a patio door the right place to vent your portable AC?
Patio doors work well for venting when you have no operable windows nearby, when the room you're cooling opens directly onto a patio or deck, or when your windows are all casement or crank-style and won't accept a standard window kit. They're also a solid choice for ground-floor rentals where you can't drill through walls.
That said, there are real trade-offs. A patio door vent panel blocks your door while the AC is running, which matters if you use that door to get in and out frequently. It also reduces natural airflow from the patio, which can feel claustrophobic in a living room. And a gap that large, even with a panel in it, takes more effort to seal tightly than a window slot does, so expect slightly more heat bleed-through around the edges if you're not careful with weatherstripping.
If you're cooling a bedroom and the patio door is in the living room, a window kit on the bedroom window may genuinely serve you better. If you're cooling the room that the patio door opens into, a patio vent is usually the cleanest solution. For rooms with double or single-hung windows, a standard window kit is quicker and seals better; for rooms where the only openings are sliding or French patio doors, follow this guide.
Safety, permits, and HOA rules, check before you start
For a temporary, removable vent panel that doesn't penetrate the door frame or wall structure, you almost certainly don't need a permit. The panel sits in the door track and comes out in a few minutes, no different legally from propping a window open. That said, there are three situations where you should pause and make a call before you proceed.
- HOA communities: Some HOAs restrict visible AC equipment or modifications to exterior-facing openings. A quick email or look at your CC&Rs saves a headache later.
- Rental units: Your lease may prohibit alterations or installations, even temporary ones. Check with your landlord first — most will say yes, but get it in writing.
- Permanent or semi-permanent panels: If you plan to caulk a panel in place, screw it into the door frame, or cut into any structural element, check your local building department. At that point it edges toward a modification that may require a permit.
- Through-wall venting as an alternative: If you're considering a sleeve through an exterior wall instead of using the door, that absolutely requires a permit in most jurisdictions and likely a pro. That's a different project entirely.
From a safety standpoint, the main concern with any patio door vent is security. A vent panel that fills the gap where your door used to close is only as safe as the locking mechanism you add. I cover this in the step-by-step section, but the short version is: always install a secondary security bar. Don't rely on the AC hose or the panel itself to prevent the door from being forced open.
Tools and parts you'll need before you start
Gather everything before you pull the AC out of the box. Mid-project hardware store runs are annoying and avoidable.
| Item | Notes / Specs |
|---|---|
| Measuring tape | 25 ft minimum; metric/imperial dual-read preferred |
| Pencil or marking pen | For tracing collar position on the panel |
| Telescoping vent kit (or custom panel material) | Kit: adjustable 25–95 in range; Material: 1/4"–3/8" acrylic or exterior plywood |
| Hole saw or jigsaw | Sized for your hose collar: typically 5.0" or 5.9" diameter |
| Drill and bits | For collar flanges and security hardware if needed |
| Foam weatherstripping tape | Closed-cell, 3/8" or 1/2" wide for panel edges |
| Exterior silicone or polyurethane caulk | For any fixed gaps; ASTM-compliant exterior grade |
| Aluminum foil HVAC tape | For sealing the hose-to-collar joint; avoid standard duct tape |
| Sliding door security bar | Telescoping steel bar sized to your door opening width |
| Safety glasses and gloves | Especially if cutting acrylic or plywood |
| Hose-diameter adapter (if needed) | 5.0" to 5.9" reducer; often included with dual-hose kits |
One note on hose sizes before you buy anything: most single-hose portable ACs from LG, Honeywell (MN10/MN12 family), and similar brands ship with a roughly 5-inch (127 mm) exhaust hose. Dual-hose Whynter models commonly use a larger 5.9-inch (150 mm) hose, sometimes with a 5.0-inch reducer included. Check your AC's manual for the exact diameter before ordering a vent kit, because getting the wrong collar size is the single most common purchasing mistake.
Measuring your patio door opening, what actually matters
Two measurements control everything: the height of the clear opening inside the door track, and the width of the gap you'll be filling once the sliding panel is moved. ApplianceTeacher, How to vent a portable AC through a sliding door (measurement checklist) recommends measuring both the clear vertical opening height inside the door track and the horizontal width of the reachable opening, and recording each dimension in inches and millimeters before buying a kit or fabricating a panel ApplianceTeacher — How to vent a portable AC through a sliding door (measurement checklist). Get both in inches and millimeters.
- Slide the active door panel to the position you'll operate it from when the AC is running. Most people slide it about 6–12 inches open — just enough to fit the vent panel but not so much that the gap is wastefully large.
- Measure the height of the opening from the bottom track floor to the top track ceiling. Write this down — this is your panel height. Standard sliding glass doors run 79–81 inches tall in the opening, but measure yours; older doors and custom sizes vary.
- Measure the width of the gap from the edge of the stationary door panel to the door frame. This is your panel width. Most telescoping kits adjust from 25 to 95 inches, so width is rarely a problem unless you have an unusually wide tri-panel door.
- Note the track channel depth (front to back). Most kits sit in a standard 3/4" to 1" deep track groove. If your track is unusually shallow or deep, you may need to add a lip or shim to keep the panel stable.
- Compare both measurements against the kit's listed min/max range. For example, some Whynter-compatible slider kits show a minimum width of about 22.1 inches and a maximum of 38.7 inches — if your gap is outside that range, find a different kit or go custom.
While you have your tape out, also note your hose routing path: how far does the AC unit sit from the door, and can you run the hose without a sharp bend or a vertical loop? Manufacturers consistently warn that sharp bends and excessive length kill cooling performance and can cause condensate to pool in the hose. Keep it as short and straight as possible, ideally under 6 feet with no more than one gentle curve.
Picking the right vent kit for your door
You have three realistic options: a purpose-built sliding-door vent kit, a modified window kit that shipped with your AC, or a custom-cut panel. Each suits a different situation.
| Option | Best For | Pros | Cons |
|---|---|---|---|
| Telescoping sliding-door kit | Standard 6 ft sliding glass doors, quick seasonal installs | No cutting required, reusable, includes collar and weatherstripping | Plastic panels are less rigid; may flex in wind; limited to kit's height range |
| Modified window kit (from AC box) | Situations where the door gap is within the kit's adjustment range | Already have it; saves money | Most window kits are too short for a full-height patio door; better for a partial-height gap only |
| Custom acrylic or plywood panel | Non-standard door sizes, long-term installs, better seal quality | Exact fit, rigid, can add insulation layer, paintable | Requires cutting tools, more prep time (1–3 hours), permanent feel |
For most homeowners with a standard 6-foot or 8-foot sliding glass door, a purpose-built telescoping kit is the right call. Look for one that explicitly lists both 5.0-inch and 5.9-inch collar compatibility (or includes an adapter), covers your measured height range, and includes foam weatherstripping tape in the package. Kits from brands like Gulrear and similar patio-door vent specialists advertise the 25–95 inch adjustable range with dual-size couplers, that covers the vast majority of residential sliding glass doors.
Door compatibility quick checklist
- Sliding glass door (single active panel): Best case — most kits are designed exactly for this
- Sliding glass door (double active panels): Works fine; just decide which panel you'll park open
- French/hinged patio doors: Requires a custom panel or a specialized hinged-door adapter kit (see the French door section below)
- Screen-only door: Not suitable for exhaust — screens have no rigid surface to mount a collar and won't stop heat re-entry
- Single-track vs. double-track: Measure track depth before ordering; deep-track doors may need a panel with a wider edge lip
Preparing the door and work area
A little prep goes a long way toward a cleaner, faster install. Start by sliding the door fully open and vacuuming out the bottom track. Grit and debris in the track will stop your vent panel from seating flush and create gaps that undercut your seal. This is also a good moment to check whether your door slides freely, if it sticks, drags, or rattles, the roller or track may need attention before you try to hold the door in a fixed position for the summer.
If there's a screen door on the exterior side of the opening, slide it out of the way or remove it entirely. Most screen doors lift straight up and tilt out from the bottom track, you don't need tools. Store it somewhere it won't get kicked or scratched while the AC is running. If the screen door is the only door (no glass panel), a patio-door vent panel won't work directly in that opening; you'd need to fabricate a rigid freestanding panel that spans the opening, which is a more involved custom job.
Lay a folded towel or a piece of cardboard along the bottom of the glass door panel where the exhaust hose might rest against it during install. Hose connectors can chip or crack glass if they're awkwardly dropped. It's a simple precaution and takes 10 seconds.
Step-by-step: venting through a sliding glass patio door
This procedure covers the most common setup: a single-track sliding glass patio door with a telescoping vent kit. Time estimate: 30–60 minutes for a first-time install. For more detail on typical timelines and the factors that affect them, see how long does it take to install a patio door. Difficulty: beginner to moderate.
Step 1: Position the sliding door panel
Slide the active door panel open until the gap equals your measured panel width plus about half an inch. You'll close it back against the vent panel in a moment, the small extra clearance just makes it easier to set the panel in without binding. Clean the track channel one more time if you haven't already.
Step 2: Assemble and adjust the vent panel
Interlock the telescoping panels according to the kit instructions and slide them to your measured height. The panel needs to sit snugly from the bottom track floor to the top track ceiling with no more than 1/4-inch play in either direction. If your kit came with foam tape pre-applied on the edges, leave the backing on for now. If it didn't come with foam, apply a strip of closed-cell foam weatherstripping to all four edges of the panel before you set it in the opening.
Step 3: Set the panel into the track
Tilt the panel slightly, insert the top edge into the upper track channel, then lower the bottom edge into the lower track groove. The panel should stand without being held. Slide the glass door panel closed so it rests flush against the vent panel edge. The door panel itself now holds the vent panel in the lateral direction, that's fine, but it's not your security solution.
Step 4: Peel and press the weatherstripping
Peel the foam tape backing and press firmly along every edge where the vent panel meets the door frame, the track, and the glass door panel. Run your hand along each joint and feel for air gaps. Any gap you can feel air through on a calm day will become a noticeable heat source when it's 90°F outside. Add a second layer of foam tape over any joint that doesn't close completely. Do not use expanding spray foam, it will bond the panel in place and make removal a nightmare.
Step 5: Attach the hose collar and connect the exhaust hose
Thread or snap the hose collar into the panel's cutout. If your AC uses a 5.0-inch hose and the collar is 5.9-inch, install the reducer ring now. Connect the exhaust hose to the collar and twist-lock it. Then connect the other end to the AC unit's exhaust port. Pull the hose taut enough to eliminate sags (sags trap condensate), but don't pull it so tight that it kinks. Wrap the hose-to-collar joint and the hose-to-AC joint with aluminum foil HVAC tape for an airtight seal. Standard fabric duct tape degrades quickly in heat, use the metallic foil type.
Step 6: Install the security bar
This step is not optional. With the door panel resting against the vent panel, fit a telescoping security bar across the interior of the door track, from the edge of the stationary door panel to the far door jamb. Adjust the bar so it fits snugly under light pressure, it shouldn't rattle, but you also shouldn't need a mallet to get it in. Some homeowners also add a top-of-frame sash pin or a keyed patio door lock for additional peace of mind, which is worth doing if the door faces a public area or a shared yard.
Step 7: Test the setup before calling it done
Turn the AC on, set it to cool, and let it run for 5 minutes. Then do the following checks: hold your hand around every panel edge and feel for warm air blowing back in; look at the exhaust hose for any obvious kinks or sharp bends; make sure the security bar hasn't shifted; and check that the door panel is fully closed against the vent panel with no gap at the top or bottom. If you feel warm air coming back through the panel joints, add more foam tape. If the hose is kinked, reposition the AC unit to give it a gentler angle.
Adapting the method for French and hinged patio doors
French patio doors (the kind that swing open on hinges) don't have a track you can drop a panel into, so the approach is different. For a visual, step-by-step walkthrough, watch a how to install French patio doors (YouTube) video that demonstrates cutting the panel, fitting the collar, and temporary fastening methods. You need a rigid custom panel that either fills one door's opening while the other door remains closed, or spans both openings. The panel is typically cut from 1/4-inch acrylic or 3/8-inch exterior plywood to match the door opening dimensions, fitted with a duct collar cut with a hole saw, and held in place with removable friction clips or hook-and-loop fasteners at the door stops, not screwed permanently into the frame unless you want a semi-permanent install.
For a single active door leaf: measure the clear width and height of one door opening, cut the panel to match with a 1/8-inch clearance on all sides, apply foam tape to the perimeter, and prop the panel into the open doorway. Lean it against the door stops on both sides and apply gentle clamping pressure with a few removable adhesive clips or a light bungee cord route to keep it from falling. The second door leaf remains closed and locked. This approach works but is inherently less secure than a sliding door with a track, so the security measure here is ensuring the other door leaf is fully locked.
Cutting acrylic sheet: use a fine-tooth jigsaw blade (at least 10 teeth per inch) and go slowly, acrylic melts and chips at high blade speeds. For blade selection and cutting-speed guidance when working with acrylic, see CraftLikeAPro, how to cut acrylic sheet with a jigsaw (materials and tool guidance) CraftLikeAPro — how to cut acrylic sheet with a jigsaw (materials and tool guidance). Clamp the sheet firmly and let the blade do the work. For the hose hole, a sharp hole saw at low drill speed works well; cool the bit periodically and don't force it.
Managing condensation and drainage
Portable ACs produce water as a byproduct of cooling, and how your unit handles that water affects whether you need to do anything beyond the initial setup.
- Auto-evaporation: Most modern single-hose units (many Honeywell and LG models) evaporate condensate into the exhaust stream automatically under typical conditions. In very humid weather, even auto-evaporation models may fill their reservoir — check the manual for your model's limits.
- Manual drain reservoir: Some units collect water in a tank you empty by hand. Position the AC so you can access the drain plug easily, and set a reminder to check it every 8–12 hours in humid weather.
- Continuous gravity drain: Some units have an upper drain port where you attach a small hose and run it to a floor drain or a bucket. Route this hose with a continuous downward slope — any uphill segment traps water and will eventually overflow the unit.
Whatever drainage mode your unit uses, don't run the exhaust hose in a way that creates a low-hanging sag between the unit and the vent panel. Condensate that forms inside the hose will pool in that sag and can drip back into the unit or onto your floor. Keep the hose elevated and angled slightly downward toward the exterior collar if possible.
Single-hose vs. dual-hose: does your setup affect the install?
Single-hose units exhaust hot air outside but draw replacement air from the room itself, which creates slight negative pressure and can pull hot outside air in through gaps around the panel. This is why a good seal matters more with single-hose units. Dual-hose units run a separate intake hose to pull outdoor air for condenser cooling, which avoids the negative-pressure effect and in real-room testing runs roughly 20–30% more efficiently. If you're using a dual-hose unit like most Whynter models, your vent panel needs two collar cutouts rather than one, and you need to confirm the panel kit supports dual-hose configurations. The install steps are otherwise the same; you're just routing two hoses through two collars instead of one.
Troubleshooting common problems after install
| Symptom | Likely Cause | Fix |
|---|---|---|
| Warm air blowing back into the room | Gap in panel seal or loose hose-collar joint | Add foam tape to gaps; re-wrap hose joints with foil HVAC tape |
| AC works but room barely cools | Kinked or over-extended exhaust hose; poor room sealing | Shorten hose run; seal other gaps in the room (under doors, etc.) |
| Water puddle under the AC unit | Condensate reservoir overfull, or hose sag trapping water | Empty reservoir; re-route hose to eliminate low sag |
| Vent panel rattles or falls | Panel too short for track height or foam tape too thin | Add shim strips; increase foam tape thickness on top/bottom edges |
| Door won't slide back after removing panel | Debris in track, or panel has deformed the track lip | Clean and vacuum track; check for bent track channel |
| Security bar keeps slipping | Bar diameter too small for track width | Replace with correct-sized bar; add non-slip rubber end caps |
When to skip the patio door and use an alternative
A patio door vent panel is a smart temporary solution, but there are cases where a different approach genuinely serves you better. If you find yourself removing and reinstalling the panel every single day because the door is your main entry point, the hassle will wear you down fast, a window kit in a less-used window will make your life easier. If you want a truly permanent, weathertight solution with no panel in the door, a through-wall sleeve installation is the right call, though that's a more involved project and almost always needs a permit and possibly a contractor.
If you're at the point of considering a through-wall installation or a full patio door replacement to accommodate a built-in AC sleeve, those are projects with their own complexity. Door framing, rough opening dimensions, and wall penetration all factor in, it's worth reading up on how patio door installation and wall openings work before you commit to that path. If you're preparing for a through-wall sleeve or replacement, see our step-by-step guide on how to install patio doors in a wall for details on door framing, rough openings, and wall penetration. If you're replacing a patio door or doing a through-wall sleeve, see our guide on how to install patio doors in a brick wall for details on framing, rough openings, and safe wall-penetration techniques. If you’re researching installing a patio door where a window was, see our detailed guide on converting a window opening to a patio door for framing, flashing, and structural considerations. If you're considering replacing the door, see our guide on how to install patio doors for detailed steps and measurements.
When to call a professional
The install described in this guide is genuinely DIY-friendly. Call a pro if: you need a through-wall duct penetration (structural concern, permits required); your door frame or track is damaged and won't hold the panel reliably; your patio door is in a rented commercial space with code-compliance requirements; or you're in a municipality that requires licensed HVAC work for any duct connection to a conditioned space. For a simple removable panel in a residential sliding glass door, you don't need a contractor.
FAQ
When is venting a portable air conditioner through a patio door the right choice?
Venting through a patio door is a good choice when the room lacks an accessible window at the right height or orientation, when you need a temporary/seasonal solution that avoids cutting a hole in the wall, or when the sliding‑door opening dimensions match available sliding‑door vent kits. It’s suitable for homeowners comfortable with basic carpentry and weatherproofing. Choose other options if you need a permanent, higher‑efficiency installation (through‑wall or replacing the door) or if the door opening cannot be effectively sealed, secured, or made code‑compliant.
What measurements and compatibility checks must I make before buying a vent kit or fabricating a panel?
Measure and record: (A) the clear vertical height where a panel would seat in the patio‑door track (inside track to threshold clearance); (B) the horizontal width of the reachable opening when the active door is slid open to the point you’ll install the panel; and (C) the distance from the AC unit to the door to estimate exhaust hose length needed. Check the kit’s stated minimum and maximum length range and hose‑collar diameter compatibility (most portable AC hoses are ~5.0"; some dual‑hose models use ~5.9" and kits may include reducers). Confirm the kit supports your door type (sliding vs hinged) and that the collar diameter matches your AC or you have an adapter.
What basic tools and materials do I need?
Essential tools: tape measure, pencil/marker, drill and bits, hole saw or jigsaw (fine‑tooth blade for acrylic), circular saw or jigsaw for plywood, utility knife, caulking gun. Materials/hardware: sliding‑door vent kit or panel material (1/4"–3/8" acrylic or exterior‑grade plywood), molded duct collar/adapter sized for 5.0"/5.9" hoses, closed‑cell foam weatherstripping, exterior‑grade silicone or polyurethane caulk, stainless/self‑tapping screws or knobs, exterior aluminum foil tape, hose clamps, and a security bar or lock bracket to secure the door. Optional: V‑strip, door sweep and small drip pan or drain hose for condensate.
Step‑by‑step: how do I install a portable AC vent in a sliding glass patio door using a commercially available sliding‑door kit?
1) Measure opening and confirm kit fits. 2) Slide the active door partially open to the intended position; assemble/interlock adjustable kit panels to match the opening length. 3) Seat the assembled panel into the door track so it closes against the fixed panel/track; ensure smooth operation of the remaining door panel. 4) Install the molded hose collar into the pre‑cut collar location on the kit (follow kit template and secure per instructions). 5) Attach the exhaust hose to the AC unit, keeping it as short and straight as practical; attach the hose to the panel collar with the provided adapter and clamp; seal the outside joint with foil tape. 6) Apply closed‑cell foam weatherstripping around the panel edges where they contact the door frame and use exterior caulk on any gaps that won’t be in moving joints. 7) Install the kit’s security hardware (tension/locking bar or bracket) so the sliding door cannot be opened against the panel. 8) Test door operation, hose route, and AC operation; check for air leaks and condensation routing.
How do I adapt the installation for hinged (French) patio doors?
For hinged/French doors, you typically fabricate a removable panel sized to fit the opening when one or both leaves are open or you use a custom framed insert. Use 1/4"–3/8" acrylic or exterior plywood cut to fill the doorway with an installed duct collar. Seal with foam weatherstripping and caulk to the jambs. If only one leaf opens, install the panel into the open leaf and secure it with temporary fasteners or a removable jamb bracket; ensure the other leaf is secured with its latch. Avoid blocking main door locks; use additional security like a door bar or sash pins. Ensure any fasteners do not damage door threshold or swing clearance.
What about screen‑only patio doors (no glass)?
Screen‑only doors usually have shallower frames and less secure tracks. Best options: (A) use a thin, lightweight rigid panel (acrylic) sized to fit the opening with a duct collar and foam seals; (B) build a framed insert that seats behind the screen frame (remove the screen or mount the panel outside the screen); (C) consider using a window‑slider kit installed above or adjacent to the door if feasible. Reinforce with temporary security hardware and heavy weatherstripping. Avoid relying on the screen to carry loads; don’t compress expanding foam into the screen track as it can jam or damage the frame.
Next Article
Installing a Patio Door Where a Window Was: DIY Guide
Step-by-step DIY for installing a patio door in a former window opening, including framing, weatherproofing, alignment,