Hanging vertical blinds on a patio door takes about an hour if you measure carefully first. Mount the headrail track above and just outside the door frame, drill your brackets no more than 30 inches apart, snap the track in, then slide each vane up into its stem carrier until it clicks. That's the whole job. The details below make sure yours actually slides smoothly and doesn't snag every time you open the door.
How to Hang Vertical Blinds on a Patio Door

Jamie Archer
11 Jun 2026
Why vertical blinds are the right call for a patio door
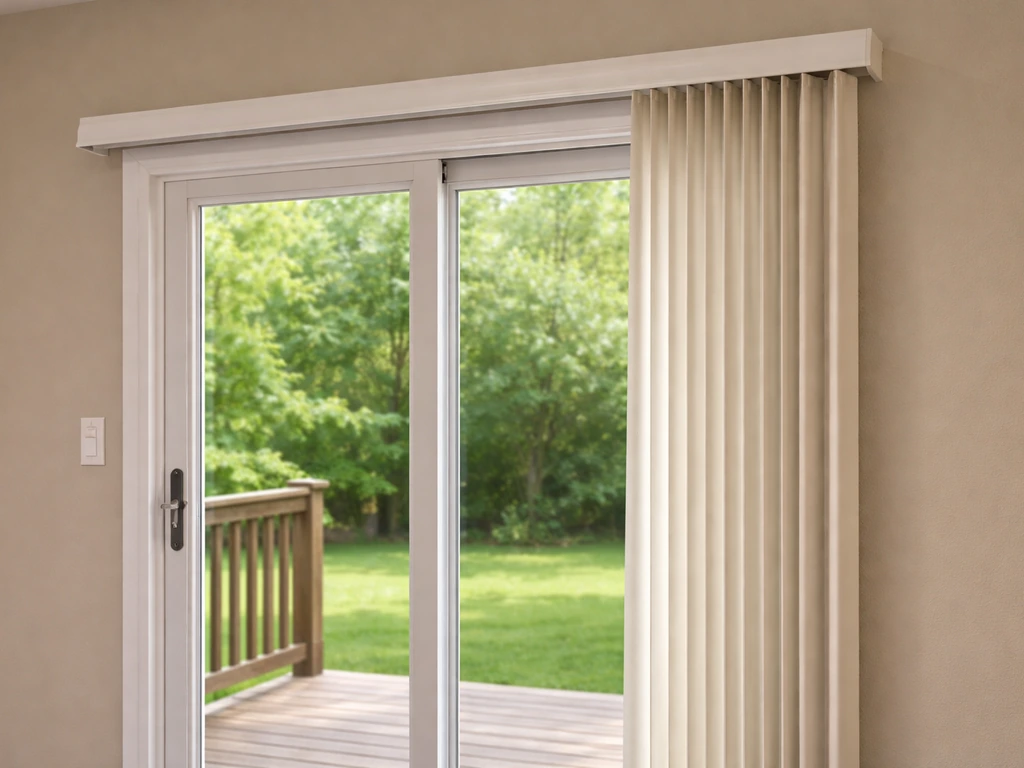
Most window coverings are a bad fit for sliding patio doors. Horizontal blinds, cellular shades, and drapes all get in the way when you're trying to open the door, and they tend to catch the door frame or screen. Vertical blinds are designed for exactly this situation: long vanes hang from an overhead track and stack neatly to one side when you open the door, so they're completely out of the way. That stacking behavior is the main reason verticals dominate patio doors, and it's what you're building toward with this install.
One note if you were considering horizontal blinds for a patio door: a standard patio slider is typically 80 inches tall and 60 to 72 inches wide. Most horizontal blind systems aren't designed for that span, and even if you find one wide enough, the cords and tilter end up awkwardly placed relative to where you actually stand to open the door. Stick with verticals here.
What you're working with: parts of a vertical blind system
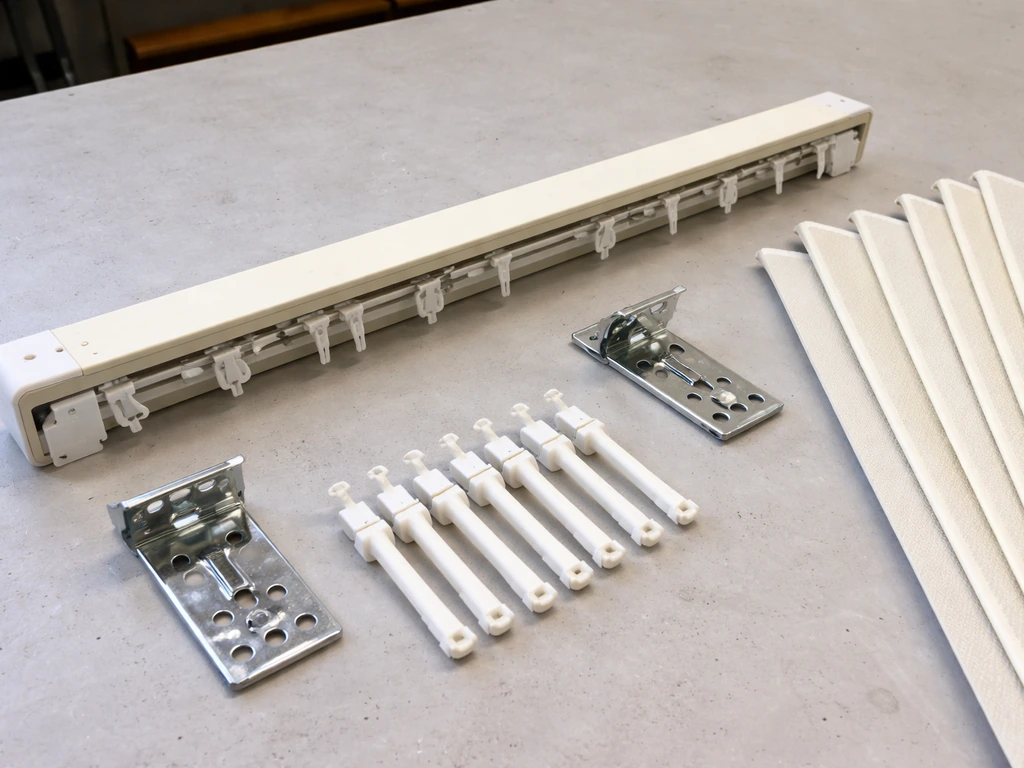
Before you start drilling, it helps to know the names of the pieces so you can follow instructions (including these) without guessing. A vertical blind system has four main components.
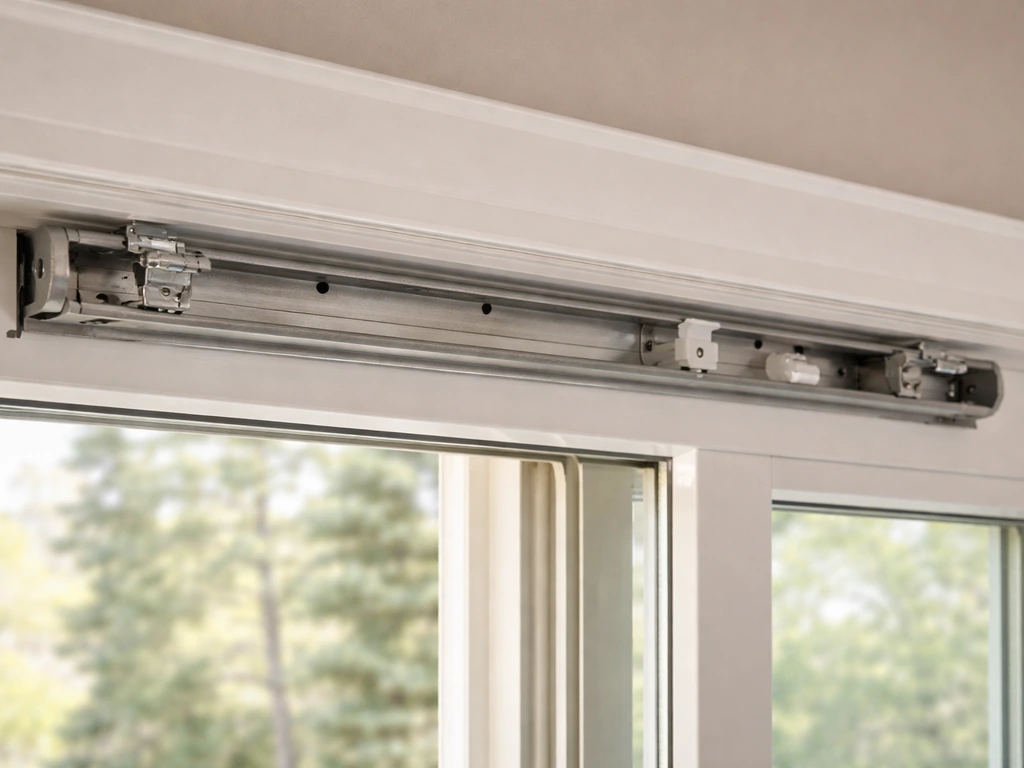
- Headrail (also called the track): the horizontal metal or plastic channel that mounts to your wall or ceiling and carries everything else
- Carriers (also called stem carriers or gliders): the individual plastic pieces that live inside the headrail, slide along it, and hold each vane via a rotating stem
- Vanes (also called louvers or slats): the long vertical fabric or vinyl panels that hang from the carriers and do the actual blocking of light
- Control system: either a chain and wand, or a cord, that lets you pull the vanes open and tilt them open or closed
Mounting brackets attach the headrail to your wall or ceiling. Some systems also include a valance (a decorative cover that hides the headrail). Knowing these terms matters because the carriers are the most common source of problems after installation. If a vane stops rotating or falls out, it's almost always the carrier stem that's the culprit, not something structural.
Measure the door and decide inside vs outside mount
This is the step most people rush, and it's where most installation headaches start. Take 10 minutes here and you'll save a lot of frustration later.
Inside mount vs outside mount: which one is right for you
An inside mount means the headrail sits inside the door frame opening, with the vanes hanging within that frame. It's a cleaner look, but it requires enough depth inside the frame to fit the headrail without it rubbing against the glass or the screen door. Levolor and other manufacturers specify minimum inside-depth requirements for their headrails, and if your door frame doesn't have at least that depth (usually around 2 to 3 inches), an inside mount won't work. Measure your frame depth before ordering.
An outside mount means the headrail goes above and outside the frame, mounted to the wall or ceiling. This is by far the more common approach for patio doors because it gives you full coverage, hides the frame, and doesn't require a deep frame. It also lets you extend the blind beyond the opening on each side, which blocks more light and makes the door look larger. For a patio door, outside mount is usually the better choice.
How to measure for an outside mount

Measure the width of the door opening from one side of the frame to the other. Add at least 3 inches on each side (6 inches total) to give yourself enough overlap to block light and cover the frame edge. So a 72-inch-wide patio door needs a blind that's at least 78 inches wide, and 84 inches is even better for light control. For height, measure from where you plan to mount the top of the headrail down to about half an inch above the floor. Many people mount the headrail 2 to 4 inches above the frame, which conceals the top of the frame and gives the door a taller, more finished look.
How to measure for an inside mount
Measure the exact width of the inside of the frame opening at the top, middle, and bottom. Use the narrowest measurement. The manufacturer will typically deduct about 1/4 inch automatically so the blind fits without binding. For height, measure from the top of the inside frame to the sill. Double-check that your frame has enough depth for an inside mount before ordering.
| Mount Type | Best for | Width measurement | Clearance needed |
|---|---|---|---|
| Inside mount | Clean, built-in look; shallow frames not ideal | Exact inside frame width (narrowest point) | 2-3 inch frame depth minimum |
| Outside mount | Most patio doors; better light block; recommended | Door opening + 3 inches each side | 1/2 to 1-1/2 inch clearance from wall to headrail |
Tools and materials you'll need
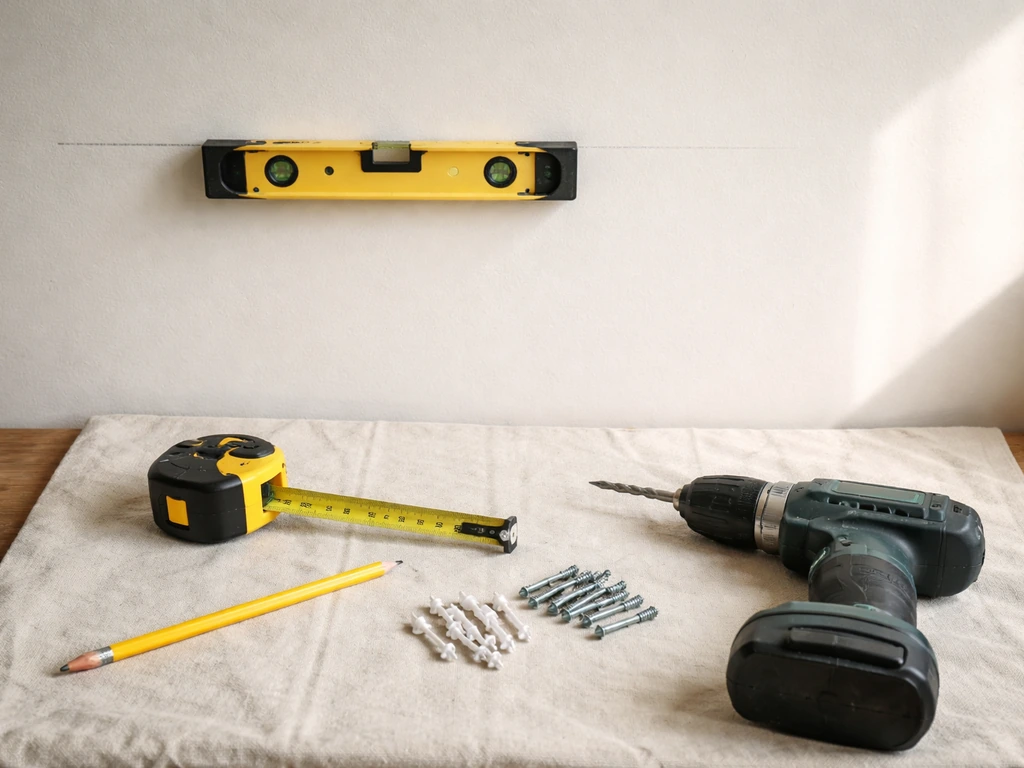
- Tape measure
- Pencil
- Level (a torpedo level works fine)
- Power drill with bits sized for your screws and wall anchors
- Wall anchors if you're not hitting studs
- Screwdriver (usually Phillips)
- Step stool or ladder
- The blinds kit (headrail, brackets, carriers, vanes, control system, hardware)
Prep the wall and mark your bracket positions
Before drilling anything, figure out where your brackets go and make sure they're level with each other. This matters more than most people realize. If your brackets are even slightly off-level, the carriers inside the headrail will bunch to one side and the vanes won't hang straight.
For an outside mount, hold the headrail up where you want it and mark the wall at the left and right bracket positions. Then use your level across those two marks to confirm they're even. Adjust one mark up or down until both marks are perfectly level before you drill. If you have a long headrail (over 48 inches), you'll have one or more intermediate brackets as well. Space all brackets so there's no more than 30 inches between any two brackets. This keeps the headrail from sagging in the middle, which is one of the main causes of vanes that won't glide smoothly.
Standard wall-mount brackets are adjustable and provide roughly 1/2 to 1-1/2 inches of clearance between the headrail and the wall or ceiling. Make sure you're accounting for this offset when you mark your heights. If your door has trim molding, check that the mounted headrail will clear it. Also confirm there's enough clearance between the back of the vanes and the glass or screen so the vanes can rotate fully without scraping. Usually 2 inches of standoff from the glass is enough.
Once your marks are confirmed level, drill pilot holes and drive in wall anchors if you're not hitting a stud. For patio door installations, you're usually mounting into drywall above the door, so anchors are almost always necessary. Mount each bracket and test them by pressing firmly on each one before you hang anything.
Mount the headrail and check alignment
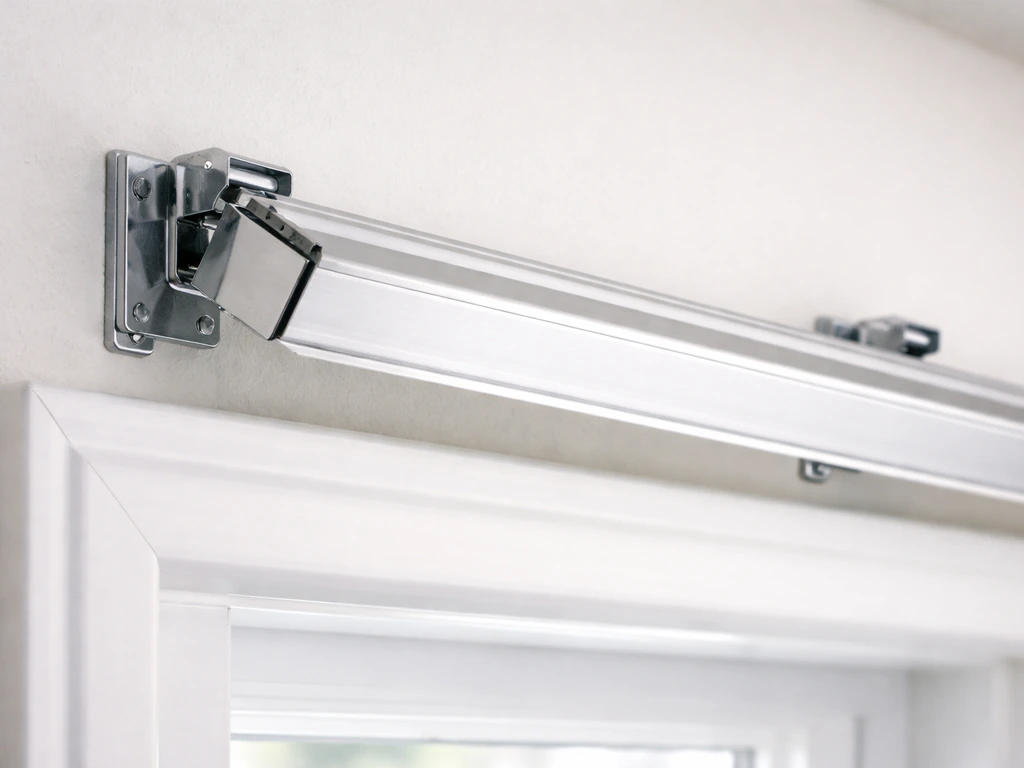
With the brackets secured, it's time to seat the headrail. Most systems use a bracket with a front lip and a locking clip or tab. Tilt the headrail slightly, fit the back edge into the rear of the bracket, then rotate it forward and press up until the front lip snaps or locks into place. You'll feel and hear it click. Do this across all brackets before you put any weight on the headrail.
Once it's seated, give it a firm tug downward. It should feel solid with no flex or movement. If one bracket feels loose, take the headrail back down, check that bracket, and re-drive the screws before continuing. A headrail that's even slightly loose at one end will cause vanes to drift to that side and eventually snag.
Now slide a few of the carrier stems back and forth manually along the headrail to check they move freely. They should glide with light finger pressure. If they catch or stick, check whether the headrail is twisted. A very slight twist is sometimes enough to bind the carriers. You can usually correct this by gently adjusting the bracket that's causing the twist, either adding a small shim behind it or loosening the screw slightly and repositioning.
Hang the vanes and set them up correctly
Before inserting vanes, use the control chain or wand to rotate all the carrier stems so their openings (the small hook or clip at the bottom of each stem) are facing you. This is the correct position for inserting vanes. If you try to hang vanes when the stems are rotated sideways or away from you, you'll struggle to seat them and might bend the hooks.
Take a vane, hold it at the top near the punched hole or tab, and gently guide the top into the stem opening. Push upward with light pressure until you feel it snap or click into place. You shouldn't need to force it. Each vane clips in the same way. Work from one end of the headrail to the other so you can space them evenly as you go.
After all vanes are hung, pull the control chain to space the carrier stems evenly across the headrail. The vanes should hang parallel to each other with consistent gaps. Now test the tilt by rotating the wand or pulling the tilt chain. All vanes should rotate together in the same direction. If one or two don't rotate with the rest, that's a stem alignment issue, covered in the troubleshooting section below.
Check the hang height while the vanes are straight down. They should clear the floor by about half an inch to prevent drag, and if your door has a track at the bottom, make sure the vanes clear it as well. If any vanes are too long, you have two options: adjust the bracket height (easier if you haven't patched the holes yet) or trim the vanes from the bottom. Most fabric and vinyl vanes can be trimmed with scissors or a sharp utility knife using a straight edge.
Set up the control system and check safety
The control system handles two functions: drawing the vanes open and closed (the traversing motion), and tilting the vanes to control light angle. Most residential vertical blind kits use a wand for tilt and a chain or cord loop for traversing. Some newer systems combine both into a single wand.
Test the traversing motion by pulling the chain or cord. The carriers should slide smoothly from one end of the headrail to the other, and the vanes should stack neatly at the end without bunching, twisting, or overlapping unevenly. For a patio door, you typically want the vanes to stack at the side of the door that opens so they're completely clear of the doorway.
Some systems include end stops or limit stops that prevent the carriers from traveling too far. If yours came with these, set them now by sliding the last carrier to where you want it to stop, and positioning the stop clip just behind it. This keeps vanes from jamming against the wall at the edge of travel.
Cord safety is worth a moment of attention, especially if there are children in the home. For vertical blinds corded operation, Blinds To Go also recommends installing the cord tie-down tension/installation addendum device as directed to help prevent an accessible slack loop [Cord safety is worth a moment of attention](https://www. blindstogo. com/mm-images/cordtiedown-en-us-g18b9c85.
pdf). The CPSC has documented strangulation hazards from looped window blind cords. If your blind includes a cord tie-down device, install it now per the manufacturer's instructions. It anchors the cord loop low and under tension so it can't form a large accessible loop.
If your blind has a cord that hangs freely, keep it tied up out of reach. Wand-operated tilt systems are a safer option in homes with young kids.
Troubleshooting common problems right after installation
One or more vanes won't rotate with the others
This is the most common issue right after hanging vanes. If your patio door blinds broken string is keeping the tilt or traversing from working, check the control system next. The stem on that carrier has twisted out of its correct orientation. The fix is simple: use the wand or tilt chain to rotate all the vanes to the fully closed position. As you do this, the misaligned stem should pop back into sync. If it doesn't, manually rotate just that vane by hand to match the others while the tilt mechanism is in the closed position, and it should re-seat itself.
Vanes are uneven or won't hang straight
Usually a leveling problem at the headrail. Get a level and check the headrail again. If it's even slightly tilted, the vanes will all angle in the same direction. Loosen the bracket at the low end, shim it up slightly, and retighten. If individual vanes are hanging at different lengths, check that each one is fully seated in its carrier stem. A vane that isn't fully snapped in will hang an inch or two lower than the rest.
Carriers stick or the track feels stiff to traverse
This usually means either the headrail is twisted (fix by adjusting brackets as described above) or the carriers need lubrication. A light spray of silicone lubricant on the inside of the headrail track will usually free up sticky carriers. Don't use WD-40 as it attracts dust and gums up plastic parts over time.
Vanes stick together or cling electrostatically
Vinyl vanes in particular can build up static, especially in dry climates, which causes them to cling to each other and move as a clump instead of individually. The fix is low-tech: rub each vane with a dryer sheet or apply a light mist of anti-static spray. This usually solves it immediately.
Light leaking around the edges or bottom
If light is coming in at the sides, your blind isn't wide enough for an effective outside mount. Adding a valance can help marginally, but the real fix is a wider blind next time. If light leaks at the bottom, either the vanes are too short or the tilt isn't reaching full closed position. Check that the tilt wand is rotating the stems to a full 90-degree closed angle.
If the vanes physically don't reach full closure, the carriers may be worn or the tilt mechanism may need adjustment. For more complex tilt and rotation issues, the same principles that apply to fixing blinds inside a patio door panel system can help. If your blinds seem misaligned or they do not move smoothly, use these steps to fix blinds inside a patio door fixing blinds inside a patio door panel system.
The headrail sags in the middle
You either need an additional intermediate bracket or your existing brackets aren't properly secured. Add a center bracket if the span between your end brackets exceeds 30 inches. A sagging headrail puts stress on the carriers at the center and eventually causes them to bind or fall out.
Quick maintenance tips to keep things running smoothly
- Dust vanes monthly with a microfiber cloth or vacuum attachment to prevent buildup that can cause sticking
- Re-check bracket screws every year, especially if the door sees heavy daily use and vibration from the door closing
- If a single carrier stem breaks, replacements are available cheaply by brand and model; you don't need to replace the whole blind
- Avoid yanking the traversing cord or chain sharply, especially in cold weather when plastic carriers are more brittle
- If vanes start to yellow or crack over several years, you can replace just the vanes (not the whole system) as long as they're the standard 3-1/2 inch width used by most brands
When the problem is bigger than the blinds
Sometimes what looks like a blind problem is actually a door problem. If your patio door is hard to open even with the blinds stacked fully to the side, that's a door track or roller issue, not a blind issue. If your door is hard to open, the fix often comes down to the door track, rollers, and weatherstripping rather than the blinds themselves why is my patio door so hard to open.
If your patio door is stuck even with the blinds moved out of the way, you may need to troubleshoot the door track or rollers patio door stuck. Similarly, if you're getting drafts around the door frame even with the blinds closed, the blind isn't the fix: that's a weatherstripping or door seal problem.
These are separate repairs worth addressing on their own, and they're worth sorting out before or alongside your blind installation so you're not retrofitting around a bigger underlying issue.
FAQ
Can I use an inside mount on my patio door if I do not have much depth in the frame?
If your patio door frame does not meet the minimum inside-depth requirement for the headrail, choose an outside mount instead. Inside mounts can cause rubbing on the glass or screen, which leads to carriers binding and vanes not rotating smoothly. Re-check the frame depth before ordering the blinds.
What if my vertical blind headrail seems to sag in the middle?
For outside mounts, bracket spacing matters, especially for long headrails. If the distance between end and intermediate supports creates more than 30 inches of unsupported span, the headrail can sag and carriers can bind. Add intermediate brackets or reduce the span between brackets.
How do I know the headrail is secure before I hang all the vanes?
Test the headrail once installed by pressing down and giving it a firm tug for movement, then slide a few carriers by hand. If you feel any wobble at one end, remove the headrail, recheck that bracket for screw tightness and alignment, and reinstall. A slightly loose bracket can shift carrier alignment over time and lead to snags.
How much space should I leave between the vanes and the patio door glass or screen?
Yes, but you need clearance behind the vanes so they can rotate fully without touching the glass or screen. As a rule of thumb, plan around 2 inches of standoff from the glass. If clearance is tight, reposition the brackets to increase the offset or switch mounting position to gain space.
Which side should the vertical blinds stack on for a sliding patio door?
Set your stack side based on how you open the door. Typically you want the vanes to gather on the same side the door slides toward, so the vanes remain out of the doorway path. If the blind stacks the wrong way, you may not be able to open the door fully without interference.
Why do only one or two vertical vanes tilt differently from the others?
If vanes refuse to tilt in sync, confirm you are rotating the carrier stems using the control mechanism with all vanes in the closed position first. Then inspect whether a single stem is out of orientation relative to the rest, you may need to re-seat it manually while the tilt is closed.
What lubricant should I use if the carriers move slowly or stick?
If carriers stick or drag, avoid lubricants like WD-40 because residue can attract dust and worsen the problem. Use a light silicone lubricant targeted to the inside of the headrail track, then test the traversing motion before adding all vanes.
Why is it hard to insert the vanes into the carrier stems?
A very common mistake is inserting vanes with the carrier stem openings rotated away from you. Before hanging, rotate all stems so the hook or clip at the bottom faces the correct direction, then clip each vane in with gentle upward pressure until it snaps.
What should I do if light leaks around the sides even when the blinds are closed?
Light gaps at the sides usually mean the outside-mount blind is too narrow. A valance can help disguise the top opening, but it will not fully stop side light leaks if your blind does not extend past the frame by enough overlap. Measure for extra width and consider a wider blind next time.
Why are the vanes leaving a gap near the floor?
If vanes do not cover the floor properly, check hang height first (top-of-headrail placement affects the bottom clearance). If the vanes are still too long or do not reach full closure when tilted, either trim the vanes at the bottom with a straight edge or verify the tilt mechanism actually reaches the fully closed angle.
Are there child-safety steps I should take with vertical blind cords on a patio door?
If your control includes a cord loop, install any cord tie-down or tension device included with your kit. Keep loops out of reach, and if you are choosing between designs, consider wand-operated tilt setups since they generally reduce loop exposure compared with hanging cord systems.
How do end stops or limit stops affect where the blinds stack?
If the blind stack position does not align with the side you open the door toward, adjust either the end-stop/limit clip (if your kit includes them) or relocate the stop position so carriers travel to the intended edge without bunching or jamming.
Next Article
How to Fix Blinds Inside Patio Doors: DIY Guide
Step-by-step DIY fixes for patio door blinds: sticking, off-track, uneven hanging, tangled cords, broken parts, re-align