If your wood patio door steps feel spongy, the door is suddenly sticking or scraping, or you're getting drafts and water coming in at the base, you're almost certainly dealing with rot, shifted framing, or failed waterproofing at the threshold or step assembly. Most of the time this is a DIY-fixable problem, but you need to correctly identify what you're working with before you start pulling things apart. Here's how to do that, and how to fix it the right way.
Wood Patio Door Steps Repair Guide: Fix Rot and Drafts

Jamie Archer
20 Jun 2026
What 'wood patio door steps' actually means: threshold vs. step vs. riser
People use these terms interchangeably, but they refer to different things, and knowing which one you're dealing with changes your repair approach completely. The threshold is the sealed transition strip right at the base of the door frame, sitting where the door bottom sweeps across it. It's part of the door's weather system and in a sliding patio door setup it's often integrated with the sill track and weep-hole drainage.
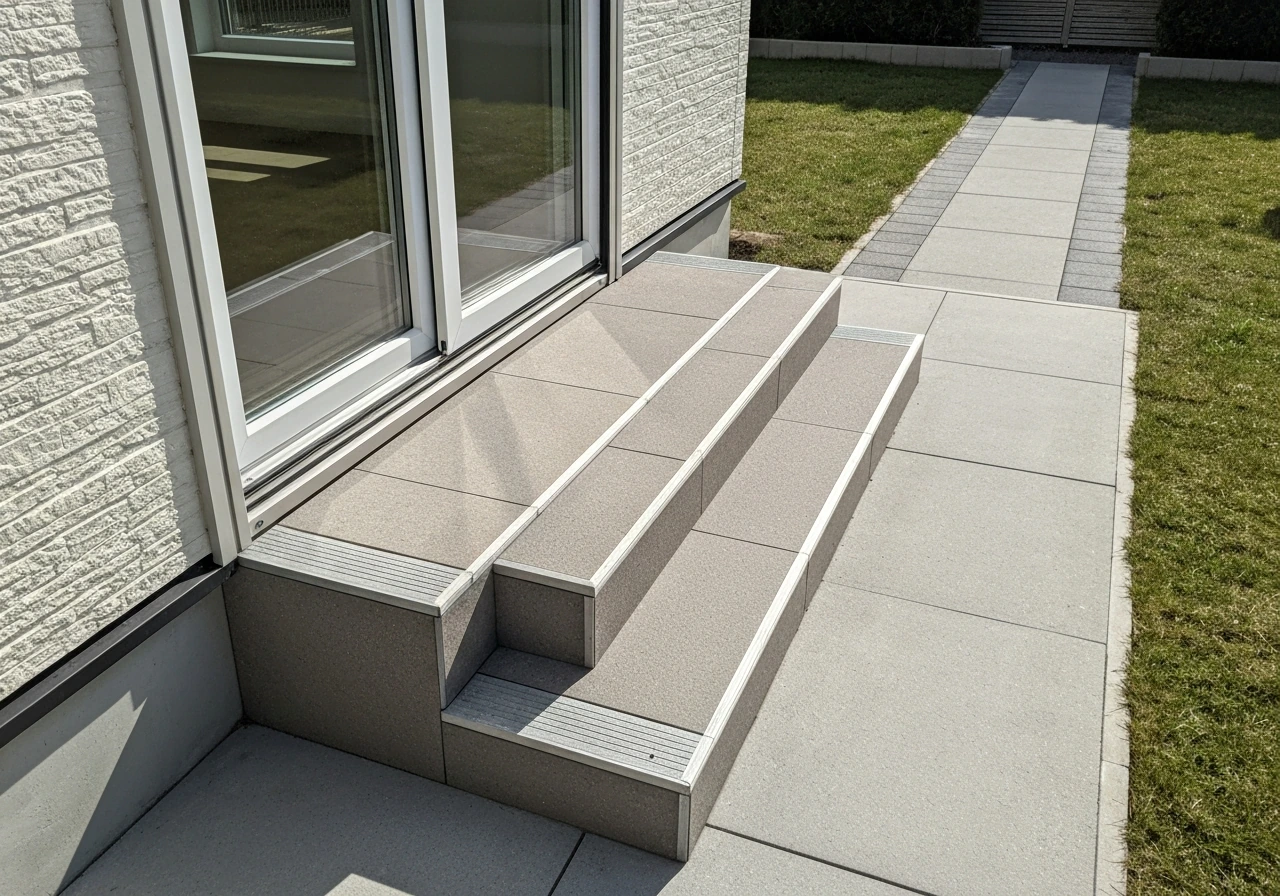
The exterior step is the physical platform you step onto when you walk out the door, usually sitting just beyond the threshold, and it's often a small wood-framed landing. A properly built set of wooden steps for a patio door should include a solid landing and weatherproof details so it lasts through wet seasons wood-framed landing. Risers connect the step platform to the ground level if there's a height difference.
All three can be made of wood, all three are exposed to weather, and all three can fail, but they fail in different ways and need different fixes.
On most patio doors, the threshold is the first thing to go because it takes the worst of the weather exposure: rain blows in, condensation forms underneath, and it gets foot traffic on top. The step or landing outside is usually a separate wood-framed structure, and the risers (if any) are the vertical face boards between step levels. It's common to have rot in the threshold and a perfectly sound exterior step, or vice versa. Don't assume the whole system has failed until you've checked each piece.
Why this happens: the usual causes
Wood at a patio door entry has a hard life. It sits at grade level or close to it, gets rained on, snow piled against it, and rarely dries out properly. Here are the specific causes I see most often:
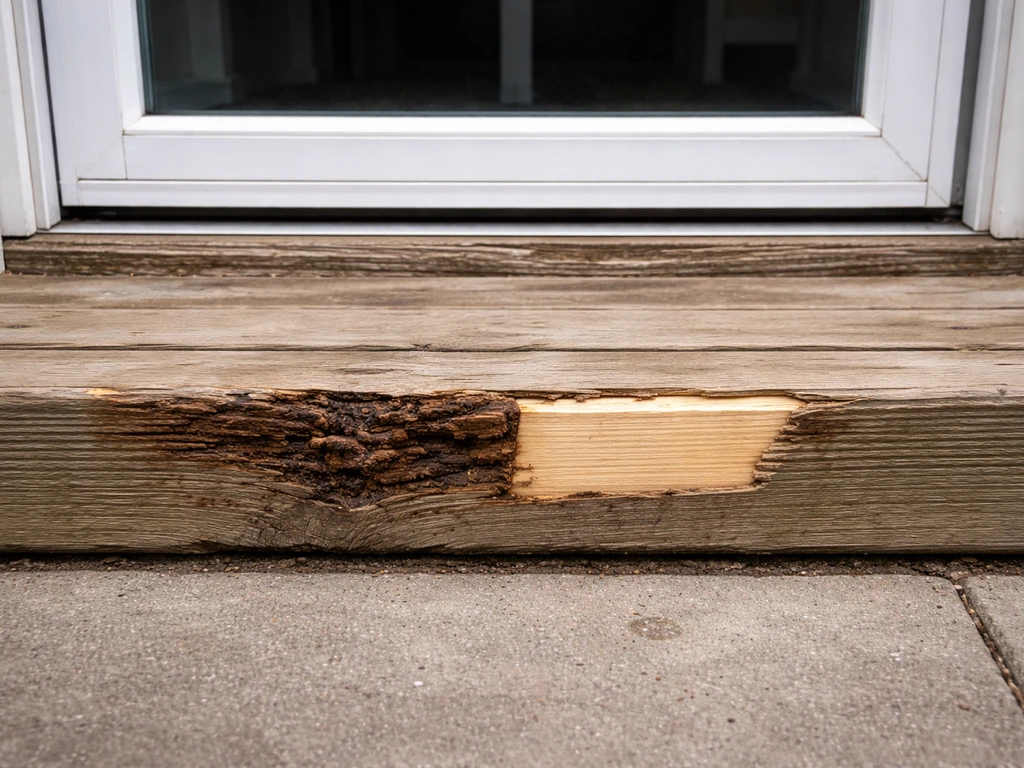
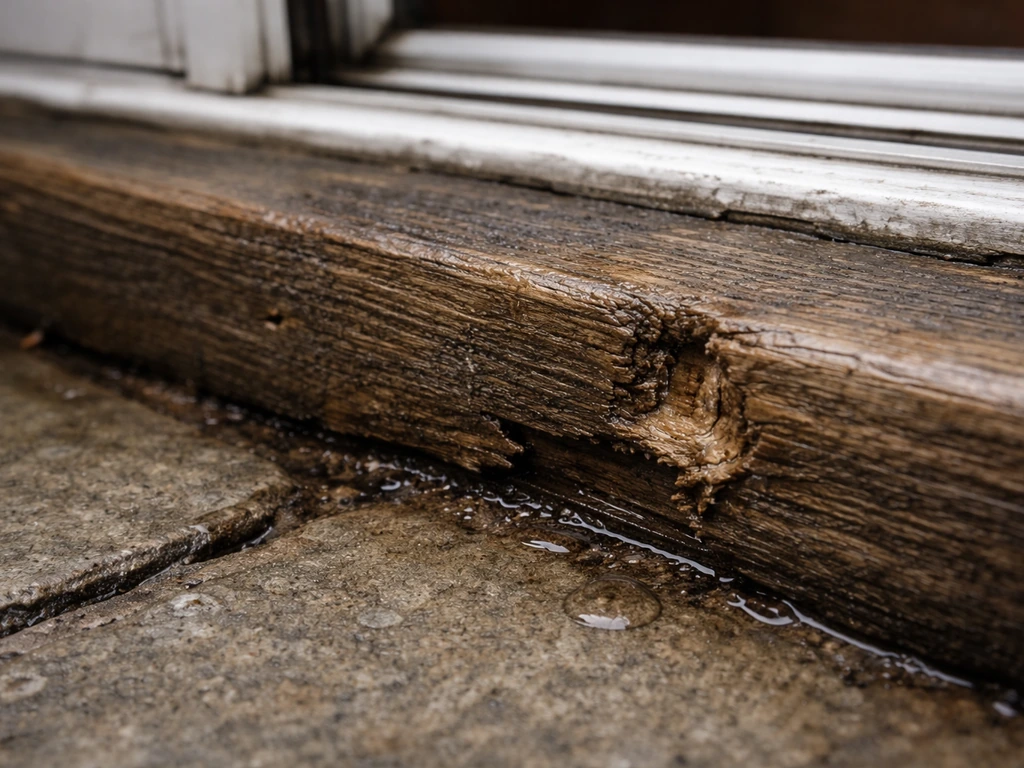
- Rot from sustained moisture: Wood decay needs two things, moisture and time. Brown rot breaks down the cellulose in wood, leaving it dark, crumbly, and cube-fractured. White rot attacks both cellulose and lignin, leaving wood soft, stringy, and light-colored. Soft rot develops under constantly wet conditions and affects just the outer layers first, so the wood can look fine on the surface while it's failing underneath. Any of these can be hiding under your threshold.
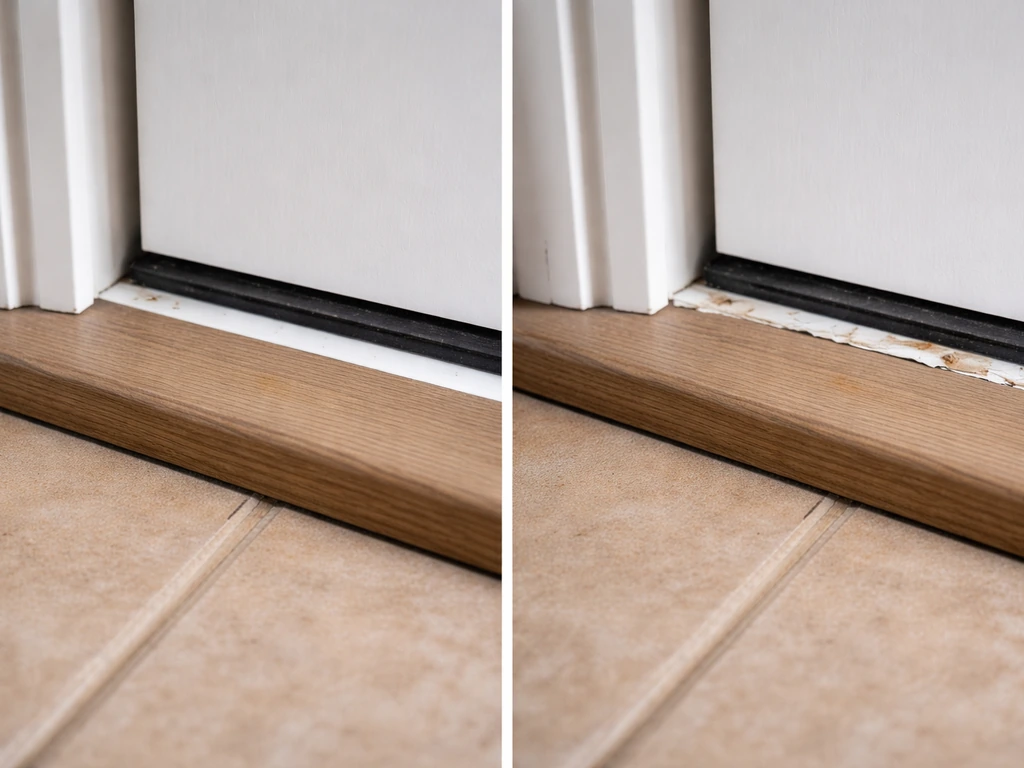
- Failed or missing caulk and sealant: The joint between the threshold and the door frame, and between the threshold and the exterior decking or step, is supposed to be sealed. When that seal cracks or peels, water gets in and never fully dries out.
- Blocked weep holes and poor drainage: Sliding patio doors have weep holes in the track that drain water to the outside. When those clog with debris, water pools at the sill and soaks into the wood underneath. This is one of the most overlooked causes of threshold rot.
- Improper or missing flashing: The sill pan under a patio door is supposed to catch water that gets past the threshold and direct it out. If the original installation skipped proper flashing or it has failed, water soaks straight into the framing.
- Loose or shifting framing: Exterior step framing can settle, shift, or pull away from the house over time, creating gaps that let water in and cause the step to feel bouncy or uneven.
- Door misalignment creating gaps: If a sliding door sits low on its rollers, the door bottom drags on the threshold and creates a gap on the other side. That gap lets in both drafts and water, and the ongoing friction accelerates wear on the threshold itself.
How to inspect and diagnose the issue safely
Before you touch a tool, spend 15 minutes doing a proper inspection. You need to know whether you're dealing with a surface problem (sealant, minor rot) or a structural one (failed framing, deep decay). Here's how to work through it systematically.
What to look and feel for
- Walk the step and threshold with purpose: Press down firmly in multiple spots. Any give, bounce, or soft feeling means the framing or substrate has lost structural integrity, not just the surface wood.
- Probe with an awl or penknife: Jab the tip into the wood at the threshold edges, corners, and any discolored spots. Sound wood will resist and the tool will bounce back. Rotten wood lets the tip sink in easily, sometimes an inch or more with almost no force. This is how you find decay hiding under a surface that looks fine.
- Check moisture content: A wood moisture meter (available at hardware stores for $20-$50) tells you the actual moisture percentage in the wood. Readings above 19% mean the wood is wet enough for fungal decay to be active. Anything above 28% and decay is essentially guaranteed to be ongoing.
- Look at the color and texture: Dark brown, crumbly, cube-cracked wood is brown rot. Pale, soft, stringy wood is white rot. Soft, degraded outer layers with a darker core suggests soft rot. The type matters less than the depth, but it tells you how long the problem has been going on.
- Inspect the threshold-to-frame seal: Run your finger along every joint where the threshold meets the door frame and the floor. Look for cracked, missing, or peeling caulk. Hold a lighter near the joint on a windy day, movement in the flame confirms a draft.
- Check the weep holes: On a sliding patio door, look at the bottom track on the exterior side. There are small openings (weep holes) that drain water out. Stick a thin wire in each one and check whether it's blocked with debris, paint, or caulk.
- Look at the step and riser framing from below if accessible: If you have a crawl space or can see under a deck, check the ledger board, joists, and post bases for staining, discoloration, or soft spots.
- Look for daylight: From inside the house at night (or with a helper using a flashlight outside), check the base of the door frame for visible light gaps. Any light means air and water can follow.
Structural vs. sealing problem: how to tell
If the step feels solid, the awl test shows no more than surface-level softness, and moisture readings are under 20%, you're probably dealing with a sealing and weatherproofing problem. That's a straightforward fix. If the step bounces, the awl sinks in more than half an inch, moisture readings are high, or you can see crumbling or cube-cracked wood, you have structural decay and need to replace material, not just seal over it. Sealing over rot is one of the most common DIY mistakes: it traps moisture and accelerates the problem.
Repair or replace: how to make the call
| Situation | Right move | DIY or pro? |
|---|---|---|
| Surface rot under 1/4 inch deep, isolated to one spot | Epoxy wood filler repair, re-seal | DIY |
| Threshold is soft or crumbly across most of its length | Full threshold replacement | DIY with moderate skill |
| Step platform bounces but framing is dry and sound | Reinforce or sister joists, re-fasten decking | DIY |
| Step framing is wet, soft, or showing brown/white rot | Remove and rebuild step framing | DIY or pro depending on scope |
| Rot has reached the door frame, sill, or rim joist | Structural repair needed before door reinstallation | Pro recommended |
| Door is misaligned but wood is sound | Roller and track adjustment only | DIY |
| Step has shifted and pulled away from the house | Re-attach and re-flash ledger connection | DIY or pro |
The honest line is this: if the rot is in the decorative or finish wood only (the threshold strip, the step decking boards), this is absolutely DIY territory. Once decay reaches the structural framing (rim joist, king stud, header, post), you need someone who can properly assess whether load transfer has been compromised. Don't guess on that one.
What you'll need before you start
- Flat pry bar and reciprocating saw (or oscillating multi-tool)
- Awl or penknife for probing
- Wood moisture meter
- Tape measure and speed square
- Drill/driver and deck screws (stainless or coated for exterior use)
- Treated lumber (for any framing replacement, use pressure-treated)
- Exterior-grade plywood or composite decking material for step surface
- Sill pan flashing kit or flexible flashing tape (min. 6-inch width)
- Exterior polyurethane caulk or hybrid polymer sealant
- Waterproof wood epoxy filler (for minor repairs)
- Primer and exterior paint or stain to match
- Utility knife, putty knife, and wire brush
- Safety glasses and work gloves
DIY repair: step-by-step
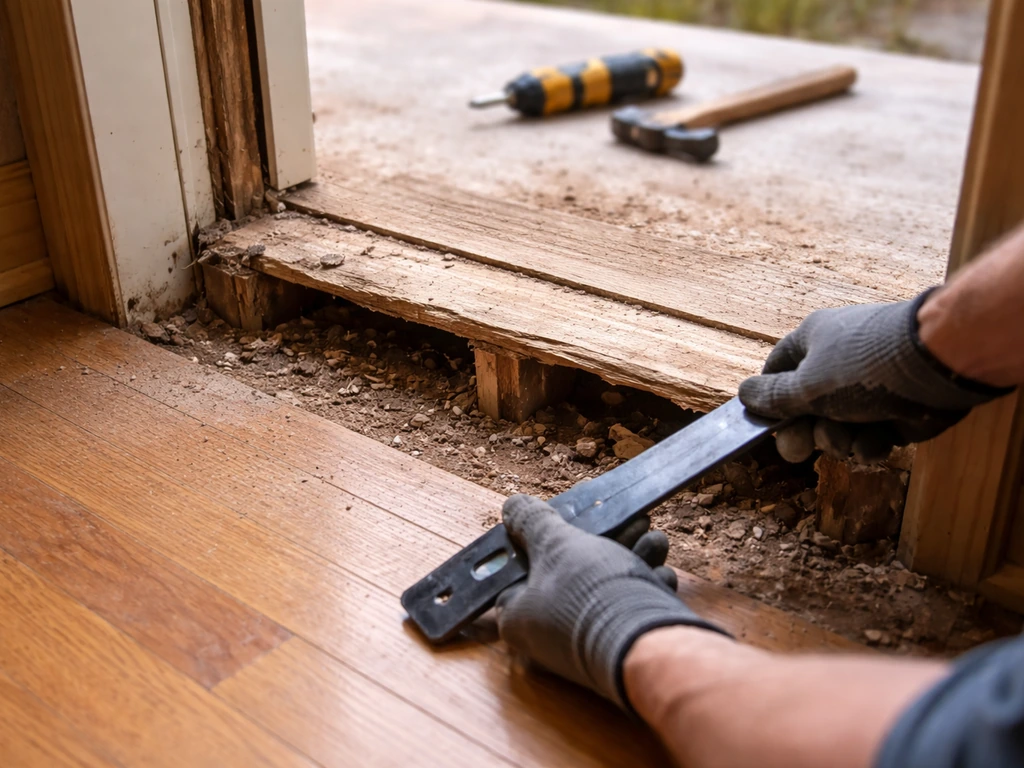
Step 1: Remove the damaged wood
Start by prying off any trim or toe-kick pieces around the threshold. Go slowly with the flat bar to avoid damaging the door frame. Once the threshold is exposed, cut through any fasteners with the oscillating tool and lift it out. If you're working on the exterior step, remove the decking boards first, then assess the framing underneath.
Don't try to save partially rotten wood by cutting around the rot: cut back to clean, solid material at least 2 inches past any visible decay. If the framing below the threshold is wet, set up temporary weatherproofing (a tarp) and let it dry for at least 24-48 hours before continuing. Installing new wood over wet framing is how you end up doing this again in three years.
Step 2: Probe and repair the sub-framing
With the threshold and surface boards removed, probe every piece of exposed framing with your awl. Pay particular attention to the rim joist and the sill framing directly under the door opening. If you find soft spots, sister a new piece of pressure-treated lumber alongside the damaged one: nail and screw it to the solid sections on either side. If a full joist or rim joist section is rotted through, you need to cut it back to solid material and install a new section, fastened with joist hangers and exterior-rated hardware. Make sure everything is level before you move on. A threshold that isn't flat and level will cause your door to misalign and drag.
Step 3: Install proper flashing before the new threshold goes in
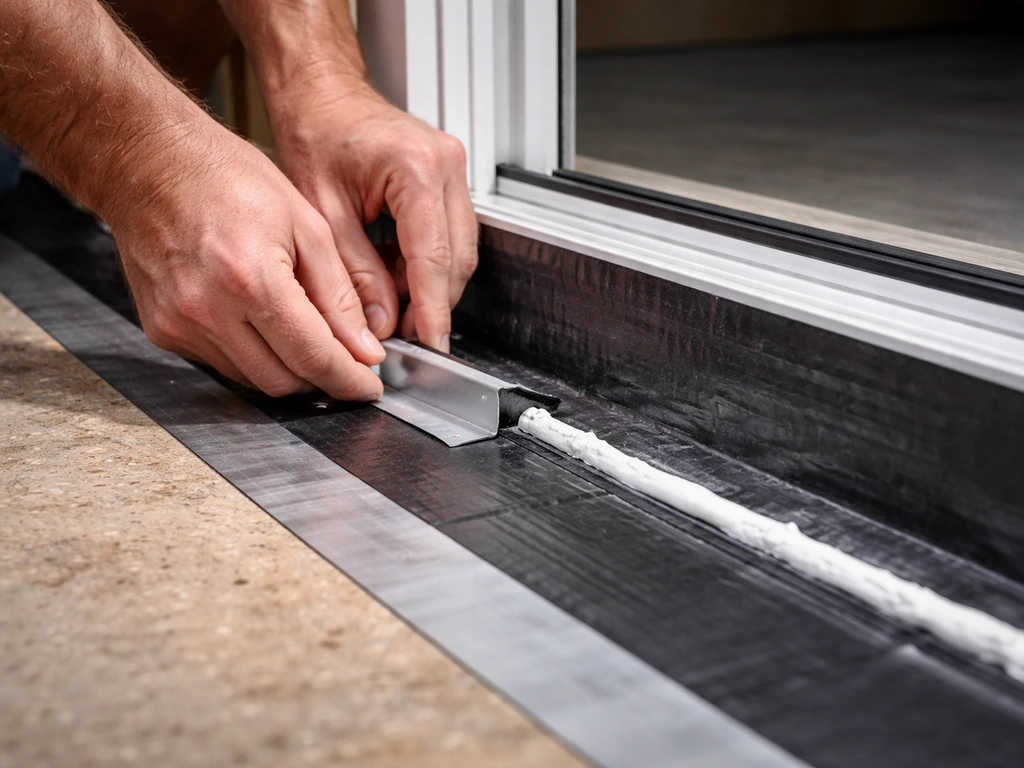
This is the step most DIYers skip, and it's why the problem comes back. The sill pan under a patio door is the last line of defense against water reaching the framing. Before the new threshold goes in, apply self-adhesive flexible flashing tape across the sill, lapping it up the sides of the rough opening and over the edge of the exterior sheathing.
If you're using a premade sill pan flashing kit (available at home centers), install the end dams first so any water that enters is directed to the exterior rather than pooling in the corners. The sill should slope slightly toward the exterior, about 1/8 inch per foot minimum, so water drains out rather than toward the interior.
Step 4: Install the new threshold
Set the new threshold in place and check it with a level. Sliding patio door thresholds are part of a broader door-bottom system that includes the sill track, so if you're replacing the threshold on a sliding door, match the profile and width to the original (replacement parts are available by door manufacturer and model). If you're planning a patio door threshold replacement, follow this patio door guide to get the right measurements and weatherproofing steps.
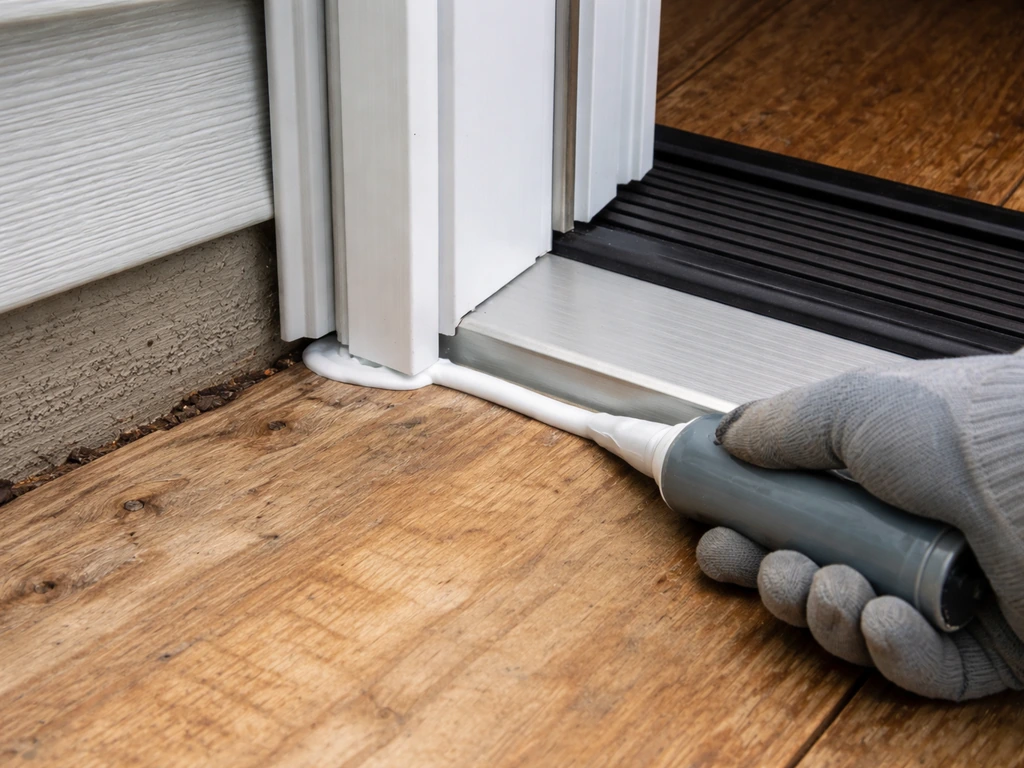
Apply a bead of exterior polyurethane caulk to the underside of the threshold before setting it, press it down, and fasten with stainless or coated screws. Don't fully torque the screws until you've confirmed the door operates correctly, as you may need to shim from below. If the door seems too tight or the bottom drags, shim the threshold up in 1/16-inch increments and test each time.
Step 5: Rebuild the exterior step if needed
If the exterior step platform needs rebuilding, use pressure-treated lumber for all framing members in contact with or near the ground. If you want patio door steps ideas, focus on a weatherproof design that drains well and uses durable materials like composite decking or pressure-treated lumber. Set posts on concrete footings or post bases that keep wood off the ground. Frame the landing so it slopes away from the house (again, about 1/8 inch per foot) for drainage.
Use stainless or hot-dipped galvanized hardware throughout. For the walking surface, composite decking or pressure-treated decking both outlast standard pine significantly. Leave a 1/8-inch gap between decking boards for drainage. Make sure the finished step height puts you within a comfortable step of the threshold: a rise over 7-8 inches is uncomfortable and may not meet local code, which is worth checking before you rebuild.
Weatherproofing: stopping drafts, leaks, and future rot
With new wood in place, weatherproofing is not optional. This is what determines whether the repair lasts 2 years or 20 years. Work through these in order:
- Caulk every joint: Apply exterior-grade polyurethane or hybrid polymer caulk (not silicone by itself, it doesn't paint well and can fail at joints that move) along both sides of the threshold where it meets the door frame and the exterior step or decking. Tool it smooth and let it cure fully before painting over it.
- Confirm weep holes are clear: Look at the exterior face of the sliding door sill track. Weep holes should be open. Clear any debris with a thin wire or a can of compressed air. These holes are what drain the sill when water gets past the door seal.
- Check and replace door sweeps and weatherstripping: The bottom sweep on a sliding patio door and the weatherstripping on the fixed panel and door frame are your first line of defense. If they're flattened, torn, or missing sections, replace them. They're inexpensive and make a significant difference in draft and water control.
- Prime and seal all bare wood: Any new wood should get at least two coats of exterior primer before paint or stain. Pay extra attention to end grain, which absorbs moisture fastest. End-grain sealing alone can dramatically extend the life of exterior wood.
- Check flashing laps at the door frame base: The flashing under the threshold should lap over the top of any exterior sheathing or housewrap below it, not under it. Water runs down the wall and needs to drain over the flashing, not behind it.
Door alignment, tracks, rollers, and locks: don't skip this part
Any time you replace a threshold or level out a step, the door alignment changes. A threshold that sits even 1/8 inch higher or lower than before will affect how the door rolls and whether it locks. This is especially true for sliding glass doors, where the rollers are adjusted to set the gap between the door panel and the frame.
How to adjust the rollers
On most sliding patio doors, roller adjustment screws are located at the bottom of the door panel, often behind small plastic covers. You'll need a Phillips or flathead screwdriver to reach them. Turning the screw clockwise raises that side of the door, counterclockwise lowers it. The goal is an even gap (called the reveal) between the door panel and the frame on all sides, typically 3/16 to 1/4 inch. Adjust one side at a time, check the reveal, and test the door operation. When it rolls smoothly without lifting or dragging at the threshold, it's correct. Replace the screw covers when you're done.
Checking the track and lock alignment
While the door is open, inspect the bottom track for debris, warping, or damage. A damaged track causes dragging and uneven roller wear even after adjustment. Clean the track with a stiff brush and apply a dry lubricant (silicone spray, not WD-40, which attracts dirt). After adjusting roller height, test the lock: if the door sits too low or too high, the lock latch may not engage the strike properly. Most sliding door lock strikes have a few screws that allow you to shift the strike plate up or down to meet the latch. If the door isn't latching cleanly, adjust the strike before assuming the lock is broken.
Screen door considerations
If you have a sliding screen door, it runs on its own track and also has roller adjustments, usually at the top corners. After any threshold work, test the screen door too. A misaligned screen can create gaps at the bottom that let in insects even when the door appears closed. Adjust and re-test both doors before calling the job done.
When to call a professional
Be honest with yourself about what you find. When planning your repair, also confirm local building and patio door steps regulations so the flashing, height, and drainage changes are compliant. If your inspection reveals that rot has reached the rim joist, king studs around the door frame, or the subfloor near the opening, those are structural elements that need proper assessment and repair before you reinstall anything.
The same goes if you find signs of significant water intrusion into the wall cavity, such as dark staining on sheathing, insulation that's wet or compressed, or mold inside the wall. A contractor who specializes in exterior rot repair or a door installation professional can assess the structural situation and make sure the repair doesn't create a liability down the road. For everything short of structural framing damage, a competent DIYer can handle this in a weekend.
Your next steps today
Start with the inspection using just an awl and your hands, which takes 15 minutes and tells you exactly what repair category you're in. If you find only surface rot or a failed seal, pick up caulk and epoxy filler today and you can finish the repair the same afternoon. If the awl sinks deep or the step bounces, plan for a half-day to full-day project and pick up treated lumber, flashing tape, and fasteners before you start. Either way, don't skip the flashing step and don't seal over any wood with a moisture reading above 19%. Get the wood dry first, then fix it, then seal it. That sequence is what makes the repair last.
FAQ
How can I tell whether I’m dealing with threshold failure versus rot in the exterior step landing?
Do a quick probe separately on each component. If the door bottom and weather strip area are soft or crumbling, that points to threshold and sill pan issues. If the threshold is firm but the landing boards or posts feel bouncy, the step framing is failing. Also check where the moisture shows up first, inside the house at the base versus only on the exterior platform.
Is it ever okay to patch small wood rot with epoxy or filler instead of replacing boards?
Epoxy or wood filler can work only when the awl shows surface softness and the surrounding material is still solid. If the awl sinks more than about half an inch, you see cube cracking, or the bouncy feel returns after cleaning and drying, plan on cutting out to solid wood and replacing the section. A patch over active rot usually fails because the trapped moisture continues breaking down the fibers.
What’s the safest way to remove the threshold or decking without damaging the door frame or sill track?
Start with trim removal using a flat bar with gentle leverage, keep the bar wrapped or protected so you do not gouge the frame. Cut fasteners from the side where access is best with an oscillating tool, then lift slowly and stop if you feel resistance from hidden screws or adhesive. For sliding doors, confirm how the threshold interfaces with the sill track before prying, so you do not bend or misalign the track.
Do I need to dry everything for 24 to 48 hours even if the wood looks mostly okay?
Yes, if the exposed framing is wet or you see dark staining and elevated moisture readings, waiting matters. Let it dry until you can probe without softness and moisture readings are down, then proceed with flashing and new wood. Installing new members over damp framing can trap moisture behind the threshold and accelerate rot again.
What if my measurements show the threshold must be shimmed, but I’m worried about the door’s rollers and lock?
Make shims in small increments and test after each change. Re-check roller reveal and lock engagement each time you adjust, because a slightly higher threshold can lift the door panel and affect latch alignment. If the door drags, shim up or down by about 1/16 inch increments while watching for smooth rolling and a consistent gap.
How do I avoid creating a new leak when reinstalling the sill pan and flashing tape?
Focus on overlap and direction of water flow. The flashing tape must lap up the sides and extend over the exterior sheathing edge, and if you’re using a kit with end dams, install those first so water gets directed outward rather than pooling in corners. Press the tape firmly along edges and remove any dust or loose debris from the sill surface before sticking it down.
Should I use exterior caulk everywhere, or is it better to rely on flashing tape alone?
Flashing tape is the primary water barrier, and caulk is a secondary sealant. Apply polyurethane caulk where the threshold contacts the sill, especially on the underside, then fasten. Avoid over-sealing joints that need drainage paths, and do not caulk over areas that are still wet or contaminated.
What lubricant should I use on the bottom track after threshold work, and what should I avoid?
Use a dry lubricant like silicone spray after you clean out debris and dust. Avoid WD-40 for this, because it leaves residues that attract dirt and can make the track gunky over time. After lubrication, cycle the door several times and confirm there’s no new dragging at the threshold.
How do I know whether I can DIY a step rebuild versus needing a pro?
If rot is confined to decorative/finish wood or decking boards and the awl indicates only surface-level softness, DIY replacement is usually reasonable. If rot reaches structural framing like the rim joist, king stud, header, or subfloor near the opening, you should get an exterior rot or door installation pro to assess load transfer and water damage extent before you reinstall anything.
Are there common code or safety issues with rebuilding wood patio door steps?
Yes. Step height and rise-to-run can affect safety and compliance, and some areas have specific requirements for exterior door egress and slip resistance. Before rebuilding, verify local rules for maximum rise and minimum tread dimensions, and confirm whether your plan needs permits or inspections, especially if you’re altering the landing elevation.
What’s the best way to prevent future rot in wood patio door steps?
Keep wood off the ground and ensure drainage. Use pressure-treated lumber for framing members near or touching soil, set posts on concrete footings, and build the landing so it slopes about 1/8 inch per foot away from the house. Add deck board spacing for drying, use stainless or hot-dipped galvanized hardware, and inspect annually for seal gaps or trapped water at the threshold.
Next Article
Patio Door Steps Ideas: Layout, Sizing, Materials, DIY
Step-by-step patio door steps ideas: layout, landing, sizing, slip-safe materials, weatherproofing, and DIY tips.