Most patio door problems come down to four things: dirty or damaged tracks, worn rollers, a misaligned lock strike, or failing weatherstripping. All four are DIY-fixable with basic tools in an afternoon. The tricky part is knowing which one you're dealing with, so start with a quick diagnosis before you grab anything from the toolbox.
Patio Door Fix: Step-by-Step Troubleshooting and Repair

Jamie Archer
28 Apr 2026
Quick diagnosis: what's wrong with your patio door
Before you take anything apart, spend two minutes running through these symptoms. Most doors have one primary issue that causes the others, so fixing the root problem first saves you a lot of unnecessary work.
| Symptom | Most likely cause | Where to start |
|---|---|---|
| Door is hard to slide or sticks | Debris in track or worn rollers | Clean track first, then check rollers |
| Door drags along the bottom | Rollers are too low or broken | Roller adjustment or replacement |
| Door won't latch or lock | Rollers out of adjustment, strike misaligned | Adjust rollers first, then lock strike |
| Door feels wobbly or loose | Rollers fully worn out or frame damaged | Inspect rollers and frame |
| Drafts or cold air coming in | Weatherstripping worn or missing | Inspect and replace weatherstripping |
| Water leaking at the bottom | Clogged weep holes or failed sill seal | Clear weep holes, inspect sill pan |
| Screen sticks or won't glide | Dirty screen track or worn screen rollers | Clean track, then adjust or replace screen rollers |
One thing to check right away: lift the door panel slightly while sliding it. If it suddenly moves more freely, the rollers are almost certainly your problem. If it still drags with the panel lifted, look at the track itself for damage or heavy debris buildup.
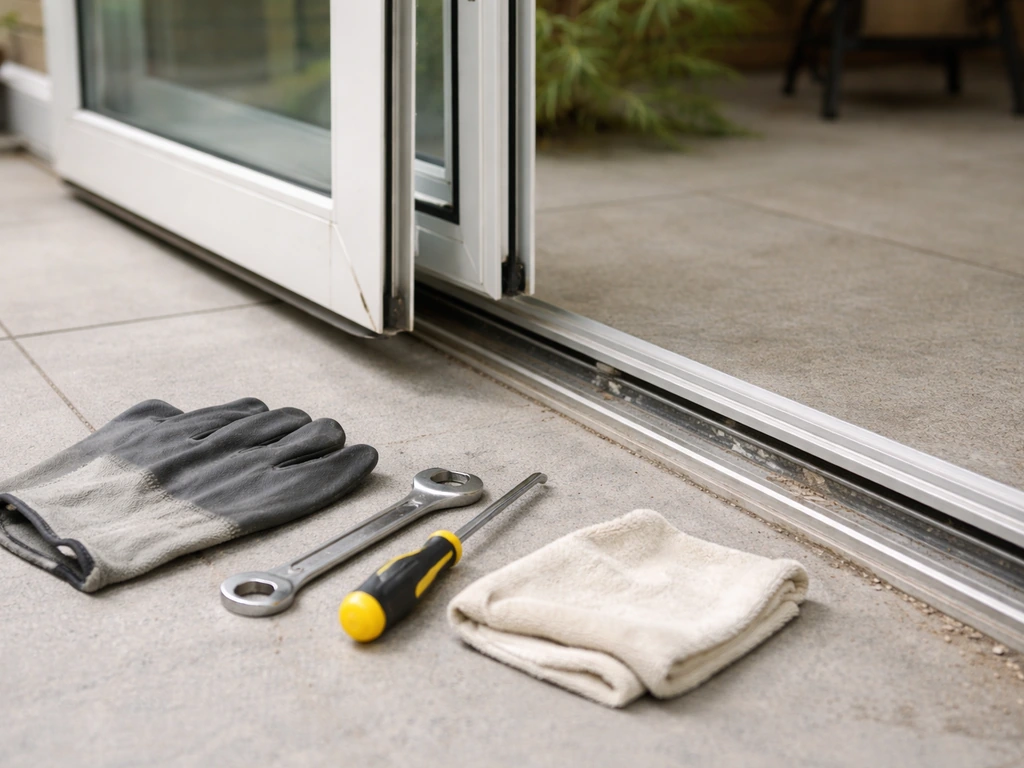
Tools, parts, and safety before you start
Gather everything before you start. Running back to the hardware store mid-job when a door panel is off its track is not a fun afternoon. Here's what covers almost every repair in this guide.
- #3 Phillips head screwdriver (used for roller adjustment on most major brands including Milgard and Simonton)
- Flat-blade screwdriver (for prying off caps and for Andersen-style roller adjustments)
- Putty knife (for lifting the door panel during roller access)
- Vacuum with crevice attachment
- Stiff nylon brush or old toothbrush
- Mild dish soap and warm water
- Silicone-based lubricant spray (not WD-40, which attracts dirt)
- Replacement rollers matched to your door brand and model
- Replacement weatherstripping or door sweep
- Tape measure and pencil
- Safety glasses
- A second person for panel removal (a standard sliding glass door weighs 50 to 100 pounds or more)
On safety: glass door panels are heavy and awkward. If you're removing the panel to replace rollers, have a helper and clear a path to lay it flat on a padded surface. Wear safety glasses any time you're working near the track or cleaning with brushes. If there's any cracking in the glass or the frame is visibly bent or rotted, stop and call a professional before doing anything else.
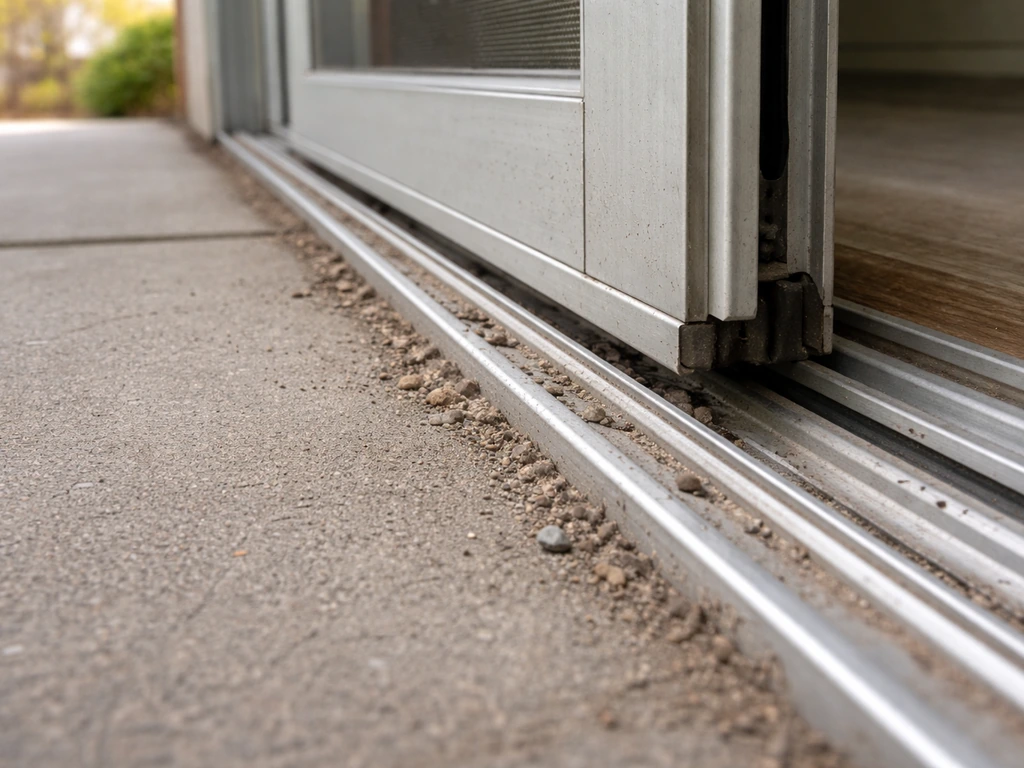
Fix a sliding door stuck in the track
A stuck sliding door is usually just dirty. Patio door tracks collect an impressive amount of grit, pet hair, leaves, and hardened grease over time, and even a small pebble jammed under a roller can make a door nearly impossible to move. Start here before you assume the rollers are bad.
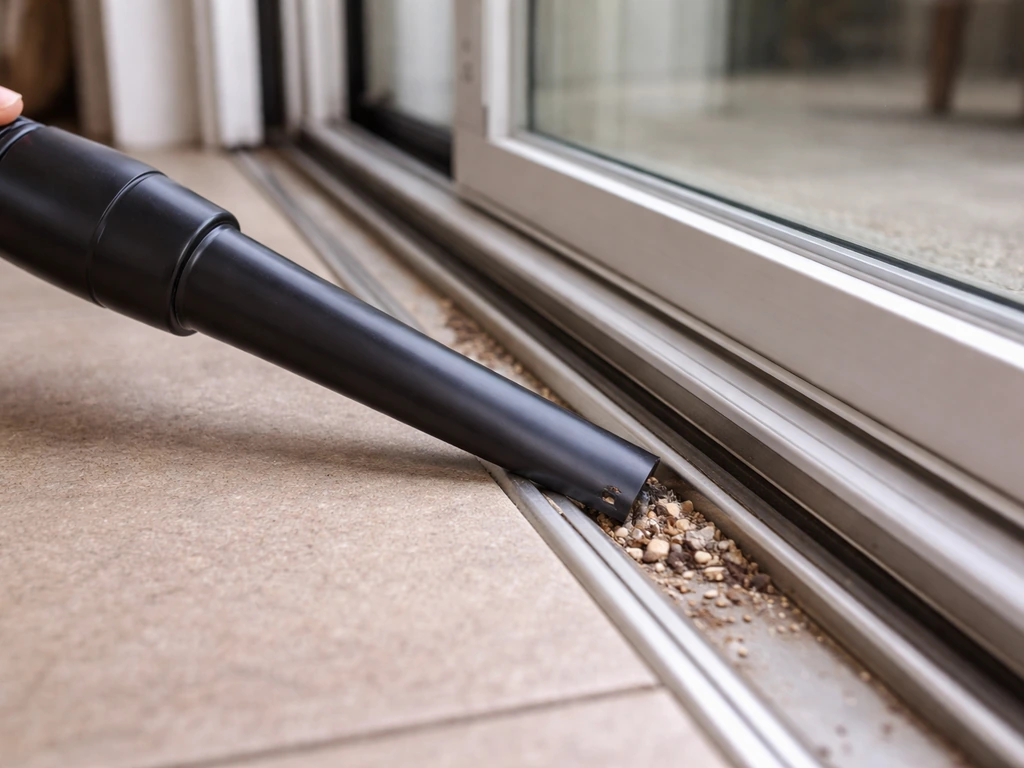
Step-by-step track cleaning
- Vacuum the full length of the bottom track with a crevice tool, paying attention to the corners and ends.
- Use a stiff brush dipped in warm soapy water to scrub the track channel. Work from one end to the other.
- Rinse with a damp cloth and dry thoroughly. Standing water in the track accelerates rust on metal tracks.
- Check the weep holes at the bottom of the door frame. These small slots allow water to drain out. If they're packed with debris, clear them with a toothpick or compressed air. Milgard specifically recommends testing weep hole function before heavy rain seasons.
- Apply a thin bead of silicone spray lubricant to the track. Don't use oil-based lubricants. They gum up fast and make future cleaning much harder.
- Test the door. If it glides freely now, you're done.
If the track is visibly bent, cracked, or has deep gouges, cleaning won't solve the problem. A damaged track needs to be replaced. This is a job for a door professional unless you're very comfortable with door framing, because the track is typically part of the sill assembly.
Clearing jams and checking alignment
If the door is truly jammed and won't budge, check the top track too. The upper channel guides the door, and if the top of the panel has shifted outward, it can jam against the frame. Gently push the top of the door inward toward the frame while trying to slide it. Also look for any objects that may have fallen into the track from outside, particularly after storms.
Replace or adjust rollers for smooth sliding
If the track is clean and the door still drags or catches, the rollers are almost certainly the issue. Rollers are the small wheels inside the bottom of the sliding panel that carry the door along the track. They wear out over years of use, and when they do, the door drops down and rubs. The good news is that adjusting or replacing them is very much a DIY job.
Adjusting rollers without removing the door
Most sliding patio doors from major manufacturers (Milgard, Simonton, Andersen, Pella) have roller adjustment screws accessible from the bottom edge of the door panel. You don't need to remove the door to use them.
- Find the small plastic caps or access holes at the bottom corners of the door panel on the interior side.
- Pop off the caps with a flat-blade screwdriver if present.
- Insert a #3 Phillips screwdriver (or flat-blade for Andersen models) into the adjustment hole.
- Turn clockwise to raise the panel, counterclockwise to lower it. Andersen recommends moving one notch at a time, then testing operation before adjusting further.
- Adjust both sides evenly. The goal is to lift the panel just enough that it clears the track surface without wobbling in the top channel.
- Test by sliding the door the full length of its travel. It should move smoothly with light pressure.
- Replace the caps when done.
Replacing rollers when adjustment isn't enough
If the adjustment screws are already maxed out or the rollers are visibly cracked and broken, you need to replace them. Order replacement rollers specific to your door brand and model before you start, because rollers are not universal.
- With a helper, tilt the door panel's bottom toward you slightly while lifting up to disengage it from the bottom track, then swing the bottom out and lower the panel off the top track.
- Lay the panel flat on a padded surface like a moving blanket on the garage floor.
- Remove the old roller assemblies. They're typically held by one or two screws at the bottom of the panel.
- Install the new rollers in the same position and orientation. Set the adjustment screw to the middle of its range before reinstalling.
- With your helper, tilt the panel back into the top track first, then lower the bottom onto the lower track.
- Adjust the roller height as described above until the door slides and latches correctly.
Plan for this job to take one to two hours the first time. The most time-consuming part is usually ordering the right parts. Take photos of the existing rollers and note your door's brand, model, and year before ordering.
Fix locks, latch, and handle problems
A patio door lock that won't engage is often a roller problem in disguise. When rollers wear down and the panel drops, the lock hook and the strike plate on the frame no longer line up. Fix the rollers first, then check the lock. In many cases, that's all it takes.
Adjusting the lock strike
If the rollers are fine but the lock still won't catch, the strike (also called the keeper) can be adjusted independently. Pella's service documentation describes this clearly: loosen the screws on the strike plate, slide it up or down until it aligns with the lock hook, then retighten the screws in the original holes. This small adjustment often restores a lock that's felt sloppy for years.
- Close the door and watch exactly where the lock hook lands relative to the strike opening.
- Loosen (don't remove) the screws holding the strike to the door frame.
- Slide the strike up or down to align with the lock hook.
- Hold the strike in position and retighten the screws firmly.
- Test the lock several times. It should engage with a solid click and no wiggle.
Handle and latch replacement
If the handle itself is loose, broken, or the internal latch mechanism is stripped, the handle assembly needs to be replaced. Most sliding door handles are held by two to four screws on the interior face of the door panel and can be swapped out in 15 minutes. Buy a replacement that matches your existing hole pattern to avoid filling and re-drilling. If your door is older and parts are discontinued, a universal replacement handle kit from a hardware store will usually work with minor adjustment.
When to call a professional for lock issues
If the multi-point lock mechanism inside the door panel itself is broken, or if the door no longer closes flush with the frame regardless of roller adjustment, that's a job for a professional. A door that doesn't seal securely is a security and weatherproofing problem that shouldn't wait.
Screen door fixes and common screen issues
Screen doors are simpler than the main panel but they fail in the same ways: dirty tracks, worn roller guides, and frames that have shifted out of square. Most screen issues are fixable in under an hour.
Cleaning and lubricating the screen track
Simonton's screen care guidance confirms what most people figure out the hard way: the screen track collects debris just like the main door track, and a gunked-up track will make even a brand-new screen feel like it's fighting you. Vacuum and scrub the screen track with soapy water, rinse it dry, then apply a light coat of silicone spray. That alone solves most sticky screen doors.
Adjusting or replacing screen rollers
Most sliding screen doors have small plastic roller guides at the bottom (and sometimes top) corners of the frame. If the screen drags or wobbles after cleaning, these are likely worn. Remove the screen by lifting it up into the top channel and swinging the bottom out (the same motion as the main panel). Inspect the rollers and replace any that are cracked, flat-spotted, or missing. Screen rollers are inexpensive, usually a few dollars per roller, and are available at any hardware store. Just bring the old one with you to match the size.
Re-screening a torn or damaged screen
If the screen mesh itself is torn or sagging, re-screening is a straightforward DIY job. You'll need a roll of screen mesh (fiberglass is easiest to work with), a screen spline roller tool, and new spline. Remove the old spline from the frame channel with a flathead screwdriver, pull out the old mesh, cut the new mesh slightly oversized, press it into the channel with the roller tool, then press in the new spline to lock it. Trim the excess with a utility knife. The whole process takes about 30 minutes once you've done it once.
Seal drafts, improve weatherproofing, and finish with maintenance
If your door is sliding smoothly and latching correctly but you're still feeling drafts or seeing water intrusion along the door panel, the weatherstripping is the next place to look. If you want to stop drafts and water intrusion at the edges, focus on the patio door bug seal as part of your weatherstripping checks. This is one of the most overlooked parts of patio door maintenance, and it makes a real difference in comfort and energy bills.
Diagnosing and replacing weatherstripping

Close the door and hold a lit candle or incense stick near the edges of the panel, especially along the sides and at the meeting stile (where the door meets the fixed panel or door jamb). If the flame flickers, you've found a gap. Milgard recommends regularly checking weatherstripping for sealing performance as part of routine door care, and Simonton lists slider weatherstripping as a standard replacement part. Pull back the old stripping and inspect it: if it's compressed flat, crumbling, torn, or pulling away from its channel, replace it. Peel-and-stick foam weatherstripping is the cheapest fix but won't last long. Pile weatherstripping (the fuzzy kind) or foam-backed vinyl tape lasts much longer and seals more consistently on sliding panels.
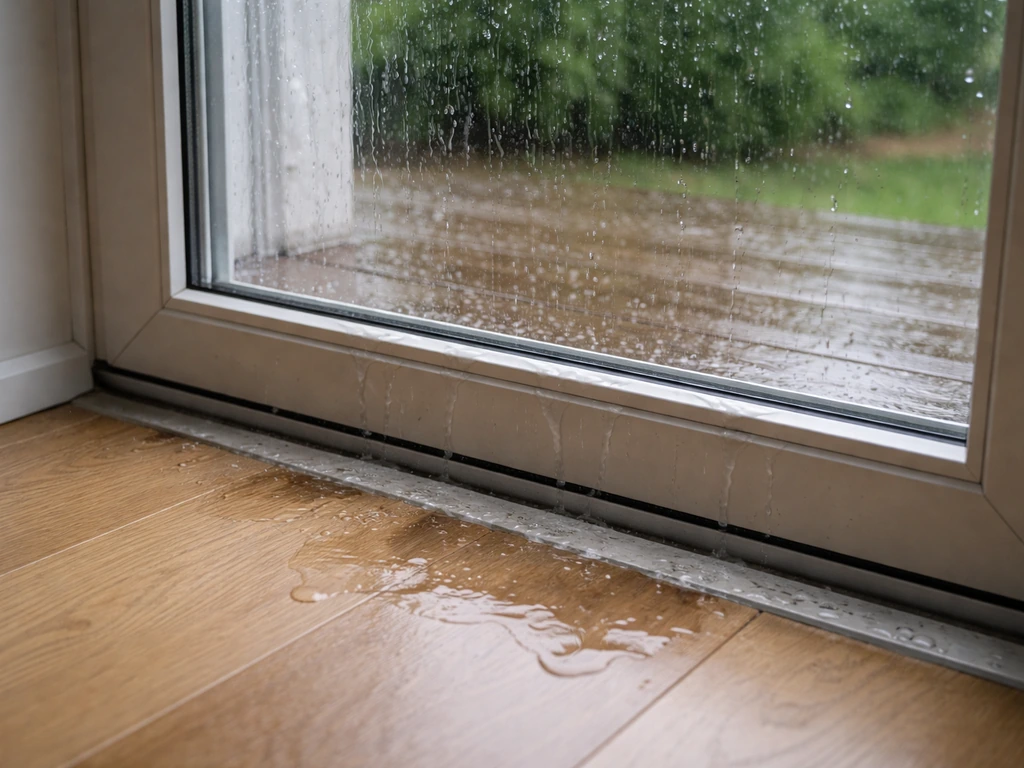
Addressing water leaks at the bottom
Water getting in at the sill is usually a weep hole issue or a failed door sweep. Clear the weep holes first. These small openings in the bottom track channel allow any water that gets into the track to drain outside. If they're blocked, water backs up and finds its way in. Use a thin wire or compressed air to clear them. After clearing, test by pouring a cup of water into the track and watching it drain. If water still pools or you're dealing with leaks during heavy rain, you may be looking at a more involved issue with the sill pan or frame seals. If your patio door leaks when it rains, the sill pan and frame seals are the areas most likely to be compromised. If you also see leaking at the top, check the same weatherstripping and top-channel drainage paths mentioned in patio door leaks when it rains as a related option. Related to this, french patio door and top-of-door leaks can involve different drainage paths and may need their own diagnosis. For anything that looks like compromised framing or sill pan damage, call a professional.
Seasonal maintenance to prevent problems from coming back
Doing a 20-minute maintenance pass twice a year (spring and fall) prevents most of the problems covered in this guide from coming back. Here's the routine:
- Vacuum and scrub the bottom track, then lubricate with silicone spray
- Clear weep holes and test drainage before the rainy season
- Check weatherstripping along the door panel and replace any sections that are compressed or pulling away
- Test the roller adjustment and raise the panel slightly if it's started dragging
- Check that the lock engages cleanly and the strike is still aligned
- Inspect the door sweep at the bottom for wear and replace if it's fraying or no longer contacting the sill
- Clean the screen track and inspect screen rollers while you're at it
Most of these issues build up gradually, so you often won't notice until the door is really fighting you. Catching them early means a 20-minute fix instead of a full roller replacement or professional service call. If at the end of all this your door still doesn't work right, or you're noticing frame rot, cracked glass, or a track that's shifted out of level, that's the point to bring in a professional. But in the majority of cases, a clean track, properly adjusted rollers, and fresh weatherstripping will make a patio door feel almost new.
FAQ
What should I do if my patio door fix steps do not move the door at all, even when I lift it?
If the door will not move even after clearing debris and confirming the track is not damaged, try lifting the panel slightly and pushing inward at the top while sliding. If it still binds, stop adjusting rollers and inspect for a shifted top guide or an obstruction that sits above the bottom track (common after storms).
How can I tell whether I should stop turning the roller adjustment screws during a patio door fix?
Do not force the roller adjustment screws if they are already at their travel limit. For a patio door fix, that usually means the rollers are failing, the door is sitting on a damaged track, or the frame is out of square. In those cases, replacing rollers or calling a professional is safer than continuing to crank the screws.
My patio door lock won’t catch, but I adjusted rollers. What’s the next step?
Check the lock after the roller height is correct, then re-test the latch with the door closed and gently pushed into the frame. A lock that feels “almost” aligned often improves with a strike plate adjustment, but a lock that still won’t engage after that usually indicates a misaligned frame or dropped sill.
Where do drafts usually come from after a patio door fix, and how do I pinpoint the right edge?
If the candle test shows drafts, confirm the gap is at the meeting stile and sides, then look at the condition of the weatherstrip where it compresses. Replace stripping that is flattened, torn, or pulling away from the channel. For best results, choose a weatherstrip type that matches how your door compresses when locked (pile or foam-backed vinyl tends to seal more consistently than basic peel-and-stick foam).
My patio door fix cured sticking, but water still gets in. What should I test first?
If water appears after rain but the door feels smooth, start at the bottom. Clear weep holes first and test drainage by pouring water into the track and watching for outside runoff. If water still pools or leaks persist during heavy rain, the door sweep and sill pan or frame seals are likely compromised, which is a higher-risk area to DIY.
How do I handle a sliding screen door that wobbles or drags even after cleaning the track?
When the screen drags after cleaning, verify the screen rollers are not cracked or flat-spotted and that the screen sits square in the top channel. If the screen wobbles, replacing only the bottom guides is often enough, but if the frame looks out of square or shifted, the fix may require realignment beyond roller replacement.
Are patio door rollers universal, and how do I avoid ordering the wrong ones?
Match replacement rollers by brand and by the roller’s size and wheel style, not just by where the parts look similar. Rollers are often not universal even when the door brand is known, so take clear photos and measure the roller or bring the old roller to the hardware store for an exact match.
Can I use a universal handle kit for a patio door fix on an older door?
If your patio door is older and parts are discontinued, a universal handle kit can work, but only if the new assembly aligns with the existing screw hole pattern. Before installing, compare the hole spacing and backset. If it does not match, filling and re-drilling can weaken the door panel, so it is better to verify compatibility first.
What signs on a track mean I should replace the track instead of cleaning it?
A partially damaged track can be tricky because cleaning may hide the issue. Look for deep gouges, cracking, or sections that look bent or out of line. If you find that, assume the track or sill assembly needs replacement, since a patio door fix that only targets rollers will keep failing.
What should I do if my patio door seals but still doesn’t close flush after roller and lock adjustments?
If you can fix the draft issue by weatherstripping but the latch still doesn’t close flush, re-check roller adjustment and ensure the top of the door is guiding properly. A door that cannot close securely despite roller adjustments often indicates internal latch or multi-point lock damage, or a frame/sill issue that should be evaluated by a professional.
Next Article
Patio Door Leaks When It Rains: DIY Fixes Today
DIY steps to find and fix patio door leaks in rain, including weep drains, seals, rollers, caulk, and alignment.