Replacing a screen on a patio door usually takes 30 to 90 minutes and costs under $30 in materials if you're just re-screening a frame, or $50 to $150 if you're swapping in a whole new screen door. The process is beginner-friendly as long as you measure carefully, match your spline size to the frame groove, and take your time tensioning the mesh evenly. Whether you have a sliding screen door on a track or a hinged insect screen that swings open, this guide walks you through every step.
How to Replace a Screen on a Patio Door: DIY Steps

Jamie Archer
15 May 2026
Identify your patio door and screen type first
Before you order anything or pick up a tool, figure out exactly what kind of screen system you're dealing with. Getting this wrong means buying the wrong replacement and making a second trip to the hardware store.
The three most common patio door screen systems are: a sliding screen door with rollers that ride in top and bottom tracks (the most common setup on sliding glass doors), a hinged or swinging insect screen door that mounts on hinge pins or brackets along the door frame, and a fixed screen panel that sits in a frame channel and is held in place with a spline (common on some porch enclosures and certain patio door models).
To tell them apart: a sliding screen door will have visible rollers or roller adjustment screws on the bottom corners, and it sits in a U-shaped aluminum track on the floor. A hinged screen has piano-style hinges or a pair of pivot brackets and typically has a closer/spring mechanism. A fixed screen panel doesn't move at all and is usually just held in a channel with a spline around the perimeter.
Also note whether you're replacing the entire door/panel (frame and all) or just the mesh screen material inside an existing frame. Both scenarios are covered below, and the spline/retainer steps in the middle apply to both.
Tools and materials you'll need
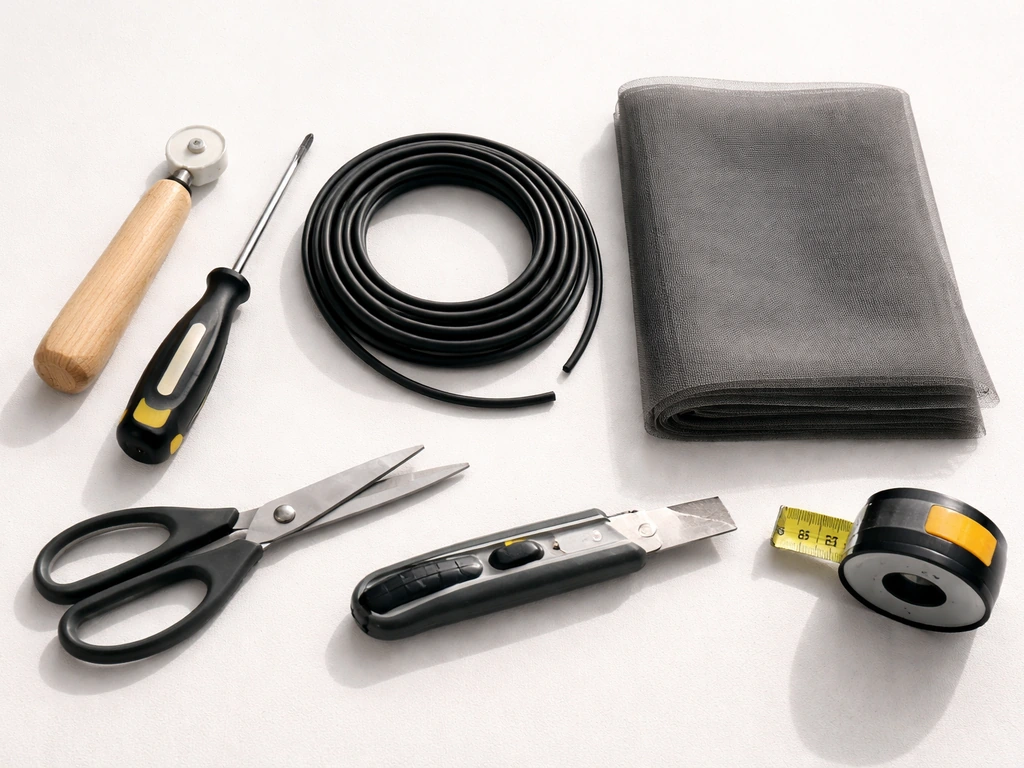
Get everything together before you start. Nothing slows down a screen job like stopping halfway to run to the store.
- Spline roller tool (a rolling wheel on a handle, used to press spline into the frame groove)
- Spline pick or flathead screwdriver (to pry old spline out of the groove)
- Utility knife with a fresh blade (for cutting mesh and trimming spline)
- Tape measure and a straight edge or ruler
- Replacement screen mesh (fiberglass is easiest for DIY; aluminum is more durable but harder to work with)
- Replacement spline in the correct diameter (see the measuring section below)
- Flat putty knife (helpful for sliding screen door removal)
- Screwdriver, typically Phillips, for roller adjustment screws
- Work gloves if using aluminum mesh (the edges are sharp)
- A flat work surface like a table or sawhorses if re-screening a removed frame
If you're replacing a full sliding screen door rather than just the mesh, you'll also want a helper for the lifting and alignment steps. These doors aren't heavy, but a second set of hands makes the track-seating step much easier.
Measure for the correct screen replacement
Measuring for a replacement screen door or panel
For a full replacement sliding screen door, measure the inside width of the track opening (from inside wall to inside wall of the frame channel) and the height from the top track channel down to the top surface of the bottom track. Door manufacturers typically sell screen doors in standard sizes (common widths are 30", 32", 34", 36", and 48" for double-wide openings), so bring your measurements to match the closest standard size. If you're between sizes, size down and adjust the rollers for height rather than forcing a too-large door.
For a hinged screen door, measure the width and height of the door opening (jamb to jamb, sill to header). Most hinged patio insect screen doors are ordered or purchased to fit the rough opening, then adjusted at install using the hinge hardware and an adjustment screw at the top.
Measuring for replacement mesh and spline

To re-screen an existing frame, measure the outer dimensions of the frame itself (not just the open mesh area). Cut your replacement mesh about 2 inches larger than the frame on every side so you have material to grip while rolling in the spline. You'll trim the excess once the spline is seated.
Getting the spline diameter right is critical. A spline that's too thin will pop out; one that's too thick will distort the frame or refuse to seat. To find the right size, look at the old spline (it often has a diameter printed on it or on the package it came in), or measure the groove width in your frame with a ruler or digital calipers. Phifer recommends choosing spline size by [matching the spline diameter to the groove width](https://www.
phifer. com/screening/diy/sizing/) so it fits standard fiberglass or aluminum screening. Spline diameter should match the groove width when the mesh is sandwiched in between, so if your groove measures 0. 175", you might use a 0.
160" or 0. 165" spline to account for the mesh thickness. Common round spline diameters run from 0. 125" up to 0.
250" in small increments; flat spline for larger porch/patio screen frames typically runs 0. 285" to 0. 315". When in doubt, buy two sizes and test-press a short section before committing.
Remove the old screen or screen door
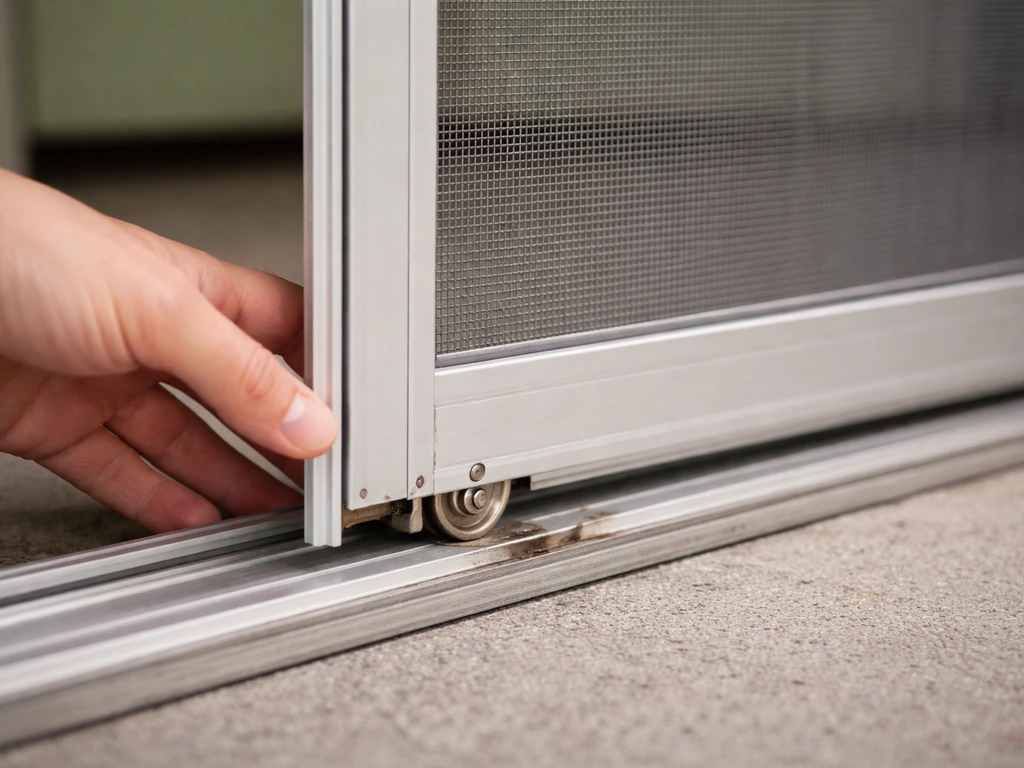
Removing a sliding screen door
Start by finding the roller adjustment screws on the bottom corners of the sliding screen door frame. These are usually small Phillips screws set in a slot.
Turn them counterclockwise to lower the rollers and reduce the door's overall height, which gives you clearance to lift it out of the track. If you are replacing or removing the whole patio screen door, the removal steps vary for sliding versus hinged styles remove patio screen door.
Once the rollers are retracted, lift the door upward firmly (you may need to press up on the frame to compress any spring-loaded rollers) and swing the bottom of the door outward, clearing it from the bottom track. Then angle it out of the top track. A flat putty knife slipped under the roller area can help compress stubborn spring-loaded rollers during this step.
If the door has been in place for years, the track may have built-up dirt or gunk that's making things stick. Clean the sill track and head frame channel before you try to remove or reinstall anything. A stiff brush and some soapy water work fine.
Removing a hinged screen door
Hinged patio insect screen doors vary more by manufacturer than sliding doors do. Most lift off piano hinges (pop the hinge pin upward with a flathead screwdriver) or unclip from pivot brackets at the top and bottom. If yours has a top head clip and an adjustment screw (common on Andersen-style systems), loosen the adjustment screw first, then slide the clip off the header. Note how the rivet pin or pivot is oriented before you pull the door free so you can reinstall it the same way.
Removing just the mesh from a frame
If the frame is staying in place, use a spline pick or a small flathead screwdriver to pry up one corner of the old spline. Once you get a corner started, the spline usually pulls out in one or two continuous pieces. Pull out all the old spline and lift the old mesh out of the groove. Clean any debris from the groove channel before installing the new mesh.
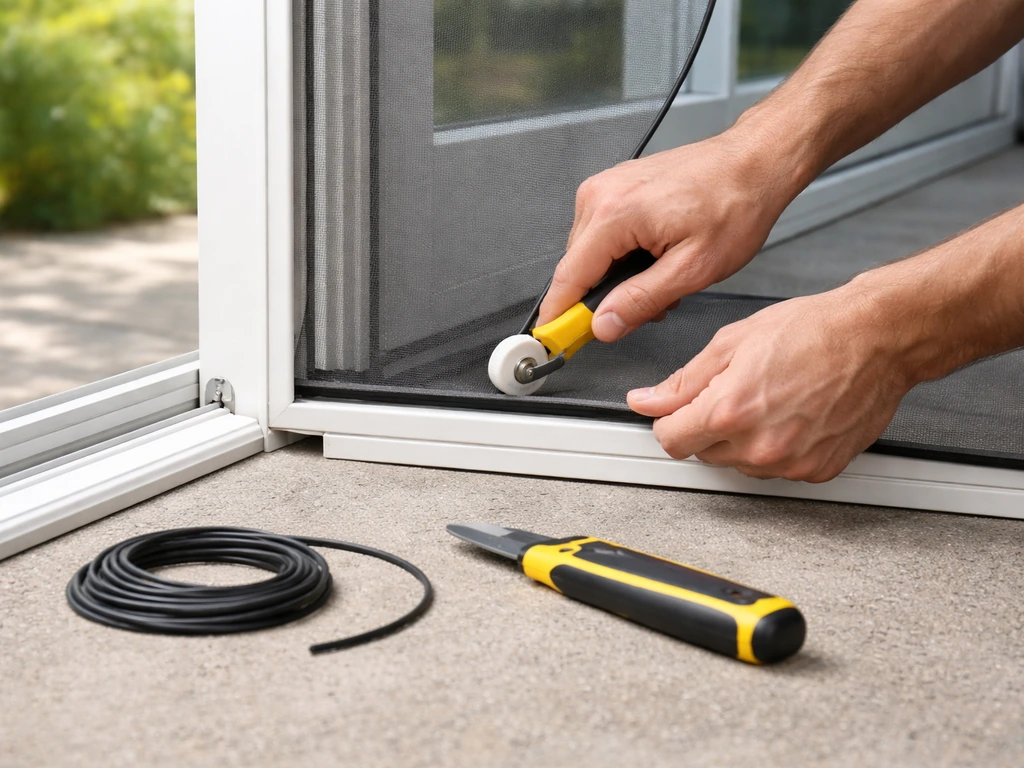
Install the replacement screen (spline and retainer steps)
This section covers both re-screening a frame and installing a whole new screen door, since either way you'll eventually need to seat mesh into a frame channel using spline. If you bought a pre-made replacement door with mesh already installed, skip to the re-hanging section below.
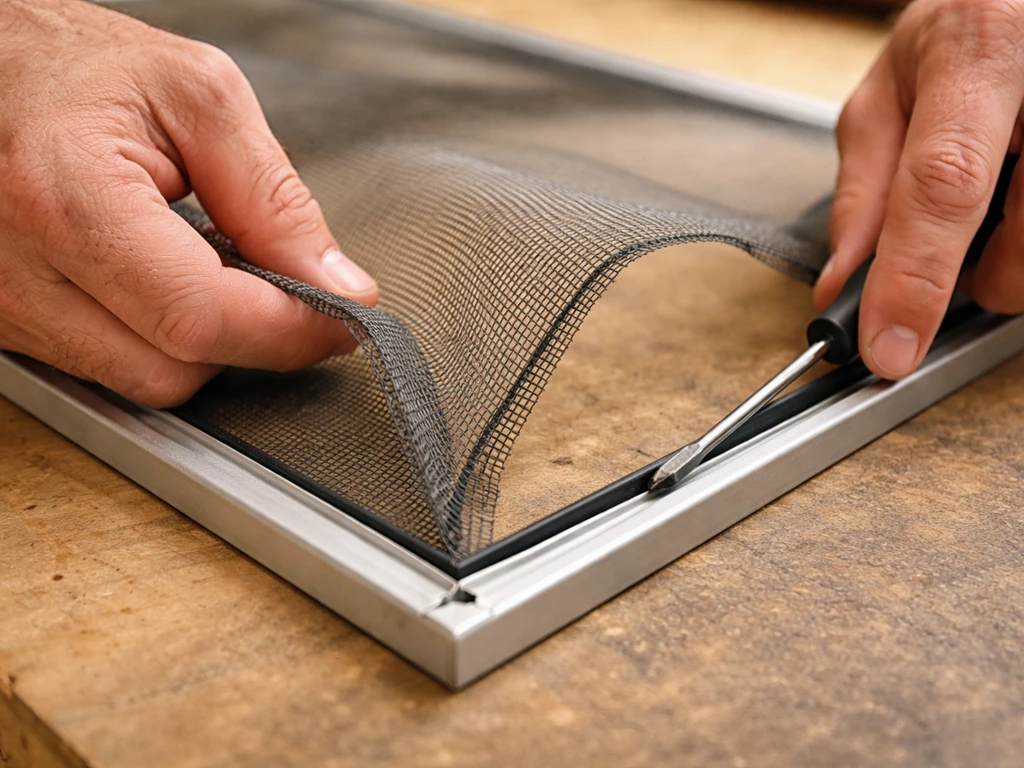
- Lay the frame flat on a table or other clean, flat surface. Flat is important: if the frame is bowed or twisted, it will stay that way once the spline locks the mesh in.
- Unroll your replacement mesh and lay it over the frame so it overlaps the frame edges by at least 1 to 2 inches on all four sides. For fiberglass mesh, align the weave straight with the frame edges so it doesn't look crooked when you're done.
- Start at one corner. Use the concave (grooved) wheel of the spline roller to press the mesh into the frame groove at a corner, then slowly roll along one of the long sides, pressing the mesh down into the groove as you go. Keep light hand tension on the mesh with your free hand to prevent bunching or sagging.
- Work opposite sides next (not adjacent sides). Press in the first long side, then the opposite long side, pulling the mesh gently taut before rolling. Then do the two short sides the same way. This cross-pattern keeps tension even across the whole screen.
- Once the mesh is pressed into all four grooves, go back to a corner and start rolling in the spline with the convex (rounded) wheel of the spline roller tool. Press the spline firmly into the groove over the mesh, working around all four sides continuously. The spline locks the mesh in place.
- Cut the spline at the end where you started, leaving a slight overlap of about a quarter inch into the corner.
- Use a utility knife to carefully trim the excess mesh flush with the outside edge of the spline. Hold the knife at a slight outward angle so you don't cut into the spline itself. One clean pass per side is usually enough.
Take your time on the tension step. Mesh that goes in crooked or loose will look bad and will sag or catch bugs at the edges. If you roll in one side and notice the mesh bunching badly, pull the spline back out on that side and redo it. The spline is reusable for a short time if you work quickly.
Rehang, align, and test the door
Reinstalling a sliding screen door
Before you rehang, clean the bottom sill track and the top head frame channel thoroughly. Dirt in the track is one of the main reasons screen doors don't glide properly after reinstallation. Once the tracks are clean, angle the top of the door into the upper track channel first, getting both top corners seated. Then swing the bottom of the door in over the bottom track and lower it down so the rollers rest in the track. This is the reverse of removal.
With the door in the track, use a putty knife to slide the bottom rollers fully into the track channel if they aren't sitting flush. Then turn the roller adjustment screws clockwise to raise the door until it's level and glides smoothly. The bottom of the door should clear the sill track by about 1/8", just enough to roll freely without leaving a gap that lets bugs through. Slide the door back and forth several times to confirm it moves smoothly and latches where it's supposed to.
Reinstalling a hinged screen door
For hinged systems, reattach the hinges or pivot brackets and reseat the hinge pins. If your door has a head clip and top adjustment screw, center the clip on the header and tighten the screw enough to hold it without binding. Test the swing through the full range of motion. The door should close flush against the door stop and the latch should engage without forcing. If it's binding at the top or bottom, loosen the adjustment screw slightly and reposition.
Testing the seal and fit
After either type of door is rehung, close it and check the perimeter gap all the way around. On a sliding door, look for consistent contact between the pile weatherstrip and the door frame with no obvious light gaps. On a hinged door, the door should close snugly against the door stop without a gap at the corners. If air or light is coming through at the edges but the door is otherwise aligned, the issue is usually a worn pile weatherstrip on the door frame, not a misaligned door.
Common problems and quick fixes
| Problem | Likely cause | Fix |
|---|---|---|
| Spline keeps popping out | Spline diameter too small for the groove | Pull the spline, go up one diameter size (e.g., from 0.160" to 0.165" or 0.170"), and re-roll it in |
| Mesh is wavy or saggy after install | Uneven tension during rolling, or mesh not pulled taut on opposite sides | Remove spline on loose sides, re-pull mesh taut, and re-roll the spline in |
| Sliding door is hard to move after reinstall | Rollers not raised enough, or track is still dirty | Turn roller adjustment screws clockwise to raise the door; re-clean the sill track |
| Sliding door falls out of the top track | Rollers raised too high, door is too short for the opening, or top track is damaged | Lower the rollers slightly; check that the door height matches the opening; inspect the top track for bends |
| Hinged door won't close flush | Hinge pin misaligned or head clip not centered | Recheck hinge pins are fully seated; loosen and recenter the head clip; adjust the top adjustment screw |
| Mesh has a diagonal wrinkle across the middle | Mesh installed on a bowed frame, or tension applied in wrong sequence | Check the frame is flat before re-installing; use the cross-pattern tensioning method (opposite sides first) |
| Gap at the corner where mesh meets spline | Mesh trimmed too close or spline ended too short at the corner | Press a short piece of new spline into the gap; if the mesh pulled back, you may need to redo that side |
One mistake worth flagging specifically: measuring the mesh opening instead of the full outer frame when cutting replacement mesh. If your patio screen door is still not operating smoothly, check the track condition and make sure you have the right replacement for your door type. You always want the mesh cut larger than the frame so it overlaps the spline groove on all sides. If you cut it to fit inside the frame, you won't have anything to grip or tension, and the spline won't have mesh to lock onto.
If your sliding screen door keeps jumping the track even after roller adjustment, the track itself may be bent or have a section of worn-out channel that's preventing the rollers from staying seated. In that case, the fix is replacing the track, which is a bigger project but still very doable. Separately, if the door itself is structurally bent or the frame corners are pulling apart, re-screening it is a short-term fix at best and a full door replacement makes more sense.
Most DIYers finish a basic re-screen job in under an hour once they have the right materials. The jobs that take longer are almost always tied to one of three things: wrong spline size (requiring a store run), a dirty or damaged track that needs attention before the door goes back in, or a frame that wasn't kept flat during the spline rolling step. If you ever need help putting a patio door back on track, focus on cleaning the tracks first and then seating the rollers correctly door goes back in. Get those three things right and the rest falls into place.
FAQ
Can I reuse the old spline when I replace the screen on a patio door?
Sometimes, if it came out in one piece and still holds its shape, you can reuse it briefly. If it looks stretched, nicked, or loses its “grip” in the groove, use new spline, because reusing damaged spline is a common reason for gaps and popping out after a few days of use.
What should I do if the new screen keeps popping the spline out?
Check three things: the spline size versus your groove width, the groove being clean and free of old debris, and whether you seated the mesh evenly before rolling. If you used a spline that is slightly too thin or you didn’t get the mesh fully sandwiched, it can release under tension and pop out when the door shifts.
How tight should I tension the screen mesh before rolling it into place?
You want it taut enough that it lays flat without wrinkles, but not so stretched that it bows the frame or creates uneven puckering near corners. A good cue is that you can press the mesh lightly at the center and it springs back without rippling around the spline line.
Why does my sliding screen door rub after reinstalling, even though the spline and mesh are correct?
Often it is not the screen, it is roller height and track condition. Recheck that both rollers are fully seated in the track channel, then adjust roller screws in small increments until the door clears the sill by about 1/8 inch and glides without contacting the frame.
My measurement for the screen opening was correct, but the mesh still doesn’t fit. What went wrong?
A common mistake is measuring only the visible mesh opening instead of the full outer frame dimensions and cutting the mesh to “fit inside.” You typically need extra overlap on all sides so the spline has enough mesh to grip and lock into the groove before trimming the excess.
How do I choose between round spline and flat spline for my patio door screen?
Use the spline type and diameter that match your frame groove design. Round spline is typical for many mesh-in-frame channels, while flat spline is used on larger porch or patio screen frames with different groove geometry. If you are unsure, match what was on the original screen, then verify groove width with a ruler or calipers.
What if I bought the wrong mesh size or spline size after measuring?
Don’t force it. If the spline is wrong, it can distort the frame or refuse to seat. If the mesh is too small, you will not have enough overlap to roll into the groove. The practical fix is to buy the correct spline size and recut mesh with at least a small extra margin on each side for proper spline seating.
Is it safe to use a screen door if the door is slightly off-level after replacement?
You should fix it before regular use. Small misalignment can cause the mesh to rub, wear pile weatherstrip unevenly, and increase the chance rollers jump the track. After rehanging, slide the door back and forth and confirm the latch engages without forcing and the perimeter gap looks consistent.
How can I tell whether a gap around the door is due to alignment or a worn weatherstrip?
If the door closes flush to the stop in the middle but you still see light gaps at the perimeter corners or edges, the issue is usually the pile weatherstrip rather than hinge or roller alignment. Compare contact along the whole perimeter, and if only the edges show gaps, replace the worn weatherstrip rather than re-adjusting the door repeatedly.
What should I do if the track looks straight but the sliding door still won’t stay seated?
Clean again, then inspect for localized wear or a bent section inside the channel. Even a small damaged or worn spot can prevent rollers from staying put, leading to jumping. If adjustment and cleaning do not solve it, the track may need replacement.
For hinged patio insect screens, what helps prevent damage when removing or reinstalling the door?
Before pulling the door free, note the orientation of the hinge pin, pivot, or any head clip, then loosen any adjustment screw only enough to take pressure off the connection. Reinstalling with the wrong orientation can cause binding at the top or bottom, making the latch feel tight or preventing full closure.
Next Article
How to Fix a Patio Screen Door: Sticking, Sliding Repair
Step-by-step fixes for sticking or sliding patio screen doors: troubleshoot rollers, track, latch, screen damage, and al