The best way to insulate a sliding glass patio door is to attack it in layers: start by sealing the frame edges and meeting rail with compression weatherstripping, replace or add a bottom door sweep or brush seal at the sill, then address the glass itself with window film or insulating curtains if drafts persist. Most of the cold air coming through a sliding patio door sneaks in at the sides, top, and especially the bottom track, not through the glass itself, so that's where your time and money should go first.
How to Insulate Sliding Glass Patio Doors: DIY Guide

Jamie Archer
13 May 2026
Why sliding glass doors draft in the first place
There are two distinct problems that people lump together as 'drafts,' and it helps to separate them before you buy anything. The first is air leakage: cold air physically moving through gaps around the door frame, at the meeting rails (where the sliding panel meets the fixed panel), along the sill, and where the frame meets the rough opening in the wall. The second is radiant heat loss through the glass itself, which makes you feel cold even when no air is moving. Both matter, but air leakage is almost always the bigger culprit and the easier fix.
The bottom track and sill area are the worst offenders on most doors. Debris builds up, the original brush or sweep wears down, and the track itself can warp slightly over years of temperature cycling. The meeting rail, that vertical spot where the sliding panel locks against the fixed panel, is the second most common leak point. Side and top frame seals tend to hold up better but still degrade over time, especially on doors that see heavy use or UV exposure.
There's also a mechanical dimension here that's easy to overlook. If the door's rollers are worn or the panel is misaligned, the door won't seat properly against its seals no matter how good those seals are. You can add all the weatherstripping in the world, but if the door is riding low and grinding against the track, or if the latch doesn't pull the panels together firmly, you'll still feel a draft. This is worth diagnosing before you spend money on materials.
Find the leaks before you buy anything
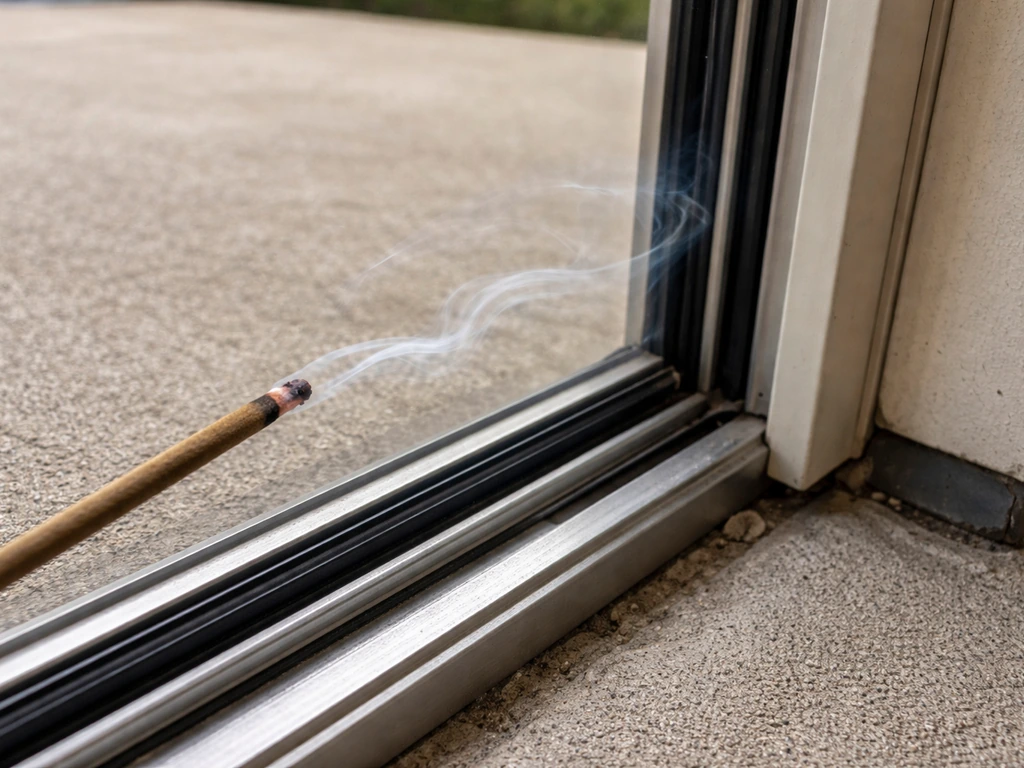
A quick visual inspection on a windy day will catch the obvious gaps, but for a thorough diagnosis, use the incense stick method the Department of Energy recommends: light a stick of incense and move it slowly around the door's perimeter, the meeting rail, and along the bottom track. Anywhere the smoke gets sucked in or blown sideways is an air leak. Do this with the door locked, since the latch pulls the panels together and represents real-world conditions. Pay close attention to the four corners of the frame, both ends of the bottom track, and the full length of the meeting rail.
While you're at it, take a close look at the door's mechanical condition. Try sliding the panel: it should glide with a light push. If it takes real effort, that's a sign of worn rollers or debris in the track, not just weatherstrip failure. Check whether the lock engages smoothly and pulls the panels together snugly. A lock that feels loose or requires lifting the panel to latch means the door isn't fully seated, which creates a direct air gap at the meeting rail. Note all of this before you start shopping for materials.
- Run your hand slowly around the full frame perimeter on a cold or windy day—you'll often feel air movement before you see it
- Use a lit incense stick for precise leak location; smoke deflection shows you exactly where the gap is
- Check the bottom track for built-up dirt, debris, or visible gaps between the door bottom and the track
- Inspect the meeting rail for worn or missing pile (fuzzy) weatherstrip
- Test the lock: does it engage easily and pull panels together, or does the panel need to be lifted?
- Note whether the door glides smoothly or requires force—hard operation usually means roller or alignment issues
DIY insulation options that actually work
There are four main tools for stopping air infiltration on a sliding patio door, and each targets a different part of the door. None of them are complicated to install, but matching the right product to the right location matters a lot.
Compression weatherstripping for the frame and meeting rail
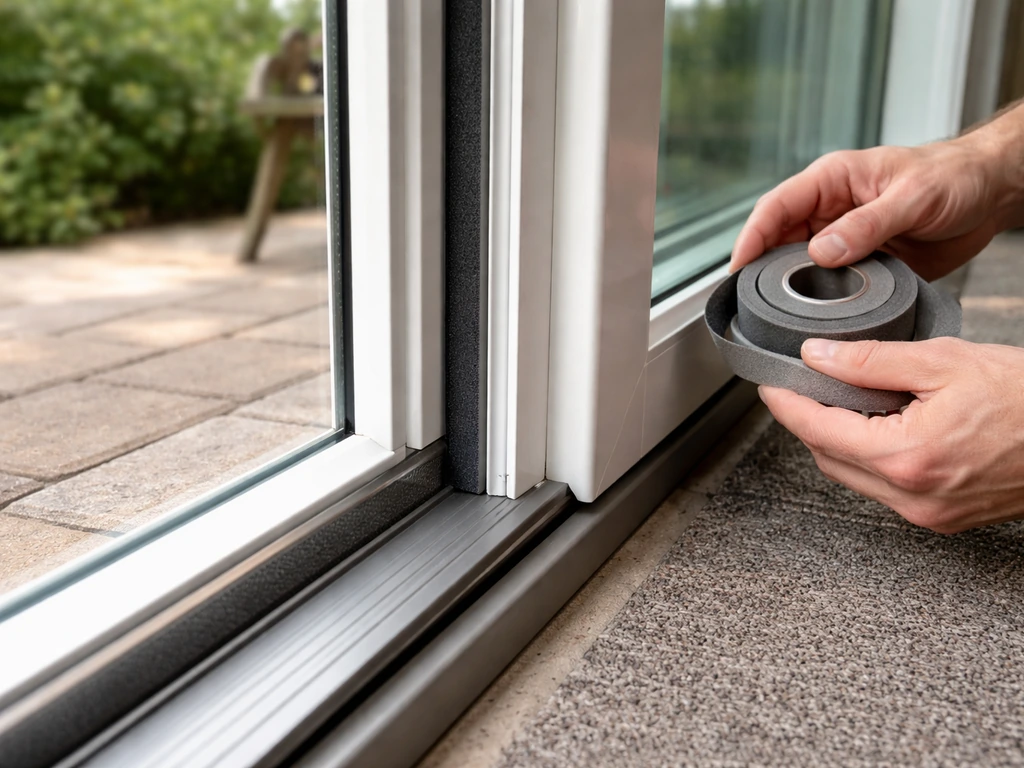
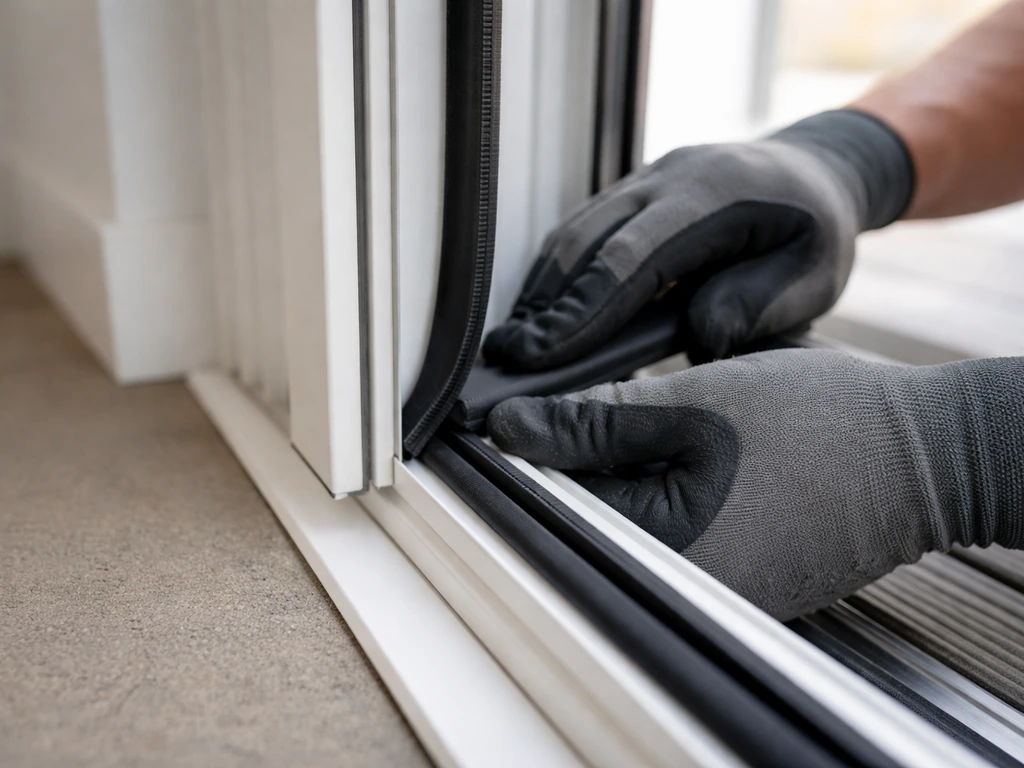
Compression-style weatherstripping, typically bulb seal or D-profile foam, works by being squeezed between two surfaces when the door closes or locks. It's the right choice for the top of the door frame and the side jambs where the sliding panel makes contact. EPDM rubber is the best material here: it handles outdoor temperature swings without cracking, returns to its original shape after compression (low compression set), and typically outlasts foam alternatives by years. Avoid basic open-cell foam tape for these spots; it compresses permanently within a season and stops doing its job. For the meeting rail, pile weatherstrip (the fuzzy brushy kind) is the standard factory choice and is easy to replace in a track slot if the original has worn down.
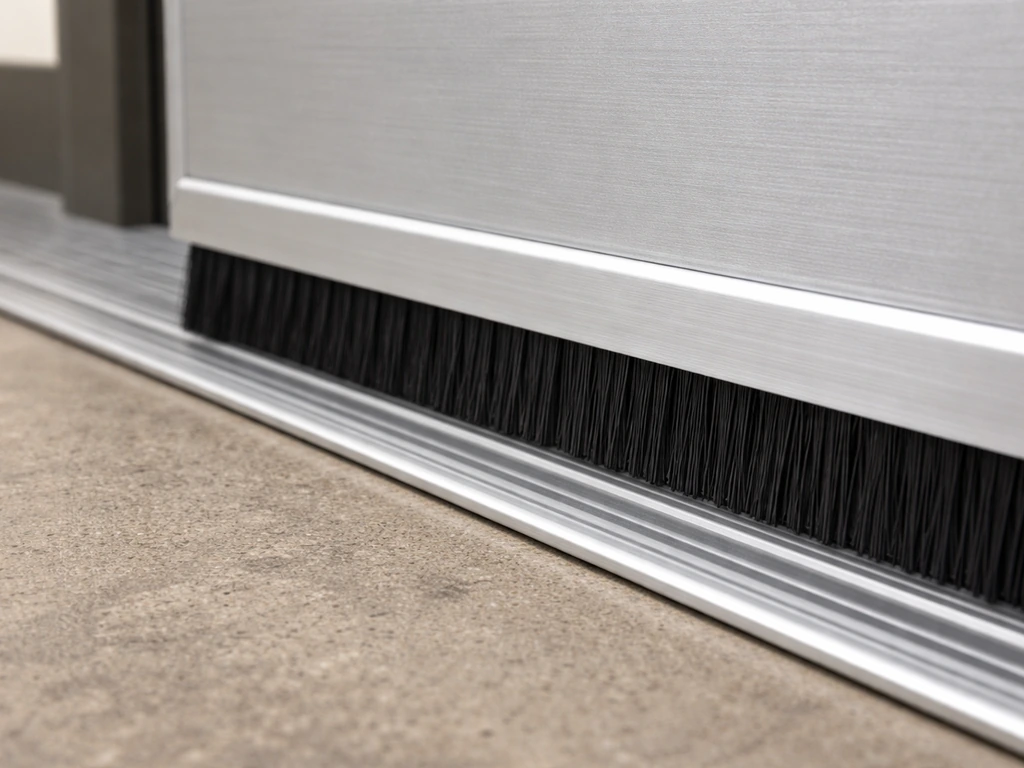
Door sweeps and brush seals for the bottom
The bottom of the door is where most sliding door insulation guides fall short. Unlike a hinged door, you can't just stick a rigid sweep on the bottom because it needs to glide along the track without dragging or jumping the rail. The right solution is a brush-style door sweep or a flexible fin seal designed for sliding doors. These compress against the sill as the door sits in its closed position and flex enough to allow movement when you slide the door open. Measure the door bottom carefully before cutting: if the seal is even slightly too thick or too stiff, you'll create binding and damage the rollers. There are aftermarket kits specifically rated for sliding and bi-fold doors that include the correct brush or flexible blade profile.
Draft stoppers for the curtain rod and interior base
A fabric draft stopper (a weighted tube) placed at the interior base of the door frame provides a cheap, zero-installation backup layer when you can't immediately fix the source problem. It won't stop air leakage the way proper sealing does, but it blocks the final gap where cold air pools at floor level. Similarly, if you have a curtain rod with a gap above the door frame, a simple valance or pelmet can prevent cold air from circulating behind the curtain and into the room. These are temporary or supplemental measures, not replacements for proper sealing.
Sealing the track, sill, and frame gaps
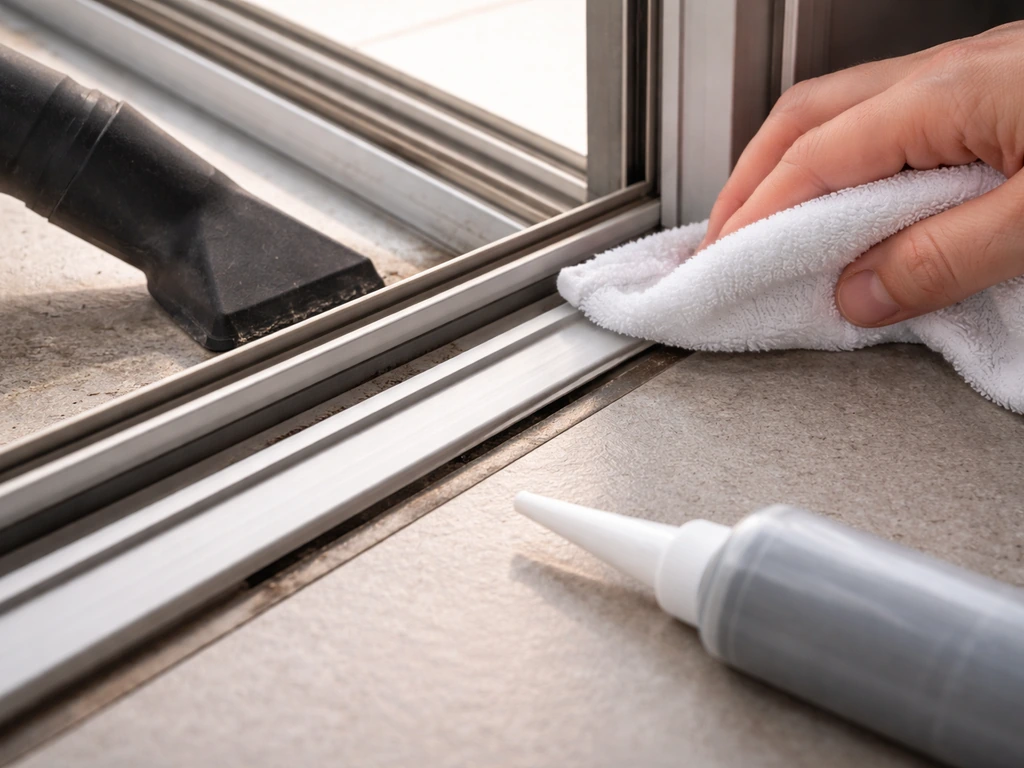
The track area needs a specific approach because you can't just caulk everything shut, the door has to keep sliding. Start by vacuuming out the track completely and wiping it down. Debris compresses over time and can lift the door off its normal seating position, creating gaps. Once the track is clean, inspect the sill pan underneath for cracks or gaps where the door frame meets the subfloor or interior trim. Small gaps here can be sealed with a flexible, paintable caulk on the interior side without affecting door operation.
For the exterior perimeter, the joint between the door frame and the wall, use a weather-resistant exterior caulk (silicone or siliconized latex). This joint is the first line of defense against air and water infiltration and is often cracked or missing entirely on older installations. Apply it around the full exterior perimeter of the frame where it meets the siding or stucco. Do not caulk the weep holes at the bottom of the exterior frame; those drain water and need to stay open.
For side gaps between the door frame and the rough opening (visible when you look at the interior trim or if trim has pulled away), a backer rod plus flexible caulk is the right approach. If you see larger gaps, more than about half an inch, low-expansion spray foam is effective but should be used carefully. Standard high-expansion foam can bow the frame and bind the door, so use a product labeled low-pressure or window-and-door formula specifically.
Insulating the glass itself
Once you've addressed the air leaks, the glass is the remaining heat-loss surface. On a single-pane door (increasingly rare but still out there in older homes), the glass contributes significantly to heat loss. On a modern double-pane or low-E door, the glass is much less of a factor, and you'll get more return from tightening up the seals.
Window film
Low-E window film applied to the interior glass surface reduces radiant heat loss in winter and solar heat gain in summer. It's a legitimate upgrade for single-pane or standard double-pane doors. However, low-E film should not be applied to windows or door glass that already has a factory low-E coating, as incompatible films can cause thermal stress and seal failures in double-pane units. Check the door's specs or the glass edge label before buying film. Installation requires a clean glass surface, an application solution, a squeegee, and patience, it's not hard but it does require careful trimming to avoid bubbles and peeling edges.
Insulating curtains and cellular shades
Cellular (honeycomb) shades are one of the best interior window treatments for patio doors from a thermal standpoint. The honeycombed cells trap air and create insulating layers between the glass and the room. Double-cell or triple-cell versions add progressively more resistance. For maximum effect, they need to fit snugly at the sides with minimal gap between the shade and the wall; a loose-hanging shade just circulates cold air behind it. Thermal curtains (lined with insulating or reflective backing) are more affordable and easier to install, and they work well as a complement to the physical sealing work you've done on the frame.
Specialty covers and insulating panels
For extreme cold climates or a door that's rarely used in winter, a removable insulating panel (essentially a rigid foam board cut to fit the door opening and sealed at the edges with magnetic or adhesive strips) provides excellent thermal resistance. Frost King and similar brands make dedicated patio door insulation kits that include plastic sheeting and tape as a lower-cost film-over-glass solution. These are effective but mean the door is out of service for the season, which works well for a secondary door but not a main entrance.
Comparing your main insulation options
| Method | Best For | Approximate Cost | DIY Difficulty | Keeps Door Usable? |
|---|---|---|---|---|
| EPDM bulb/compression weatherstrip (frame/top) | Air leaks at top and side jambs | $10–$25 | Easy | Yes |
| Brush or fin sweep (door bottom) | Bottom track air gap | $15–$40 | Easy–Moderate | Yes |
| Exterior perimeter caulk | Frame-to-wall gaps | $5–$15 | Easy | Yes |
| Low-expansion foam (interior rough opening) | Large interior frame gaps | $8–$12 | Easy (use carefully) | Yes |
| Low-E window film | Radiant heat loss through glass | $25–$60 | Moderate | Yes |
| Cellular/honeycomb shades | Glass + draft barrier layer | $80–$300+ | Easy | Yes |
| Thermal curtains | Budget glass insulation | $30–$100 | Easy | Yes |
| Patio door insulating kit (plastic sheeting) | Rarely-used door, maximum seal | $15–$30 | Easy | No (seasonal) |
For most homeowners, the best combination is: clean the track, replace worn weatherstrip on the frame and meeting rail, install a brush sweep at the door bottom, caulk the exterior perimeter, and add cellular shades or thermal curtains on the interior. Adding the right window treatments to cover patio doors can also boost privacy without undoing your insulation work how to cover patio doors for privacy. If you’re wondering how to insulate patio doors for winter, start with the leak points at the bottom track, then move up to the meeting rail and side frame seals insulate patio doors for winter for winter climate prep. That stack covers air infiltration and radiant loss without blocking the door or spending a lot of money. If you want, you can also focus on how to cover patio doors using the right insulation curtains, shades, or temporary draft stoppers. If you only do one thing, fix the bottom sweep and meeting rail strip, those two spots account for the majority of sliding door drafts. If you want to block drafts effectively, start with the bottom track and meeting rail area before moving on to the glass itself bottom sweep and meeting rail strip.
Step-by-step: installing weatherstripping and sealing the door
Plan on about two to three hours for a full weatherstripping and caulk job on a standard patio door. You'll need: EPDM bulb or D-profile weatherstrip, pile weatherstrip for the meeting rail, a brush-style bottom sweep rated for sliding doors, exterior silicone caulk, a utility knife, scissors, measuring tape, rubbing alcohol and a clean cloth, and a caulk gun. If you're doing the track at the same time, add a vacuum and a stiff brush.
- Clean everything first. Vacuum the track, wipe the frame edges with rubbing alcohol, and let it dry completely. Adhesive won't stick to dusty or oily surfaces.
- Remove old weatherstripping by pulling it out of its channel or peeling it off. Use a plastic scraper to remove adhesive residue without damaging the frame.
- Measure each section carefully before cutting. Cut weatherstrip slightly long (an inch or so), test-fit it, then trim to exact length. Cutting too short leaves gaps at corners.
- Install the top seal first, then the side jamb seals. Press firmly along the full length. For channel-mount pile strip on the meeting rail, slide it into the groove and confirm it runs the full height with no gaps.
- Install the bottom brush sweep. Most slide into a channel at the door bottom or screw on. Confirm the brush contacts the sill lightly when the door is closed—you should feel slight resistance but the door should still slide without dragging.
- Slide the door several times after installation. It should feel the same as before or slightly firmer at close—not difficult or binding. If it binds, the sweep is too thick or too low and needs adjustment.
- Caulk the exterior perimeter. Run a continuous bead at the joint between the door frame and the exterior wall surface. Smooth it with a wet finger and wipe off excess. Skip the weep holes at the bottom.
- Check the interior frame gaps. If trim has pulled away from the frame, apply flexible interior caulk at that joint. For larger gaps behind the trim, use low-expansion window-and-door foam and let it cure before replacing trim.
- Test with the incense stick again after everything is dry and cured. The smoke should stay steady at all the spots you treated.
Seasonal recheck in spring
Once warm weather arrives, take ten minutes to inspect what you installed over winter. Compression weatherstrip may have flattened slightly in high-contact spots and may need replacement earlier than expected if you used a softer material. Check that the brush sweep isn't clogged with debris from winter. If you used a seasonal film kit or insulating panel, remove it, store it flat, and inspect the door glass for any adhesive residue before warm weather sets in. A quick run of the incense test in early fall before temperatures drop is a smart annual habit.
When the door itself is the problem
All the weatherstripping in the world won't fix a door that doesn't sit correctly in its frame. Before or alongside your sealing work, check for these common mechanical issues that cause drafts by preventing the door from seating properly.
Worn rollers
The rollers sit in a housing at the bottom of the sliding panel and ride along the track. When they wear down, the door drops and sits lower than designed, which lifts the top of the panel away from the top seal and causes the bottom to scrape. Most sliding patio doors have adjustment screws at the bottom corners of the panel (accessible through small holes in the frame bottom or the edge of the panel). Turning them clockwise raises the panel, counterclockwise lowers it. If the door still feels rough or heavy after adjustment, the rollers themselves are worn and need replacement, it's a moderate DIY job involving removing the door panel from the track.
Misalignment and frame racking
If the door rubs on the frame at one corner or won't close flush, the door may be misaligned due to settling, frame racking, or an installation issue. A door that rubs against the frame at speed can cause real damage over time. Roller height adjustment fixes many alignment issues. If the door is consistently tighter at one corner regardless of roller adjustment, the frame itself may be out of square, and that's worth having a professional assess.
Lock not fully engaging
A sliding door lock that feels loose or doesn't require the door to be pushed firmly into place to engage is leaving a gap at the meeting rail. This is one of the most common causes of persistent drafts at that vertical center seam. Check whether the strike plate on the fixed panel is positioned correctly, if the latch hook barely catches or rattles, the strike plate needs adjustment. Most strike plates have slotted screws that allow some vertical movement. Adjusting it so the lock pulls the panels snugly together when latched can eliminate the meeting-rail draft without any weatherstripping change.
Condensation on the glass
Condensation on the interior glass surface in winter isn't an insulation failure, it means warm humid indoor air is hitting cold glass. It's a sign the glass has a low R-value (single pane or standard double pane without low-E coating) or that interior humidity is high. Condensation between the panes, however, means the seal on your double-pane unit has failed and the argon or air fill has been replaced by moist air. A fogged double-pane unit can't be dried out or repaired with weatherstripping, the glass unit needs to be replaced.
When to call a pro
Most of what's covered here is genuine DIY territory. Call a professional when: the door frame is visibly racked or out of square and roller adjustment doesn't fix alignment, the door panel needs to come out and you're not comfortable lifting it (these panels are heavy, often 80 to 150 pounds), the double-pane glass unit is fogged and needs replacement, or there's visible rot or damage to the wood framing around the door rough opening. A single service visit to adjust, re-seal, and inspect a patio door typically runs $150 to $350 depending on your area, and it's worth it if the mechanical issues are beyond what adjustment screws can fix.
FAQ
Do I need to insulate the glass if the door feels drafty?
Usually not first. Start by fixing air leakage at the bottom track, meeting rail, and frame edges, because those paths deliver the biggest comfort gains. Only add insulating glass measures (like cellular shades or low-E film) after the door seats and seals properly.
Can I just caulk around the whole patio door to stop drafts?
No, especially not at moving or drainage areas. Caulking the bottom track or sealing over weep holes can trap moisture and prevent the door from operating correctly. Use caulk only on intended joints, like the exterior perimeter and interior-side gaps you can control without blocking drainage.
How do I tell if cold air is coming from the track versus the meeting rail?
Do a targeted incense test: hold the smoke at the bottom track openings and ends while the door is locked, then repeat along the vertical meeting rail seam. If smoke gets pulled in strongly at the bottom but not the rail, your sweep or sill area needs priority.
What’s the most common mistake with bottom door sweeps on sliding doors?
Choosing a sweep that is too stiff or too thick for the door’s roller clearance. If it drags when opening, you can wear rollers quickly and cause uneven seating that reopens gaps. Measure carefully, and confirm the door glides with a light push after installation.
I installed compression weatherstripping and it still drafts. What else should I check?
Check door seating mechanics. If rollers are worn, the panel rides low and won’t compress the seals consistently, especially at the meeting rail and top lock area. Also verify the latch engages snugly and pulls the panels together, not loosely.
Should I install weatherstripping on the sides if my main problem is the bottom?
It’s smart to do all sealing surfaces as a system, but you can stage the work. If the incense test shows most leakage at the bottom track and meeting rail, replace the bottom sweep and meeting-rail pile first, then reassess before buying side-top materials.
Is silicone caulk always safe for the exterior perimeter?
Use weather-resistant exterior caulk on exterior joints, but avoid it at weep holes and places that must drain. Also note silicone often adheres differently than siliconized latex, so if you plan future rework, keep that in mind when selecting products.
What’s a safe way to fill gaps around the frame without bowing it?
For small gaps, use backer rod plus flexible caulk. For larger gaps, use low-expansion, window-and-door rated spray foam. Avoid high-expansion foam, which can push the frame out of square and make the door bind.
Can low-E film be used on a sliding door that already has low-E glass?
Usually no. If the glass is factory low-E coated, incompatible film can create thermal stress and potentially lead to failure in insulated units. Check the glass edge label or door specs before applying film.
My double-pane door is fogged. Does adding interior insulation fix the problem?
Fog between panes indicates a failed sealed unit, so insulation on the frame will not correct that. The glass IGU typically needs replacement. You can still improve comfort from draft sealing, but the fog itself won’t clear.
Do insulation curtains or shades replace weatherstripping?
No, they are a supplemental layer. Curtains and cellular shades reduce radiant heat loss and drafts from the room side, but they do not stop air leakage through frame gaps. Seal the leaks first, then add interior treatments for best results.
If my door is hard to slide, will new weatherstripping solve it?
Not likely. Hard sliding often points to debris in the track, misalignment, or roller wear. Weatherstripping can also increase friction if the door is not seating correctly. Clean the track and check roller movement before replacing seals.
How often should I inspect or replace the seals?
Do a quick check each fall or early winter. Compression seals can flatten in high-contact areas, and brush sweeps can clog with debris. If you see the door no longer compresses the seal or you feel return drafts after initial improvements, plan on replacing that specific component rather than redoing everything.
When should I stop DIY and call a pro?
Call a professional if roller adjustment does not restore proper alignment, if the frame is visibly racked out of square, if you need to remove heavy sliding panels, or if you see rot around the rough opening. Also call if the double-pane unit is fogged, since repair usually means replacing the sealed glass unit.
Next Article
How to Seal a Patio Door: Step-by-Step DIY Guide
Step-by-step DIY guide to seal a sliding patio door, stop drafts, seal frame gaps, and test for air leaks.
