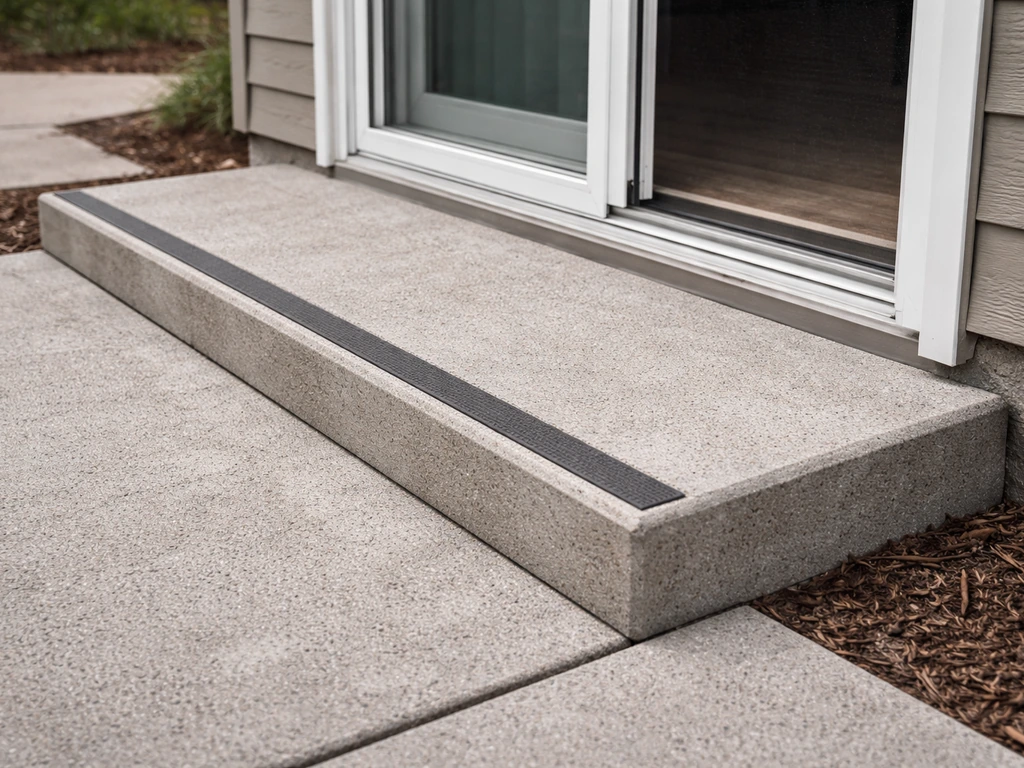
The best solution for a step-down outside a patio door depends on the height difference and what's already there. For a drop of 1 to 3 inches, a concrete or paver landing flush with the threshold solves the trip hazard without touching the door. For 4 to 7 inches, a single precast or built-up step works well. For 8 inches or more, you're looking at a proper stoop or short stair run with a landing at the top that's large enough to stand on while opening the door. Whatever you build, that top surface must sit below the door's sweep by at least the thickness of a playing card so the seal still does its job.
Ideas for Steps Down From Patio Doors: DIY Fixes

Jamie Archer
30 Jun 2026
What 'steps down' actually means at a patio door
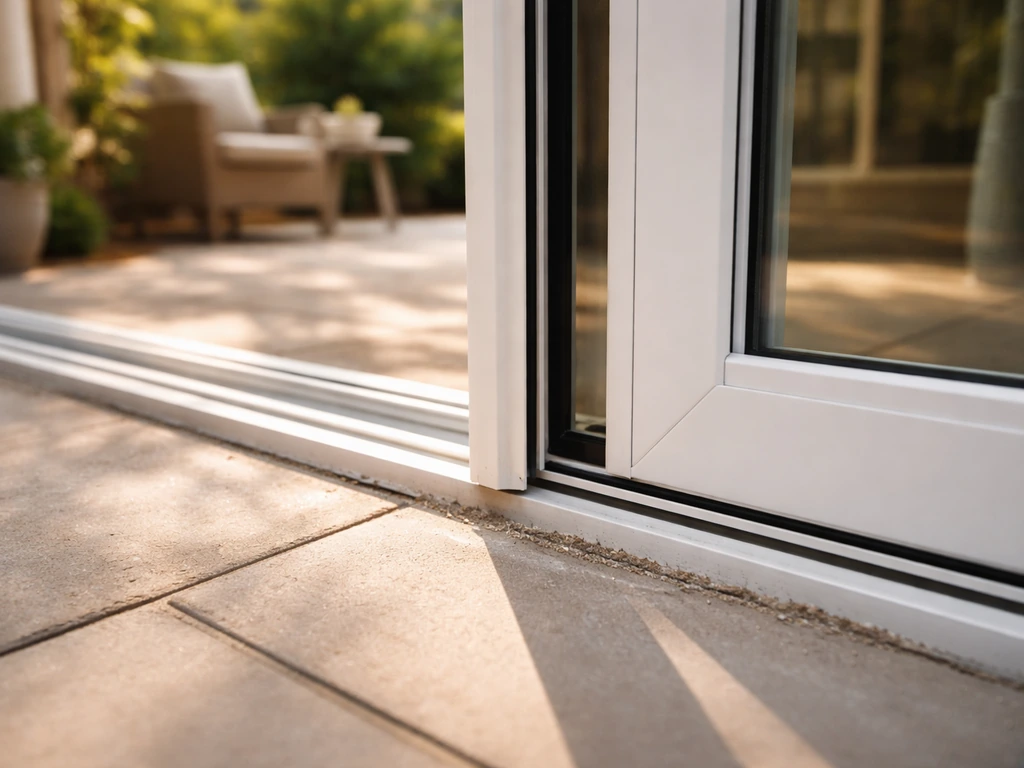
Most patio doors sit at floor height inside, with a low threshold assembly at the bottom. The ground or deck outside is almost never at exactly the same level. That gap between the interior floor and the exterior ground is the 'step down' and it ranges from a slight 1-inch annoyance to a full 24-inch drop onto a concrete patio. The problem matters for three reasons: safety (it's the number one trip spot in a home), door operation (adding height outside can cause the sweep to drag or the sliding panel to bind), and weather sealing (change the height relationship and you can break the threshold-to-sill seal and invite water and drafts inside).
The step-down situation also varies by door type. A hinged patio door swings outward over the top step, so the landing needs to be large enough that you aren't stepping backward off the edge while pulling the door open. A sliding glass door doesn't swing out, but the track assembly sits right at the bottom, and any buildup outside that's even slightly too high can lift the panel off the track's weather seal. Keep both of those constraints in mind as you plan your fix. If you are ready to move from ideas to action, follow the build steps for patio door step-downs that match your drop height and door type plan your fix.
Fix the trip hazard today before anything else
If you're not ready to build yet, deal with the immediate safety issue now. A raw threshold drop with nothing outside it is a genuine fall risk, especially at night, in wet weather, or for anyone who doesn't know it's there. These quick fixes take under an hour and cost almost nothing. Temporary steps for a patio door can bridge the gap quickly while you plan a permanent landing or stoop temporary steps for patio door.
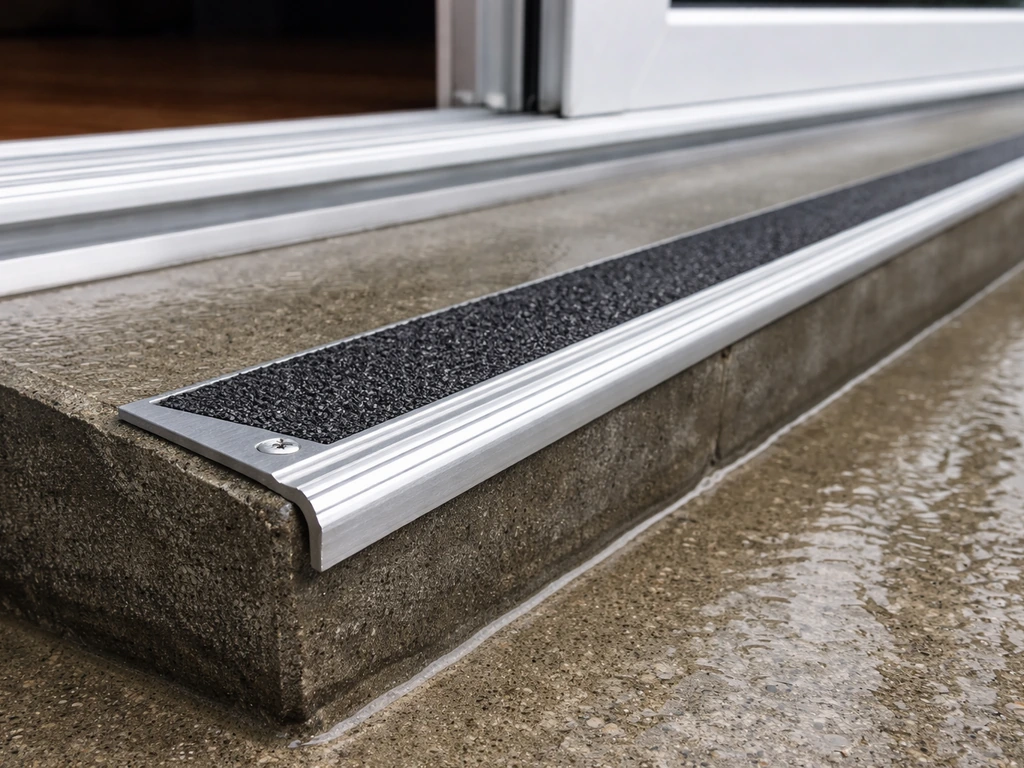
- Install aluminum abrasive stair nosing along the threshold edge. Screw-down or adhesive versions are available at any hardware store. The grit surface gives a clear edge to land your foot on and adds real grip on wet days or in icy conditions. Adhesive-only versions can lift at the edges after rain, so screw-down is worth the extra five minutes.
- Add contrasting color tape or a strip of outdoor-rated non-slip tape across the full width of the step edge. It won't last forever, but it makes the edge visible and adds traction immediately.
- Drop a rubber-backed outdoor mat right at the threshold. This doesn't fix the height difference, but it slows your foot down and gives a stable surface to step onto. Weight it down or use a mat with anti-slip backing rated for outdoor use.
- Improve lighting. A battery-powered LED step light placed at the door frame takes two minutes to mount and makes the drop visible at night. Most trip accidents happen when the step-down is invisible.
None of these are permanent fixes, but they reduce the risk while you plan the real solution. If you have elderly family members or anyone with mobility concerns using this door regularly, treat this as urgent, not optional.
Picking the right approach for your specific drop
Before you choose materials or start digging, measure the actual drop from the top of the threshold (not the interior floor) to the existing ground or surface outside. That number drives every decision that follows.
| Height Drop | Best Solution | DIY Difficulty |
|---|---|---|
| 1 to 3 inches | Paver or concrete landing pad flush with or just below threshold | Easy |
| 4 to 7 inches | Single precast step or one-step concrete/paver stoop | Moderate |
| 8 to 14 inches | Two-step run with landing at top, or raised platform/deck bridge | Moderate to Hard |
| 15 to 24 inches | Full stoop with handrail, or deck extension | Hard, consider a pro |
| Over 24 inches / multiple steps needed | Engineered stair run with landing, possibly with ramp option | Call a structural pro |
The other factor is whether you need to modify something that already exists or start from scratch. Existing steps that are settling, cracking, or uneven are a repair job covered later in this article. If there's nothing outside the door right now, you're building new. And if you want a ramp instead of steps (for accessibility or rolling equipment), the ADA rule of thumb is 1 inch of rise per 12 inches of horizontal run, with a minimum 36-inch clear width. A 6-inch drop needs a 6-foot ramp run at minimum, so make sure you have the space.
One specific scenario worth calling out: the 'landing-only' fix. If your door has a drop of just a few inches and the main issue is that there's no landing at all (just a step straight to ground level), adding a poured concrete or paver pad right outside the door, sized at least 36 inches deep and as wide as the door opening, often solves the problem without any steps at all. Adding stone steps from patio door to ground can be a solid solution when a simple landing pad is not enough. You can bring the ground up to meet the threshold rather than stepping down to meet the ground.
Materials and design options
Concrete
Poured concrete is durable, permanent, and handles freeze-thaw well when properly reinforced. Precast concrete steps are even easier for a DIYer: you buy a pre-made step block, set it on a compacted gravel base, and level it. The limitation is that precast steps come in fixed heights (typically 7 or 7.5 inches), so if your drop is 5 inches, you'll end up with a step that's slightly too tall or need to build up the base to compensate. For custom-height stoops, poured-in-place concrete is more flexible but requires forming and curing time. Either way, slope the top surface slightly (about 1/8 inch per foot) away from the door so water drains away and doesn't pool at the threshold.
Pavers
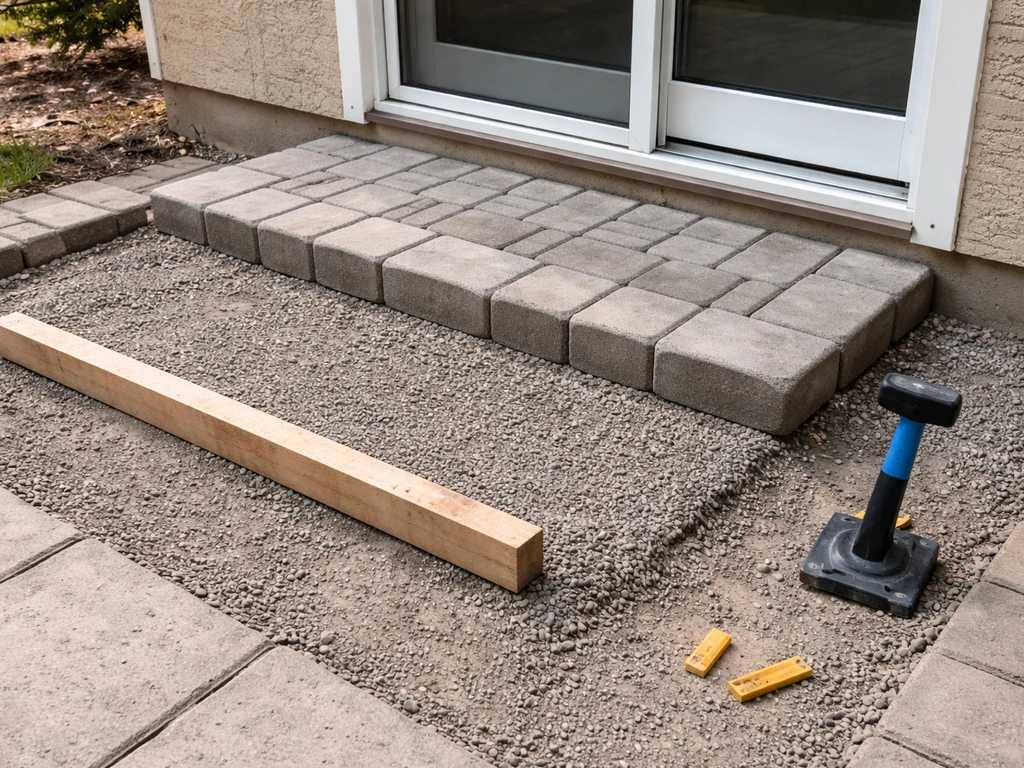
Pavers are a popular DIY choice because they're forgiving to install and easy to adjust. You can build up a landing pad or a step structure using paver blocks on a compacted gravel and sand base. The critical detail is base depth: skip this and the pavers will shift within a season. Dig down 6 to 8 inches, lay 4 to 6 inches of compacted crushed stone, then 1 inch of bedding sand, then your pavers. Use polymeric sand in the joints to lock them. Pavers drain reasonably well through the joints, which is an advantage near a door threshold. If pavers sink or tip, it's almost always a base problem, not a surface problem, and the fix is to pull them up, re-compact, and relay.
Wood (deck platform or step)
Pressure-treated wood steps or a small deck platform are fast to build and easy to customize to exact height. They're a natural choice if your patio door opens onto an existing deck. The downside is maintenance: wood needs sealing, painting, or staining every few years, and the bottom of the frame is vulnerable to moisture and rot if it sits on bare soil without adequate drainage underneath. Use composite decking or tropical hardwood if you want lower maintenance. Build with at least 2x8 framing for a small platform, and keep any wood at least 6 inches above grade to improve airflow and slow decay.
Metal treads and prefab systems
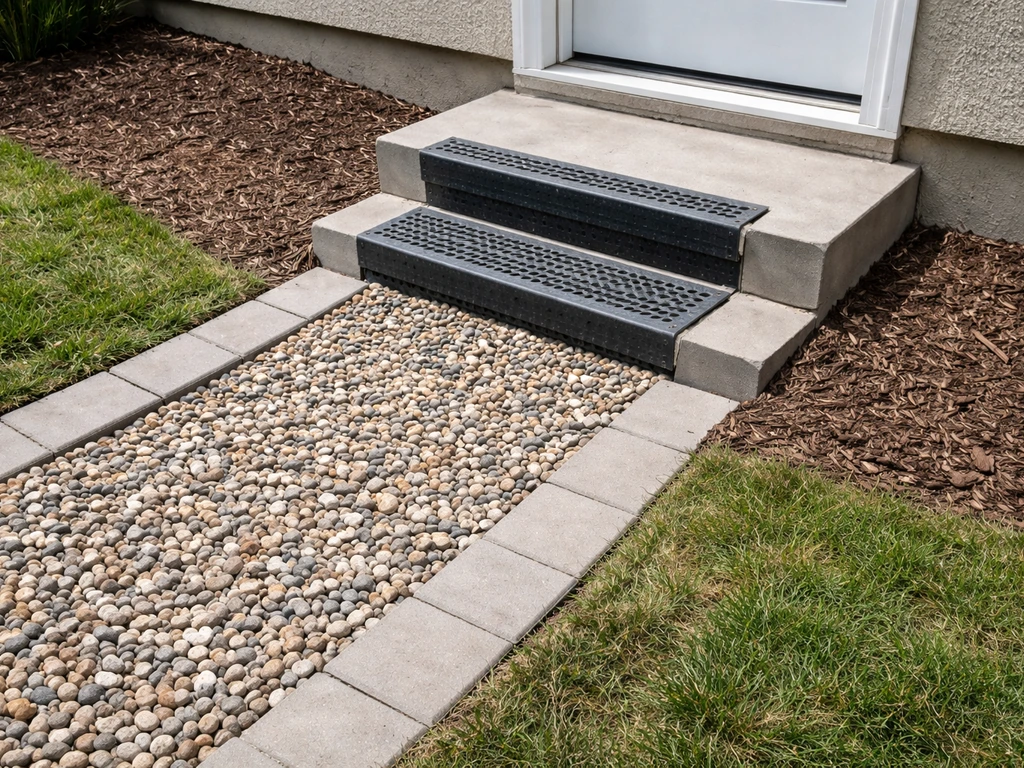
Aluminum or steel prefab step systems are worth considering when you want something quick, adjustable, and removable. They come as single or double steps with adjustable-height legs, and they're common for temporary needs or for mobile home/manufactured home installations. They don't rot, won't heave with frost if the legs are properly set, and most include integral grating or grit surfaces for traction. The tradeoff is aesthetics: they look utilitarian. If curb appeal matters, pavers or concrete are better. Prefab metal steps are covered in more detail in the related guide on prefab steps for patio doors.
Drainage: the detail most people skip
Whatever material you choose, drainage is the most important design decision you'll make. Water that pools near the threshold will eventually work its way under the door, degrade the sill pan assembly, and rot the framing. The sill pan under your door is specifically designed to drain water to the exterior, and any step or landing you add must continue that drainage path outward, not trap water against the foundation or door frame. Slope your step surface and landing at least 1/8 inch per foot away from the house, make sure your gravel base allows water to percolate down rather than pool, and keep the face of the stoop or step clear of the siding by at least half an inch so water can drain down the face rather than wicking sideways into the wall.
How to measure for threshold clearance and door operation
This is the step most DIYers skip, and it's the one that causes the most problems. Before you finalize the height of your new step or landing surface, you need to know exactly how much clearance exists between the bottom of the door (or the sweep) and the current exterior surface. This matters especially when you are building steps off a patio door and need the door to seal and open correctly new step or landing surface. Getting this wrong means your door won't seal or won't open properly.
- Open the patio door fully and look at the bottom of the door panel or sweep. Measure the gap between the sweep and the threshold plate (the piece mounted to the sill). On most doors this should be 1/8 to 3/8 inch.
- Do the playing card test: slide a standard playing card under the closed door between the sweep and the threshold. You should feel slight resistance as you pull it out. Too easy means the gap is too large and air is leaking; won't go in at all means it may be binding.
- Measure from the threshold plate down to the existing exterior surface (the ground, existing step, or patio surface just outside the door). This is your usable drop and what your new surface must stay below.
- For a hinged door that swings out, open it to 90 degrees and measure how far the door bottom clears the exterior surface as it swings. Your new step surface must stay below the arc of the door's travel, or the door will drag and potentially damage the sweep.
- For a sliding door, check the bottom track. If your new surface will come within 1/2 inch of the track exterior lip, you're risking interference with the sill pan drainage path. Keep new surfaces at least 3/4 inch below the track lip.
- Write down: threshold height above exterior surface, sweep clearance, and (for swinging doors) the door's sweep arc clearance. These three numbers define the maximum height your new landing or step can reach.
If you're adding a landing that will come close to the bottom of the door frame, also check the weather stripping around the door's perimeter. Settlement or racking of the door frame (which can be caused by exterior additions that put lateral load on the foundation or framing) can throw off the alignment of the sliding panel or the seal contact points. If your door was closing fine before and starts sticking or leaking after you add exterior steps, suspect interference at the threshold first.
DIY repair checklist for existing step problems

If you already have steps and they're failing, diagnose the specific problem before throwing materials at it. Here's a symptom-based checklist.
Uneven or tilting steps
If one side of the step is lower than the other, or the whole step has tipped away from the house, the base has shifted. Dig down at the low corner to inspect: if you find loose soil, poor compaction, or water-saturated ground, you have a drainage and base problem. The fix is to reset on a proper compacted gravel base, not just to shim the surface. For precast steps, you can lift the block with a pry bar or floor jack, re-compact with crushed stone, and reset. For poured concrete, severe tipping can indicate a footing problem that may need a professional evaluation, especially if the whole stoop is moving rather than just settling.
Sinking or settling
Gradual sinking is almost always a base and drainage issue: water is washing out fine soil particles from under the step, or freeze-thaw cycles are heaving and dropping the base material. For pavers, the repair is straightforward: pull the affected pavers, add compacted gravel, re-lay. For concrete, you can try foam-lifting (a contractor injects expanding foam under the slab to raise it) or slabjacking (pumping a slurry underneath), both of which are professional-level jobs. If the sinking is directly under the door threshold and the door frame itself has moved, that's a structural concern and warrants a pro assessment before you DIY anything.
Loose or wobbly steps
Loose steps have failed at the connection point or the base. Wooden steps: check the stringers (the angled side boards) for rot at the bottom where they contact the ground. Probe with a screwdriver. If it sinks in easily, the wood is rotted and needs replacement rather than repair. Concrete block steps that feel wobbly: they've lost their base contact and need to be reset. Don't just add mortar on top as a band-aid; it won't hold long-term.
Rotted subbase or sill pan area
If water has been pooling at the threshold and you're seeing soft spots in the door frame or subfloor, the sill pan assembly may have failed. This is the most serious scenario. A functional sill pan diverts water away from the rough opening using a sloped pan with end dams and a back dam to prevent lateral infiltration. A failed one lets water run straight into the framing. Signs of this include efflorescence (white mineral deposits) on concrete near the door base, swollen wood at the door frame bottom corners, or peeling interior flooring near the door. This is worth calling a professional for, because properly flashing and resealing the sill pan while keeping the door operational requires removing trim and possibly the door itself.
When to call a pro instead of DIYing
- The door frame itself has moved, racked, or the door panel no longer aligns with the frame
- You see wide cracks (wider than 1/4 inch) in a poured concrete stoop, especially horizontal or stair-step cracks that follow the mortar joints
- The sinking is rapid or has worsened significantly within one season
- There's visible rot or water damage extending into the door's rough opening or subfloor
- The whole stoop (not just the step surface) has separated from the house foundation
- You're in a region with heavy clay soil or significant frost depth and the settling is recurring despite repairs
Hardware and accessibility upgrades worth adding
Handrails and grab bars
Any stair run of two or more steps should have a handrail on at least one side. The IRC calls for guards on open-sided stairs, with handrail gripping surfaces at 34 to 38 inches above the stair nosing. For a short one- or two-step stoop at a patio door, a single wall-mounted grab bar on the door frame side is often more practical than a full rail system. Mount it into the framing (not just the trim) and position it so someone stepping down can use it while also reaching for the door handle. Stainless steel grab bars rated for outdoor use resist corrosion and don't need painting.
Non-slip treads and nosings
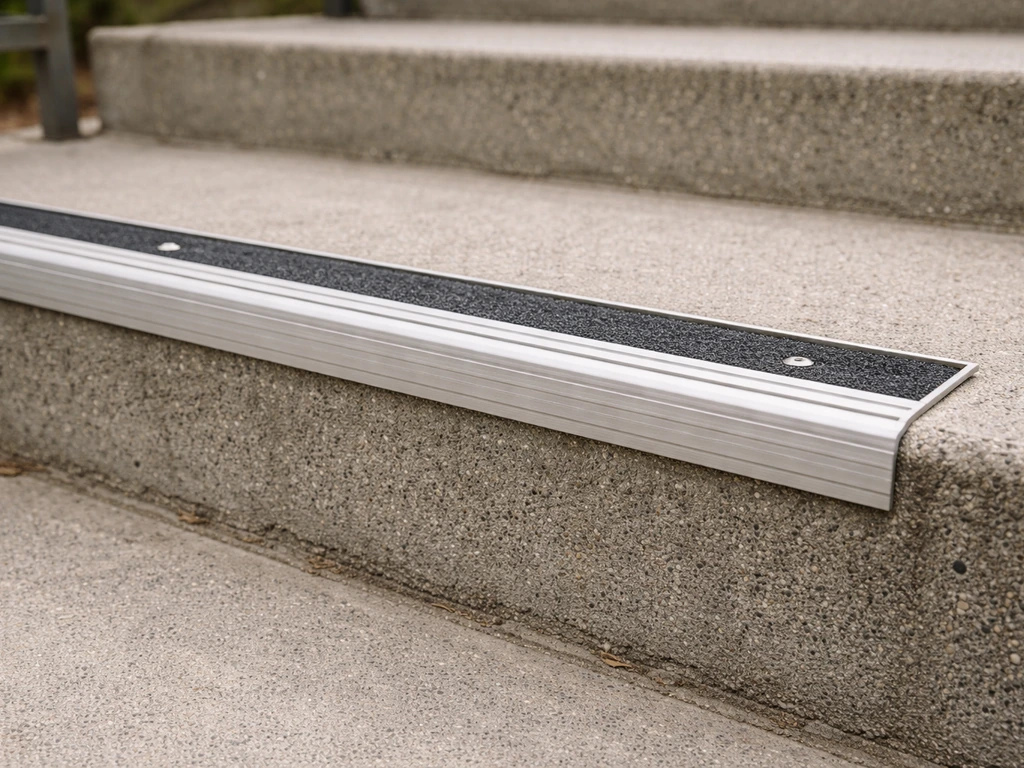
Aluminum abrasive stair nosings screwed to the front edge of each tread are the best long-term traction solution. They protect the tread edge from chipping, make the step edge clearly visible, and provide grip even when wet or icy. Look for nosings with grit-filled channels rather than just a rough surface texture, as the channels maintain their grip longer. Install them with the screws counter-sunk so there's no trip hazard from the fastener heads. For landings and flat surfaces, adhesive non-slip strips work short-term but tend to lift at the edges in wet climates; outdoor-rated aluminum grit plates or rubber stair treads with screw-down edges hold much longer.
Riser management
Open risers (the vertical face between treads left open) look clean but create more trip risk than closed risers because feet can catch the back of the tread. For a single exterior step, a closed riser with a vertical face is safer and easier to seal against water intrusion underneath the tread. Keep riser height consistent: if you have two steps, make both risers the same height. Variable riser heights are the most common cause of stair trips because your leg-muscle memory adapts to the first step and misses the second one.
Landing size: the overlooked safety spec
Home inspectors flag this constantly: the landing at the top of exterior steps needs to be deep enough that you can stand on it and open the door without stepping backward off the edge. For a door that swings out, that means the landing must be at least as deep as the door's sweep arc, which is typically 32 to 36 inches for a standard door. Add a few inches of margin. The minimum to aim for is 36 inches of depth (front-to-back) and at least the full width of the door opening plus 12 inches on each side. If your landing is shallower than 30 inches deep, it's a hazard regardless of how well the steps are built.
Accessibility: when to think about a ramp instead
If you or a family member has mobility limitations, or you frequently move bulky items through this door (appliances, furniture), consider adding a ramp option alongside or instead of steps. The standard rule is a maximum 1:12 slope (1 inch of rise for every 12 horizontal inches) and a minimum 36-inch clear width. A 6-inch drop needs at least a 6-foot ramp run. That's often practical for a patio door that opens to a yard. You'll also need a flat landing at the top (maximum 1:48 slope, essentially flat) that's at least 60 inches long in the direction of travel per accessibility guidelines. Temporary ramp systems made of aluminum sections can bridge a drop quickly without any construction, which is a useful interim solution while you plan a permanent fix.
FAQ
How do I measure the step down correctly when the outside ground slopes?
Before you buy materials, re-measure the drop at two points, one near each side of the door opening. If the exterior surface slopes, your step height may need to be tapered or your landing must be built level while the drainage slope is handled on the top surface.
What if my new landing ends up too high and the door won’t seal or slide properly?
Check the clearance between the door’s sweep and the future landing using a cardboard gauge or straightedge, then add the required gap you’re already planning for. If the landing ends up too high, you can sometimes lower the landing by removing base material, but if the door track or sill pan clearance is the limiting factor, you may need a different step height strategy.
My door used to close fine, but now it leaks or binds, what should I check first?
If the door sticks only after you install steps, look for lateral interference first, meaning the steps are pushing water and debris toward the threshold or the landing is not level and is shifting the door alignment. A quick test is to run a thin strip of paper around the perimeter, then compare gaps before and after the build, especially at the bottom corners.
How do I prevent paver joints from washing out near the threshold?
Treat polymeric sand as a seasonal system. It needs moisture to activate and it can fail if you hose the area aggressively right after installation or if water constantly rushes through the joints, so protect the new paver surface from hard washdowns for a few days and avoid constant concentrated runoff onto the joint lines.
Can I level failing steps by shimming instead of rebuilding the base?
Yes, but do it intentionally. If you rely on shimming alone, the surface may look level at first and then tilt when freeze-thaw or washout happens. Use shims only as a final adjustment after you’ve rebuilt the base with compacted crushed stone and bedding sand.
What should I do if there are signs the sill pan has failed?
If you see white residue (efflorescence) or the bottom wood looks swollen, don’t just improve exterior drainage. Those signs can mean the sill pan or flashing isn’t directing water outward, so the next step is to inspect for failed flashing and reseal/replace the sill pan assembly, which often requires removing trim.
What’s the most common landing mistake for a patio door that swings outward?
If the landing is for a hinged outward-swinging patio door, you need room not only to stand but also to pull the door open without stepping backward. A landing that is “wide enough” but too shallow front-to-back is a common mistake, so verify depth relative to the door sweep arc before pouring or installing materials.
What’s the best way to improve traction on an outdoor step down from a patio door?
For traction, choose a grit-filled metal nosing on the step edges, and keep the fastener heads recessed so nothing protrudes. Avoid smooth painted surfaces on step faces, and if you use non-slip strips, plan to replace them sooner in wet climates because they tend to lift at the edges.
Are temporary steps acceptable if I’m planning a permanent fix soon?
Don’t assume a temporary solution is “good enough” for safety. Temporary steps often shift or wobble, so set clear footing and inspect after the first rain and after freeze-thaw events. If anyone with mobility concerns uses the door frequently, prioritize a permanent landing or stoop rather than extending the temporary fix.
If I switch from steps to a ramp, what design details are critical near the patio door?
A ramp can be a good choice if you need mobility access or to roll equipment through, but you still need to design the top landing so the door operates without interference. Keep the ramp slope within the 1:12 guideline, and make sure the top landing is flat and drains away from the door so water doesn’t undermine the threshold area.
How can I tell whether my problem is surface damage or an underlying footing/drainage issue?
If the existing steps are settling unevenly, first fix the base and drainage path before you add a cosmetic surface. A practical decision rule is, if any movement continues after re-laying pavers or resetting on new compacted stone, treat it as an underlying footing or slope issue and consider professional inspection.
Next Article
Temporary Steps for Patio Door Problems Today
Quick temporary steps for patio door issues: fix sticking tracks, drafts, lock jams, screen problems, align rollers safe