To frame a patio door opening correctly, you need a rough opening that is roughly 3/4 inch wider and 1/2 to 1 inch taller than the door frame dimensions, with king studs, trimmer studs, a properly sized header, a flat sill, and everything held plumb, level, and square to within 1/8 inch. Get those fundamentals right and the door will slide or swing smoothly, seal tightly, and give you no grief for years. Mess up the framing and you are looking at a door that sticks, drafts that cost you money every winter, and potential water damage behind the wall.
How to Frame a Patio Door: Rough Opening to Header

Jamie Archer
21 May 2026
Rough-in vs. finished frame: what you're actually building
Before you touch a single board, it helps to understand the difference between the rough opening and the finished frame, because people confuse these constantly. The rough opening (RO) is the framed hole in the wall structure: the space between king studs, between the top of the sill and the bottom of the header. The finished frame is the door unit itself, the factory-assembled jambs and threshold that slide into that hole. Your job as the framer is to build the RO slightly larger than the door's finished frame so there is room to shim, adjust, and seal without cracking the door unit into the structure.
The difference matters because every step of this guide is working toward that RO being the right size, not the door size. Manufacturers like Pella and Andersen publish specific RO dimensions for each door unit, and those numbers account for installation clearance, shimming space, and room for foam or sealant around the perimeter. Always pull the spec sheet for your specific door before you cut anything. If you have not bought the door yet, that is actually the right time to read about how to buy a patio door so you can spec the door and the framing together. If you have not bought the door yet, that is actually the right time to read about how to buy a patio door so you can spec the door and the framing together. If you are still comparing options, use this guide on how to buy a patio door to match the right size, operation style, and installation requirements.
Planning the opening: measurements, clearance, and header sizing
Start with the door's actual frame dimensions from the manufacturer. From those, you build your rough opening dimensions. As a general rule: rough opening width equals door frame width plus 3/4 inch, and rough opening height equals door frame height plus 1/2 to 1 inch. Once your rough opening dimensions are set, you can move on to the actual process of fitting the patio door unit into place fit patio doors. Pella's installation instructions, for example, call for a width 3/4 inch larger than the door and a height 1/2 inch larger. blank" rel="noopener noreferrer">Kolbe recommends at minimum 1/4 inch between the door unit and the structure on all sides. Andersen similarly notes a 1/4 inch clearance around the perimeter between the door frame and the exterior wall cladding. These numbers exist for a reason: you need room to shim the door plumb and level, and room to run a bead of low-expansion foam or sealant without squeezing the door unit.
On the header side of the equation, the span (the width of the opening) and whether the wall is load-bearing both determine what kind of header you need. A standard 6-foot sliding patio door in a non-load-bearing wall can use a modest doubled 2x6 or 2x8 header. A wide opening in a load-bearing exterior wall may need doubled 2x10, doubled 2x12, or an engineered LVL (laminated veneer lumber) beam. If you are unsure whether your wall is load-bearing, treat it as if it is, or consult a structural engineer or your local building department before you cut. This is the one step where getting it wrong can be genuinely dangerous.
Measure the existing wall thickness too. Most exterior walls in US homes are framed with 2x4 or 2x6 studs. That affects your header construction: a 2x4 wall gets a header built from two pieces of dimensional lumber with a 1/2 inch plywood spacer sandwiched between them to match the 3.5 inch wall depth. A 2x6 wall uses three pieces of 2x lumber or two pieces with a full 1.5 inch spacer.
Step-by-step: framing the patio door opening
Plan on a full day for this if you are working alone, or half a day with a helper. You will need a circular saw, reciprocating saw, drill/driver, framing nailer or hammer and 16d nails, a 4-foot level, speed square, tape measure, and a string line or laser level. Put on safety glasses before you start cutting wall material.
- Mark the rough opening location on the wall. Use a level to draw plumb lines on both sides of the RO at the correct width. Mark the header height and sill height with level horizontal lines.
- Remove the wall covering (drywall or sheathing) within your marked area. Cut carefully to avoid pipes and wiring. Use the reciprocating saw for sheathing removal from outside if you are working on an exterior wall.
- Identify and protect or reroute any utilities before removing studs. You cannot safely cut a load-bearing wall without first building temporary support walls on both sides of the opening to carry the ceiling load while you work.
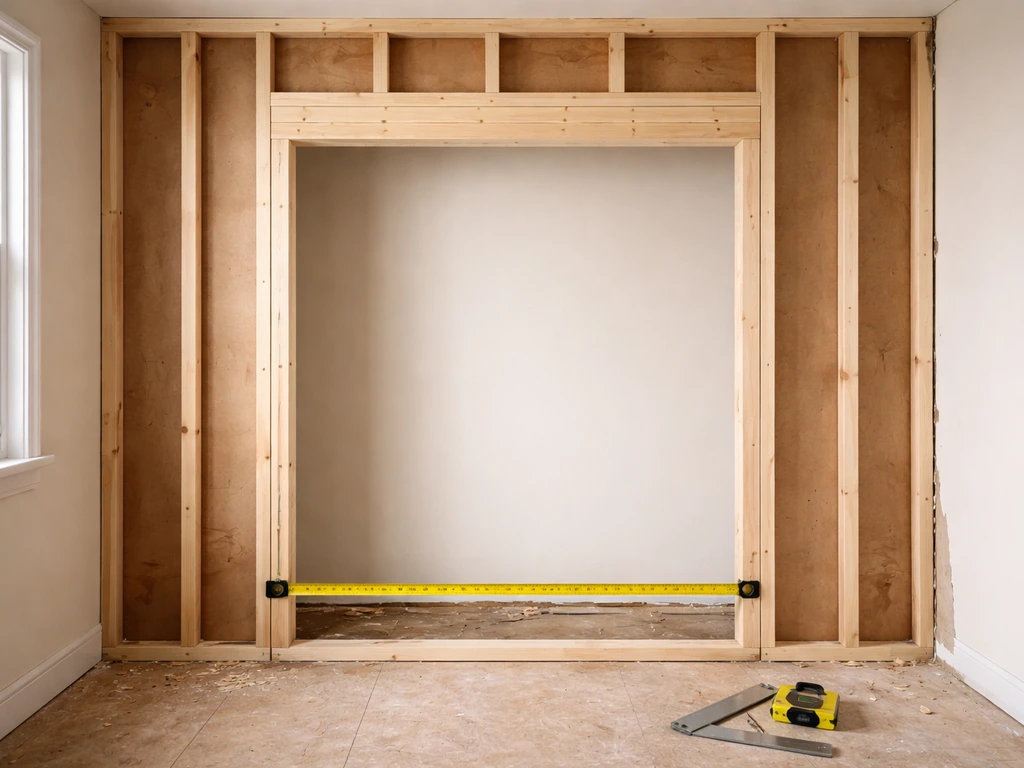
- Install king studs on both sides of the opening if they are not already there. King studs run full height from bottom plate to top plate. Toenail or nail them through the plates with 16d nails at 12 to 16 inches on center along any mating stud.
- Cut and install trimmer studs (also called jack studs) inside the king studs. Trimmers run from the bottom plate up to the underside of the header. They carry the header load down to the foundation. Nail trimmers to king studs with 16d nails every 16 inches in a staggered pattern.
- Build and install the header (see the header section below for specifics). Set the header directly on top of the trimmer studs. Nail through the king studs into the header ends with 16d nails, and face-nail through the header into the trimmers from below.
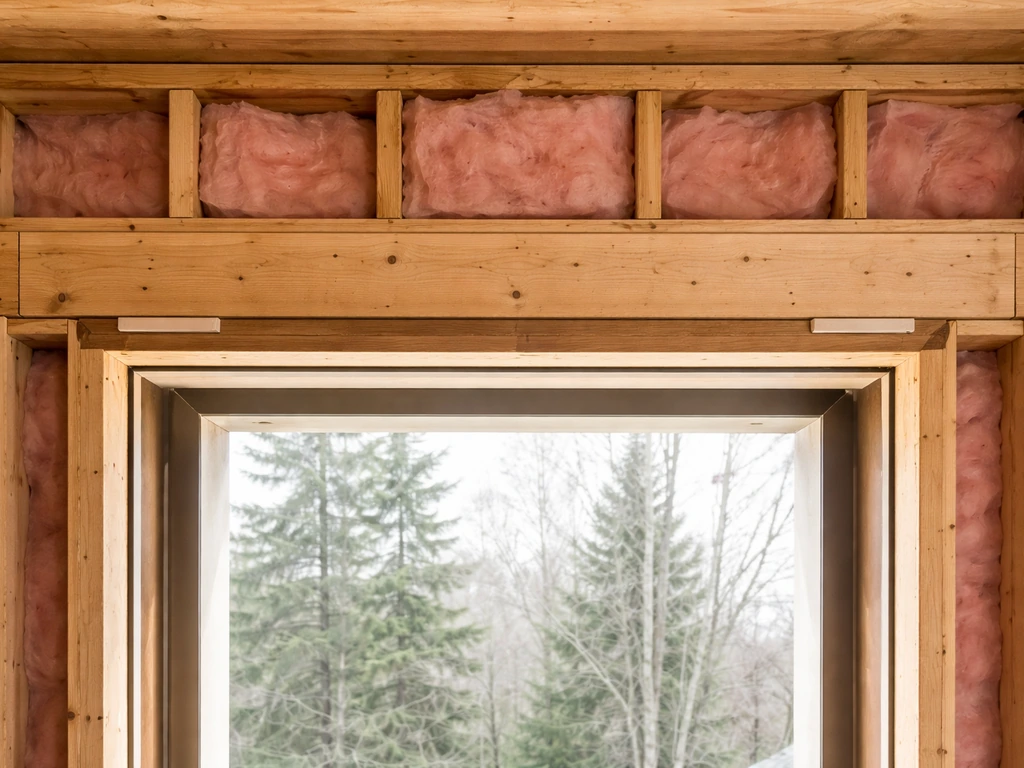
- Install cripple studs (short studs) above the header between the header and the top plate at normal stud spacing, typically 16 inches on center. These transfer load from the top plate into the header.
- Install the rough sill at the correct height across the bottom of the opening. Nail cripple studs below the sill to the bottom plate and up to the sill. The sill should be level across its full width.
- Check the opening: measure diagonally corner to corner in both directions. If the measurements match within 1/8 inch, the opening is square. Check plumb on both trimmer studs with your level. Check the header and sill for level.
- Once everything is plumb, level, and square, nail off any remaining connections and remove your temporary support walls if you built them.
The diagonal measurement check in step 9 is the one people skip and then regret. A 1/4 inch difference corner to corner will translate directly into a door that binds or will not latch. Do not skip it.
Framing the header: span, load, and how to build it right
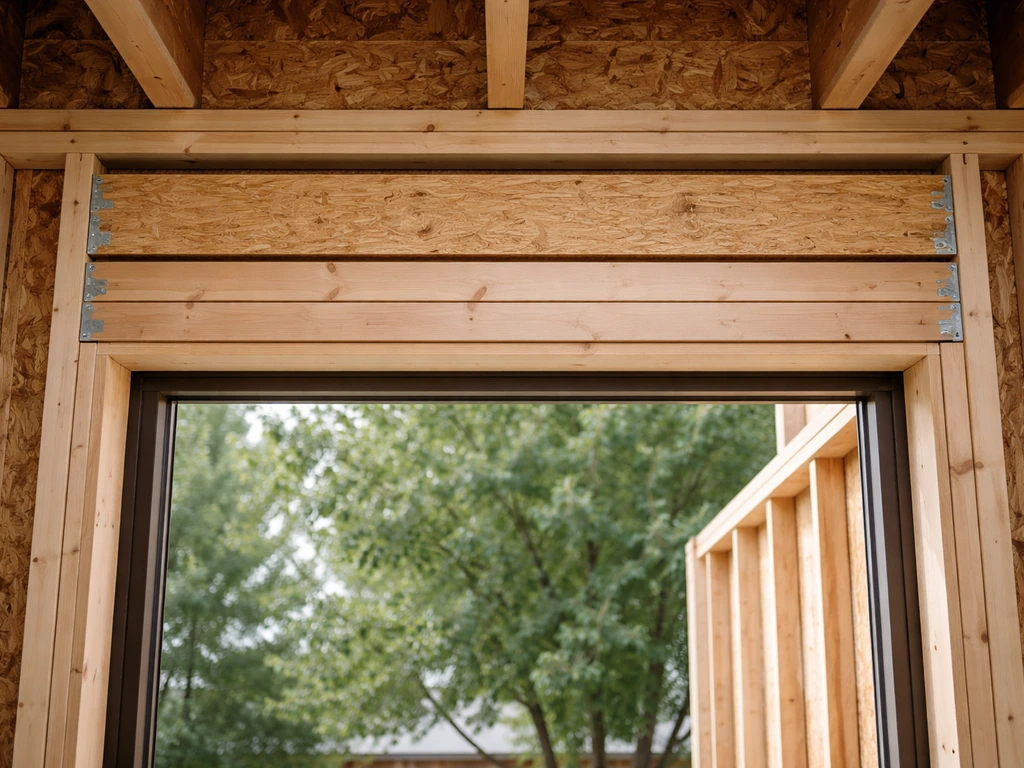
The header is the horizontal beam that bridges the top of your opening and carries whatever load used to be supported by the studs you removed. In an exterior load-bearing wall, that load can be significant: floor loads, roof loads, snow loads depending on where you live. Sizing the header wrong is not just a framing problem, it is a structural safety issue.
For a quick reference on sizing, most residential building codes follow span tables that relate opening width to lumber size and load. Here is a practical conceptual guide, though you should always verify against your local code:
| Opening Width | Non-Load-Bearing Wall | Load-Bearing Wall (1 story above) | Load-Bearing Wall (2 stories above) |
|---|---|---|---|
| Up to 4 ft | Doubled 2x4 | Doubled 2x6 | Doubled 2x8 |
| 4 to 6 ft | Doubled 2x6 | Doubled 2x8 | Doubled 2x10 or LVL |
| 6 to 8 ft | Doubled 2x6 | Doubled 2x10 | Doubled 2x12 or LVL |
| 8 to 12 ft | Doubled 2x8 | Doubled 2x12 or LVL | Engineered beam, consult engineer |
To build a built-up header for a 2x4 wall: cut two pieces of dimensional lumber (say, 2x10) to the same length, which is the full distance between the king studs, not just the RO width. Cut a 1/2 inch plywood spacer to the same dimensions. Sandwich the plywood between the two lumber pieces and nail through with 16d nails every 12 inches in a staggered pattern. This gives you a header that is 3.5 inches wide, matching the wall depth exactly, so the face is flush with both sides of the wall. For a 2x6 wall, use three pieces of 2x lumber or add a 1.5 inch spacer.
The header must bear fully on both trimmer studs, with no gaps at the bearing points. If there are gaps, the load concentrates unevenly and the header can deflect over time, causing the door opening to distort. After installation, check the header for level again. If it is not level within 1/8 inch across the span, add shimming at the low trimmer before proceeding.
Setting the sill, integrating flashing, and weatherproofing the opening
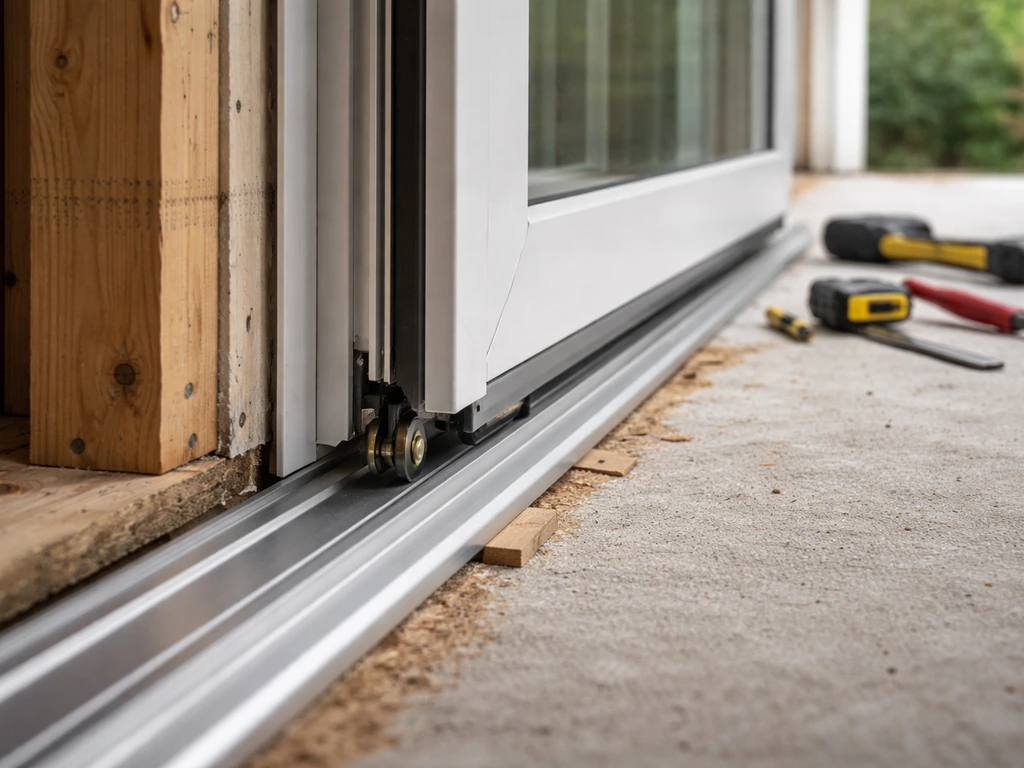
The sill area is where most patio door water problems originate. Getting this right during framing is far easier than trying to fix a leak after the door is installed and trimmed. The rough sill needs to be level, solid, and protected from moisture before the door unit goes in.
Start by verifying the rough sill is level. A sill that is off even 1/4 inch from side to side will cause a sliding door to roll toward one end or an inswing door to swing open or closed on its own. Once level, apply self-adhering flashing tape across the full width of the sill, running it up the trimmer studs at least 6 inches on each side. This is your primary water management layer at the bottom of the opening.
On the exterior, the wall wrap or house wrap should lap over the top of the opening's header area (drip-cap flashing sits on top of the header, and the house wrap laps over it), and be tucked behind the wrap at the sides and sill. Think of the flashing sequence as shingling: upper layers always overlap lower layers so water runs down and out, never behind. A metal drip cap above the header is not optional on an exterior door. It prevents water from tracking behind the siding and into the header framing, which causes rot that is expensive and invasive to fix.
Apply a generous bead of high-quality, paintable caulk or door-and-window sealant along the sill plate where the door threshold will sit. Some installers also run a bead of butyl tape on the sill before setting the door. Both work. The goal is no direct wood-to-threshold contact without a moisture barrier between them. This is especially important on exterior sills exposed to rain and snow.
Shimming, fastening, insulation, and trim
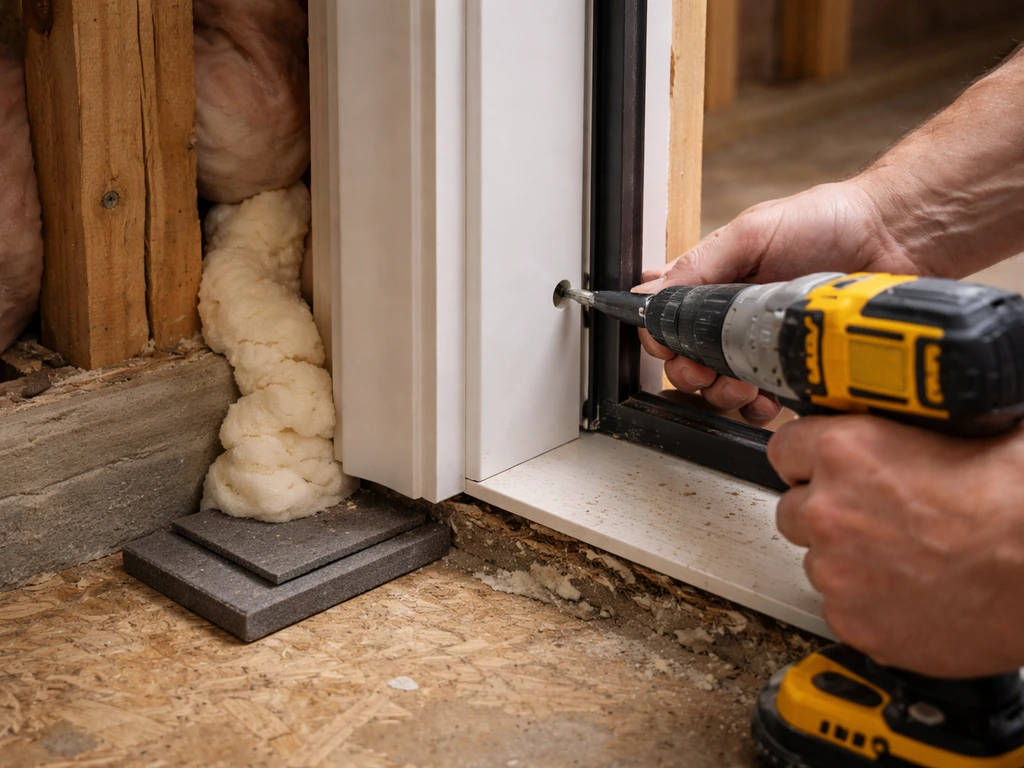
Once the door unit is set in the opening, shimming is how you fine-tune plumb and level within the rough opening clearance you built in. Use pairs of composite or cedar shims (not pine, which compresses) at each fastening point: typically at the hinge locations on an inswing door, or at the jamb corners and mid-points on a sliding door. Pella's Steady Set shim guidance recommends shimming at consistent intervals and maintaining clearance for foam and sealant around the full perimeter of the unit, not just at the fastening points.
Drive fasteners through the door frame or through pre-drilled shim points into the trimmer studs, not into the king studs or through empty sheathing. Use the fastener type specified by your door manufacturer. Over-driving screws will distort the door frame and bind the panels. Check plumb and square again after fastening each corner before moving to the next.
Fill the gap between the door frame and the rough framing with low-expansion minimally expanding foam, not standard high-expansion foam. High-expansion foam can bow the door jamb inward enough to prevent the door from operating correctly. Fill from the interior, working the straw into the gap and filling in lifts. Let it cure and trim flush before installing interior casing.
Interior trim (casing) and exterior trim (brick mold or flat casing) are the finishing layer. They cover the gap between the door frame and the wall, and on the exterior they also provide a nailing surface for caulk and a secondary weather barrier. Keep a consistent reveal, typically 3/16 to 1/4 inch, between the door jamb edge and the inside face of the casing. Cut miters at 45 degrees and nail through into the jamb and into the framing behind the drywall. Caulk all exterior trim joints and the joint between trim and siding before painting.
Common framing mistakes and how to fix them
Opening is out of square
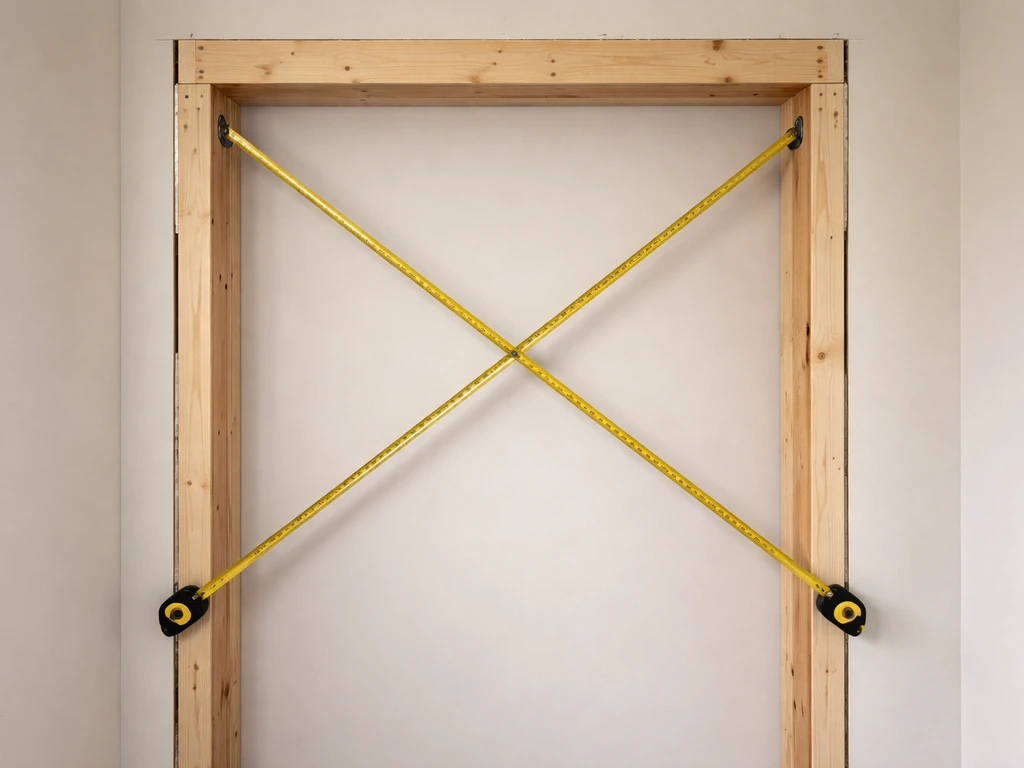
If your diagonal measurements differ by more than 1/8 inch, the opening is racked. Before the door goes in, you can correct this by loosening the connections on the high-side trimmer, pushing the framing into square, and re-nailing. After the door is in, you are shimming to compensate, which only works if you are within about 1/4 inch total. More than that and the door will never operate correctly. Pull it out, fix the framing, and reinstall.
Wrong header size or improperly supported header
A header that is undersized for the span or load will deflect over time. You will see the top of the door opening bow down in the middle, the door starts to drag at the top, or in serious cases the rough opening narrows enough to trap the door entirely. If you suspect a deflected header, measure the header height at center and at both ends. If it is lower in the middle, the header is overloaded. This is a structural issue and requires replacing the header with correctly sized lumber. Do not patch around it.
Gaps that cause drafts
Drafts usually come from three places: insufficient foam fill in the gap between the door frame and framing, missing or failed caulk on the exterior trim, or a threshold that is not sealing against the sill. Andersen’s frame installation guidance also notes leaving a 1/4 inch space around the perimeter of the unit between the exterior wall cladding or siding and the door frame to allow sealing and proper installation. The first two are fixed with low-expansion foam and fresh exterior caulk. The threshold issue is usually an adjustment or weatherstripping problem, not a framing problem, but a sill that was never level or shimmed correctly will prevent the threshold from sealing properly. In that case, you are looking at removing the door, releveling the sill, and reinstalling.
Water intrusion at the sill or header
Water at the sill almost always means the sill flashing was skipped, installed backwards, or not lapped properly with the house wrap. Water at the header means the drip cap is missing or the house wrap laps under rather than over the drip cap. Both require pulling the exterior trim and correcting the flashing sequence. It is uncomfortable work but far cheaper than letting the rot spread into the structural framing.
Rough opening sized too tight
If you framed the RO to the exact door frame size with no clearance, the door will not fit without forcing it, which distorts the jamb. You need clearance for shimming, foam, and slight adjustments. Kolbe's guidance calls for a minimum of 1/4 inch on all sides, and 1/2 to 3/4 inch is more practical for a DIYer. If the opening is too tight, you have to trim the trimmers (carefully, with a reciprocating saw) to gain back the clearance. If you are also wondering how to trim a patio door itself, the key is adjusting the frame and finishing trim without changing the clearances you built into the rough opening trim the trimmers. It is awkward but doable.
Once your framing is solid, plumb, and weatherproofed, the actual door installation is the easier part. If you are moving on to fitting the door unit into the opening, trimming the interior and exterior, or understanding what correct installation looks like from a professional standpoint, those next steps connect directly to this framing work. After the door is set and sealed, the next step is to install the exterior trim to cover the gaps and keep water out install the exterior trim on a patio door. Once you have the opening framed, use the door unit installation steps to verify clearances, set the jambs correctly, and finish with proper insulation and trim what correct installation looks like from a professional standpoint. Getting the framing right the first time makes everything downstream cleaner, faster, and more likely to hold up for the life of the door.
FAQ
What clearance should I leave if my door manufacturer’s rough-opening table is different from the 3/4-inch width and 1/2- to 1-inch height rule of thumb?
Use the manufacturer’s numbers as the controlling requirement. If their RO is larger or smaller than the rule of thumb, the spec accounts for their jamb design, shimming locations, and the sealant or foam they recommend, so follow that spec sheet even if it changes your typical increments.
Can I correct an out-of-square rough opening after the header and sill are framed, or do I need to rebuild?
You can often correct racking before the door goes in by loosening and re-positioning the high-side trimmer framing and re-nailing, but once the door unit is installed you typically cannot compensate for more than about 1/4 inch total misalignment with shims. If your diagonal is off more than that, pull the framing section back to square and reinstall to avoid binding and latch issues.
How do I know whether my header is undersized before the door starts sticking?
Check for early signs like a visible bow at the top of the opening, increasing clearance gaps that vary across the width, or doors that drag more when the weather swings. If you suspect deflection, measure header height at the center and ends with the opening unloaded, and if the center is lower you will usually need replacement, not patching.
What’s the safest way to deal with an uneven or slightly high subfloor/sill area before installing the patio door?
Confirm the rough sill is level with a 4-foot level and shim or rebuild the sill plane before the door goes in. Don’t rely on thicker foam or sealant to fix a sill that is off, especially for sliding doors, where a 1/4 inch side-to-side difference can cause rolling toward one end.
Is it okay to use standard high-expansion spray foam around the door frame if it fills faster?
Avoid it. High-expansion foam can bow the jamb inward enough to cause rubbing or latch problems. Stick to low-expansion, minimally expanding foam, and fill in controlled lifts, letting each cure, so you don’t build unintended pressure.
Where exactly should I place shims for a sliding vs an inswing patio door?
For both, shim at fastening points (commonly jamb corners and mid-points on sliding doors, or hinge and latch locations on inswing doors). Use pairs of composite or cedar shims at each point, keep the unit within the specified clearances around the perimeter, and re-check plumb and level after each fastening location is secured.
Do I need to shim the header area, or is shimming only for the jambs?
Shimming usually happens at the trimmer studs and fastening points to dial in plumb and level within the rough opening clearance, but the header itself must be correct and fully bearing. If the header is not level within about 1/8 inch across the span, you fix that at the bearing and shimming stage before setting the door, otherwise the door opening will distort.
What causes drafts when the door seems properly sealed at the sides?
Most recurring draft paths are insufficient foam fill in the perimeter gap, missing or failed exterior caulk at trim joints, or a threshold that cannot seal to the sill due to level or adjustment problems. Recheck those specific locations first before tearing into the framing.
If water leaks at the sill, is it always a flashing problem?
Often it is, but the immediate causes typically fall into skipped, mis-lapped, or backwards sill flashing, or a threshold that cannot contact the sill because the sill was not level or not shimmed correctly. After confirming water path direction, you may need to correct sill level and threshold seating, not just re-caulk.
Can I install the drip cap after the door and trim are installed?
For an exterior patio door, the drip cap placement is part of the exterior water management system and is normally installed before the exterior cladding and wrap are fully finalized. If the drip cap is missing or installed incorrectly, correcting it usually means removing exterior trim and redoing the flashing sequence, since proper lap patterns can be impossible to recreate neatly afterward.
What should I do if my casing reveal looks inconsistent around the perimeter?
A consistent reveal depends on getting the door unit plumb, square, and properly positioned within the rough-opening clearance before interior and exterior trim goes on. If the reveal varies, it usually indicates jamb movement or improper shimming, and you should address that at the shim and fastener stage rather than trying to compensate by forcing trim.
Do I need to use composite or cedar shims specifically, can I use pine?
Use composite or cedar, not pine. Pine can compress and lose thickness over time, which can change the door’s plumb and clearances, leading to renewed binding, drafts, or latch problems later.
Next Article
How to Fit Patio Doors: Sliding Door Steps and Fixes
Step-by-step guide to fit sliding patio doors, adjust alignment and locks, stop sticking, and weatherproof for smooth op